This is the self-service reference: what each cloud needs from you before you deploy, how first login and initial setup work, and what every screen in the product does, illustrated with real screenshots rather than descriptions of them. Every heading below is a real anchor you can link to directly.
Need something that isn't here, or doesn't match what you're seeing? Email support@cloud-vex.com and we'll answer directly.
1. Requirements by cloud
Cloud-Vex deploys as a template you run yourself — a CloudFormation stack on AWS, an ARM template on Azure, a Config Connector manifest on Google Cloud. Each one needs a few things ready before you start. The infrastructure diagrams cover every resource each template creates and why; this is what you need on hand to run it.
AWS
- Permission to create the stack's resources — a VPC, ECS Fargate, RDS, ElastiCache, CloudFront, an ALB, Secrets Manager, KMS, S3, and two IAM roles. In practice, CloudFormation's own deploy permissions plus the ability to create each of those resource types.
Full resource-by-resource detail: AWS Infrastructure.
Azure
- Permission to create the template's resources — a virtual network, App Service (Linux, Web App for Containers), PostgreSQL Flexible Server, Redis Enterprise, Key Vault, and a user-assigned managed identity.
Full resource-by-resource detail: Azure Infrastructure.
Google Cloud
- A GKE Autopilot cluster with Config Connector already installed and running. This is the one requirement the other two clouds don't have — the GCP deployment is a Config Connector manifest, not a native one-click template, so the cluster is what actually turns it into real GCP infrastructure.
- Project permissions to create a VPC, Cloud Run service, Cloud SQL, Memorystore for Redis, Secret Manager secrets, and an IAM service account.
Full resource-by-resource detail: GCP Infrastructure.
2. First-time login
New administrator? Start with the setup guide for how the first account is created and where its credentials come from.
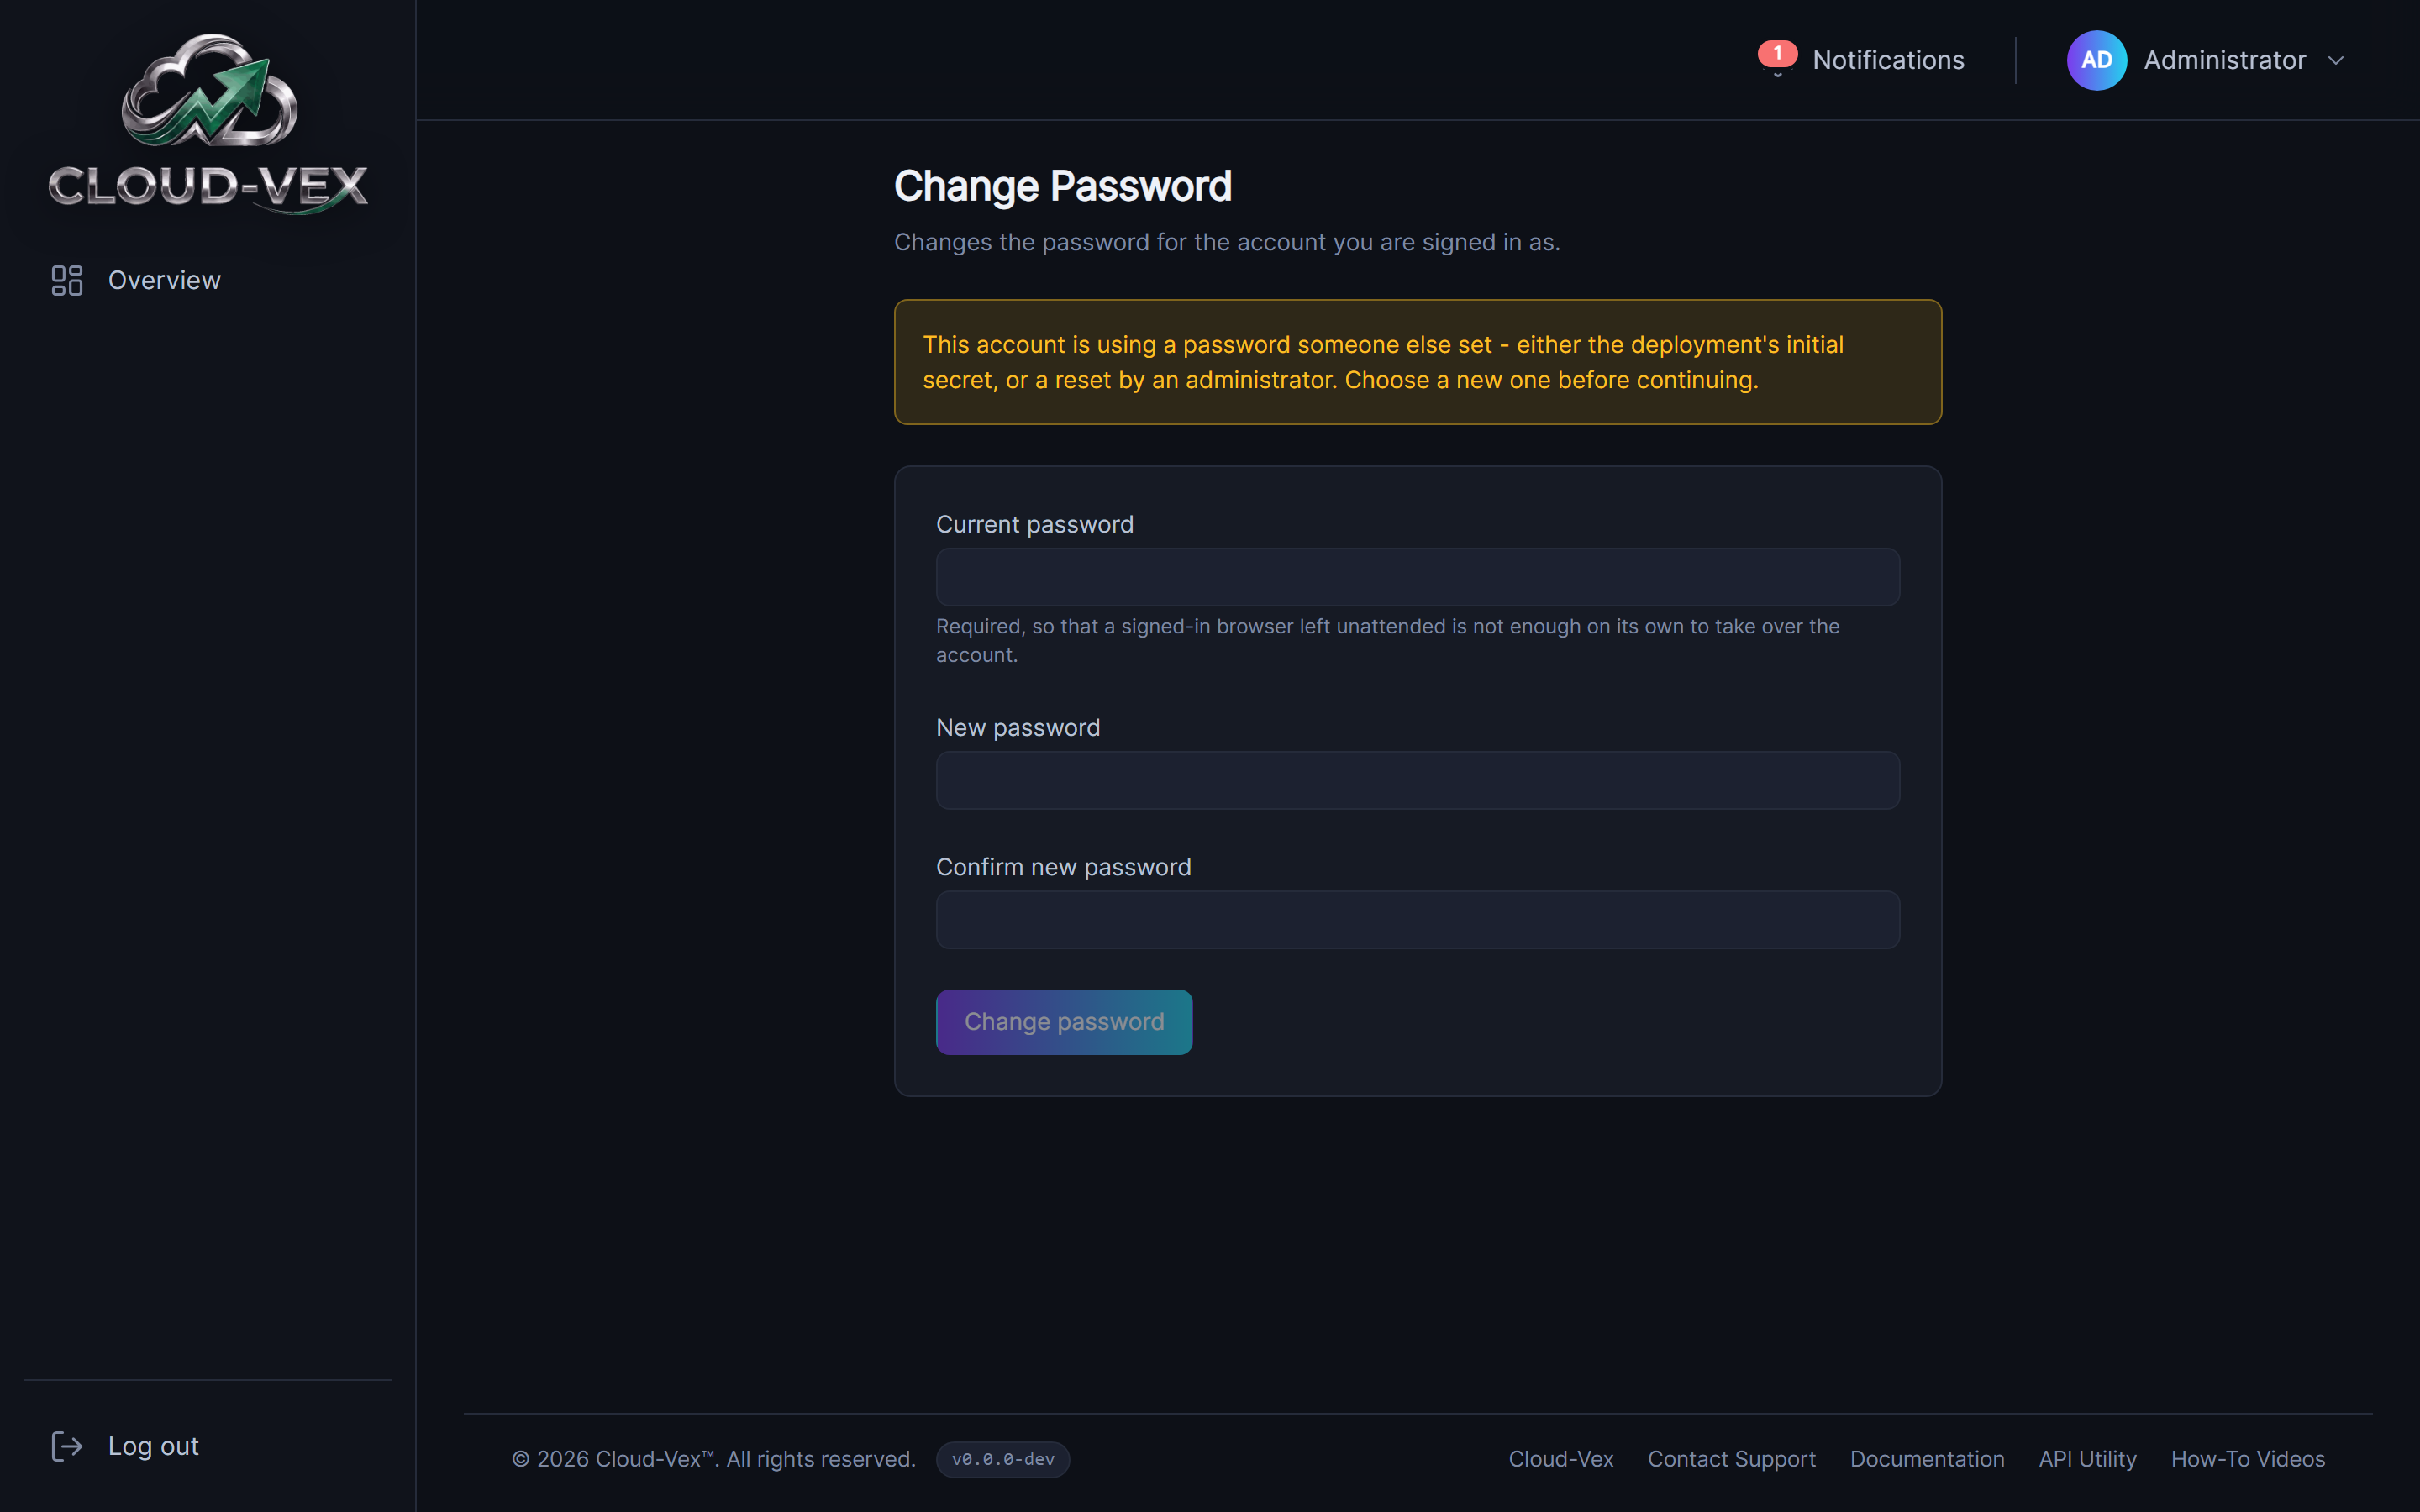
What you land on immediately after the first sign-in — the account cannot do anything else until this is completed.
3. Initial setup recommendations
All of this lives under Settings. It's grouped here in the order worth doing it: who can get in, how they sign in, and how the application itself should behave.
Configure roles
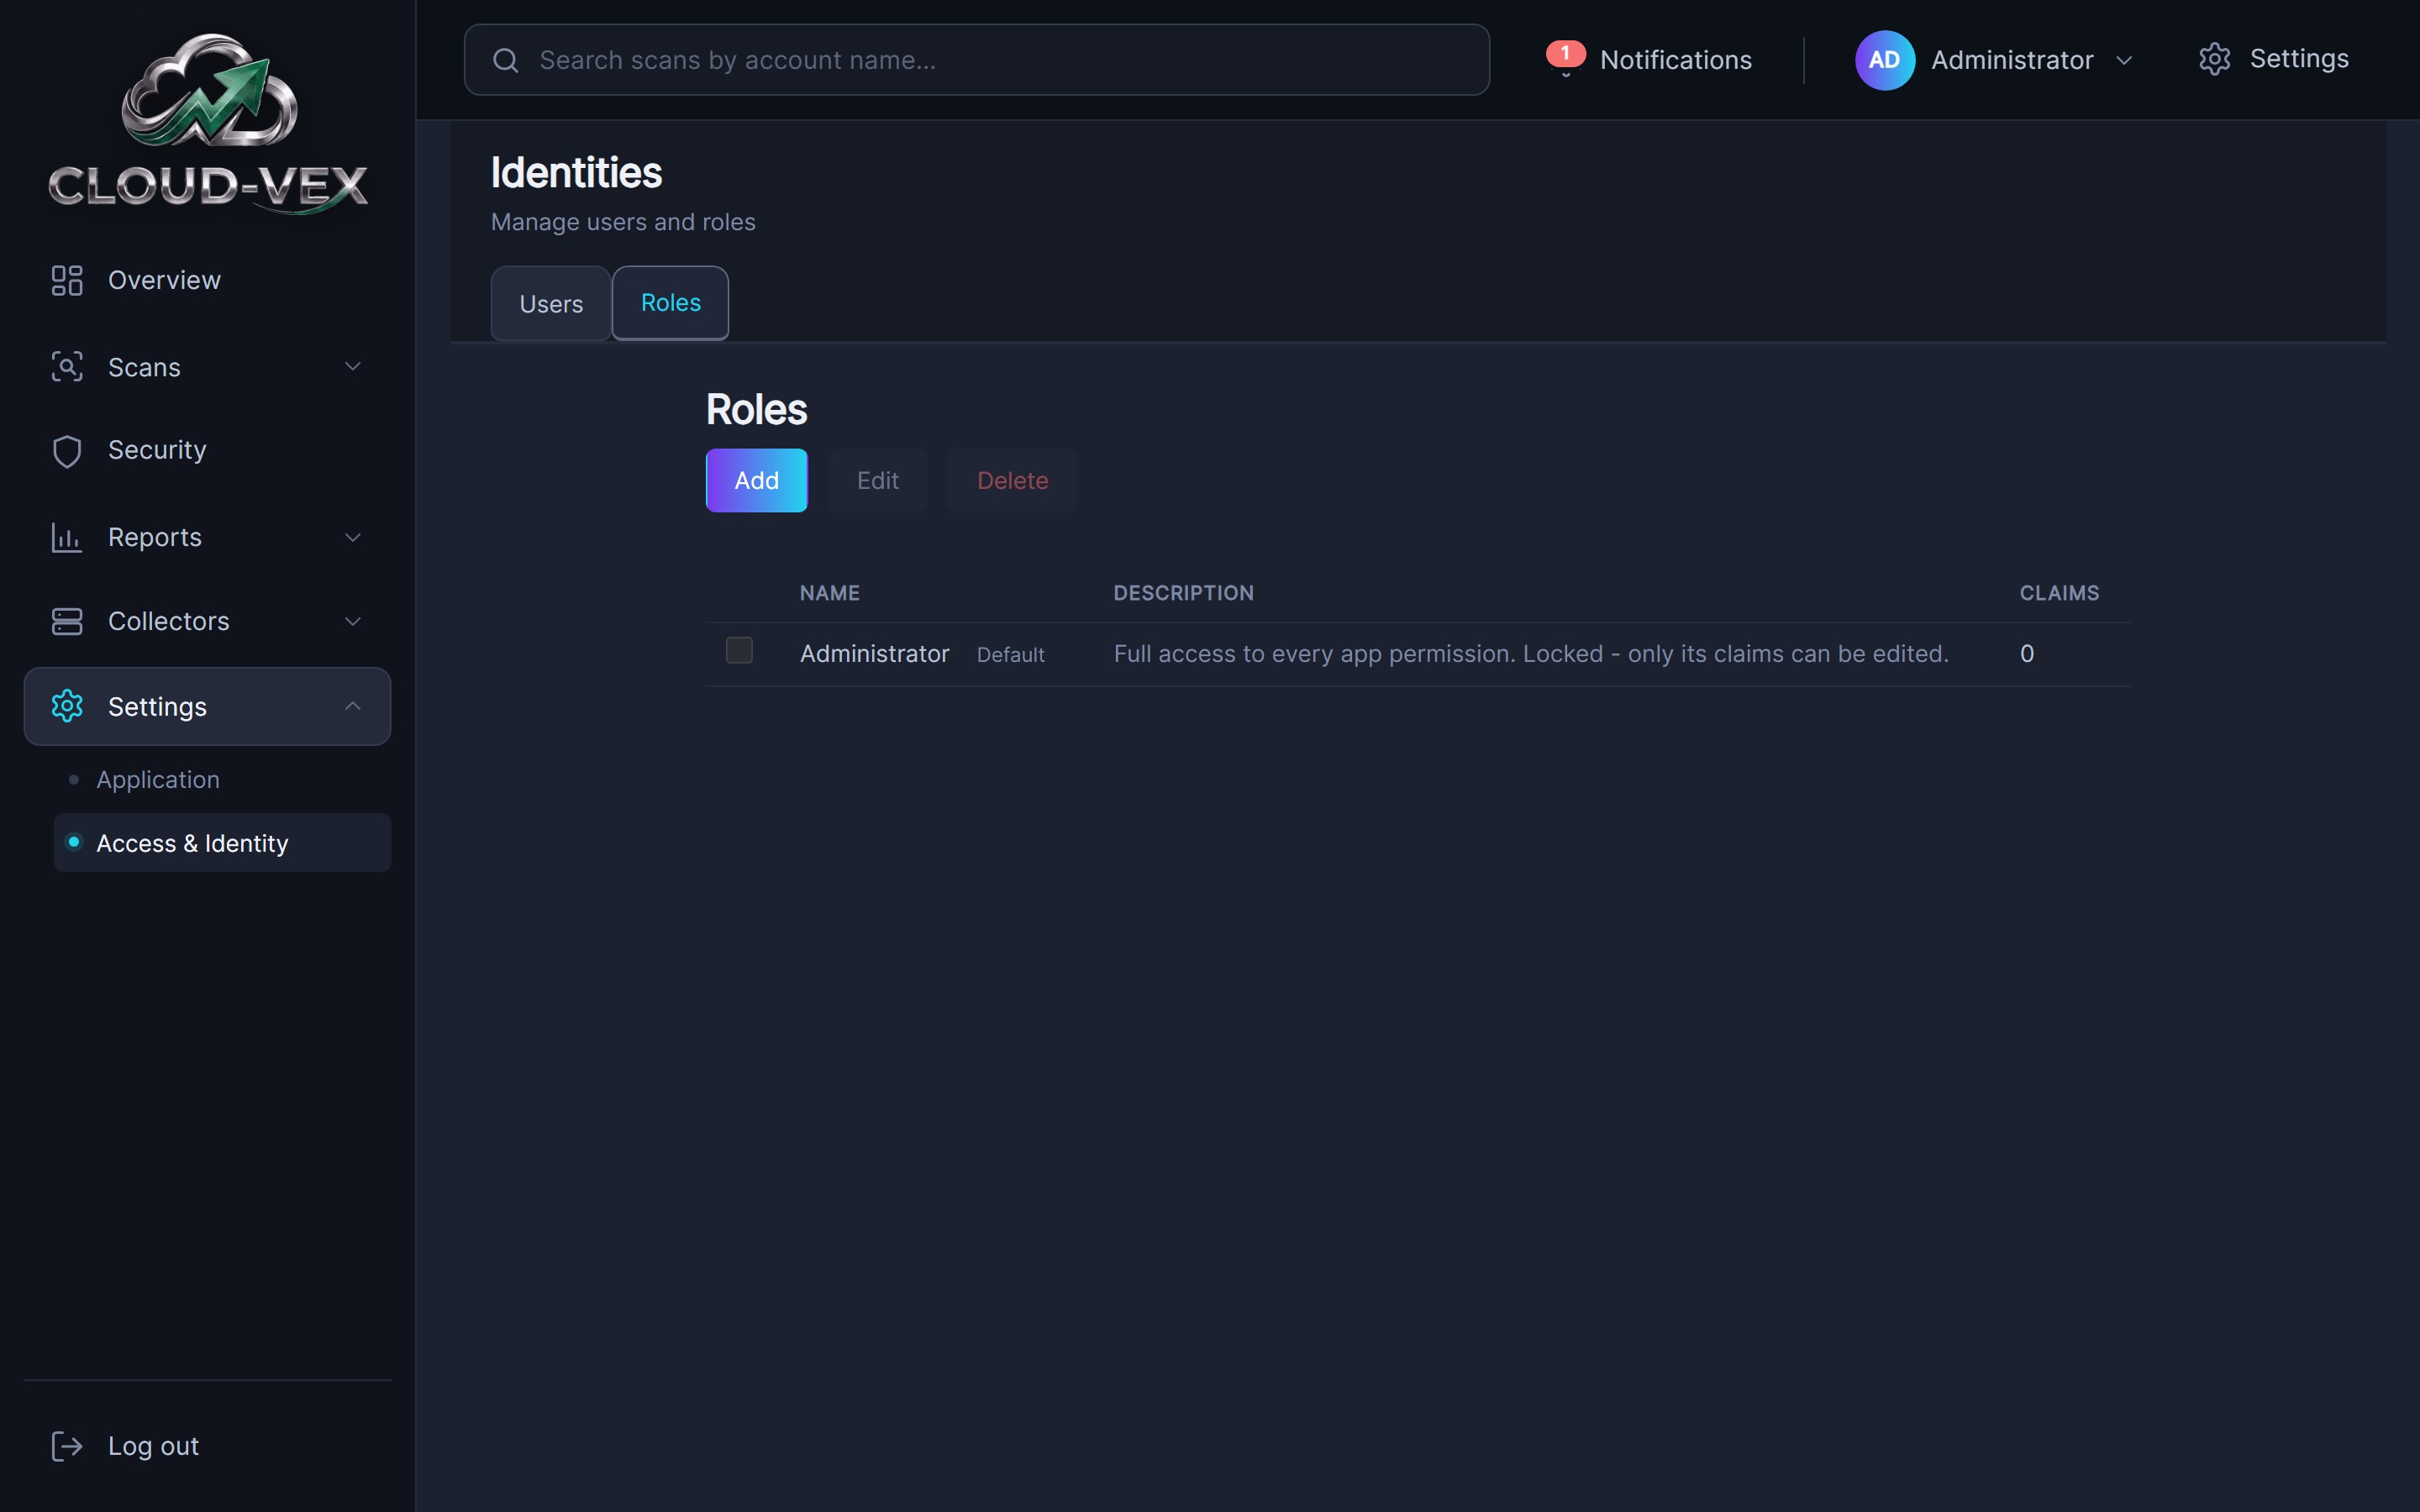
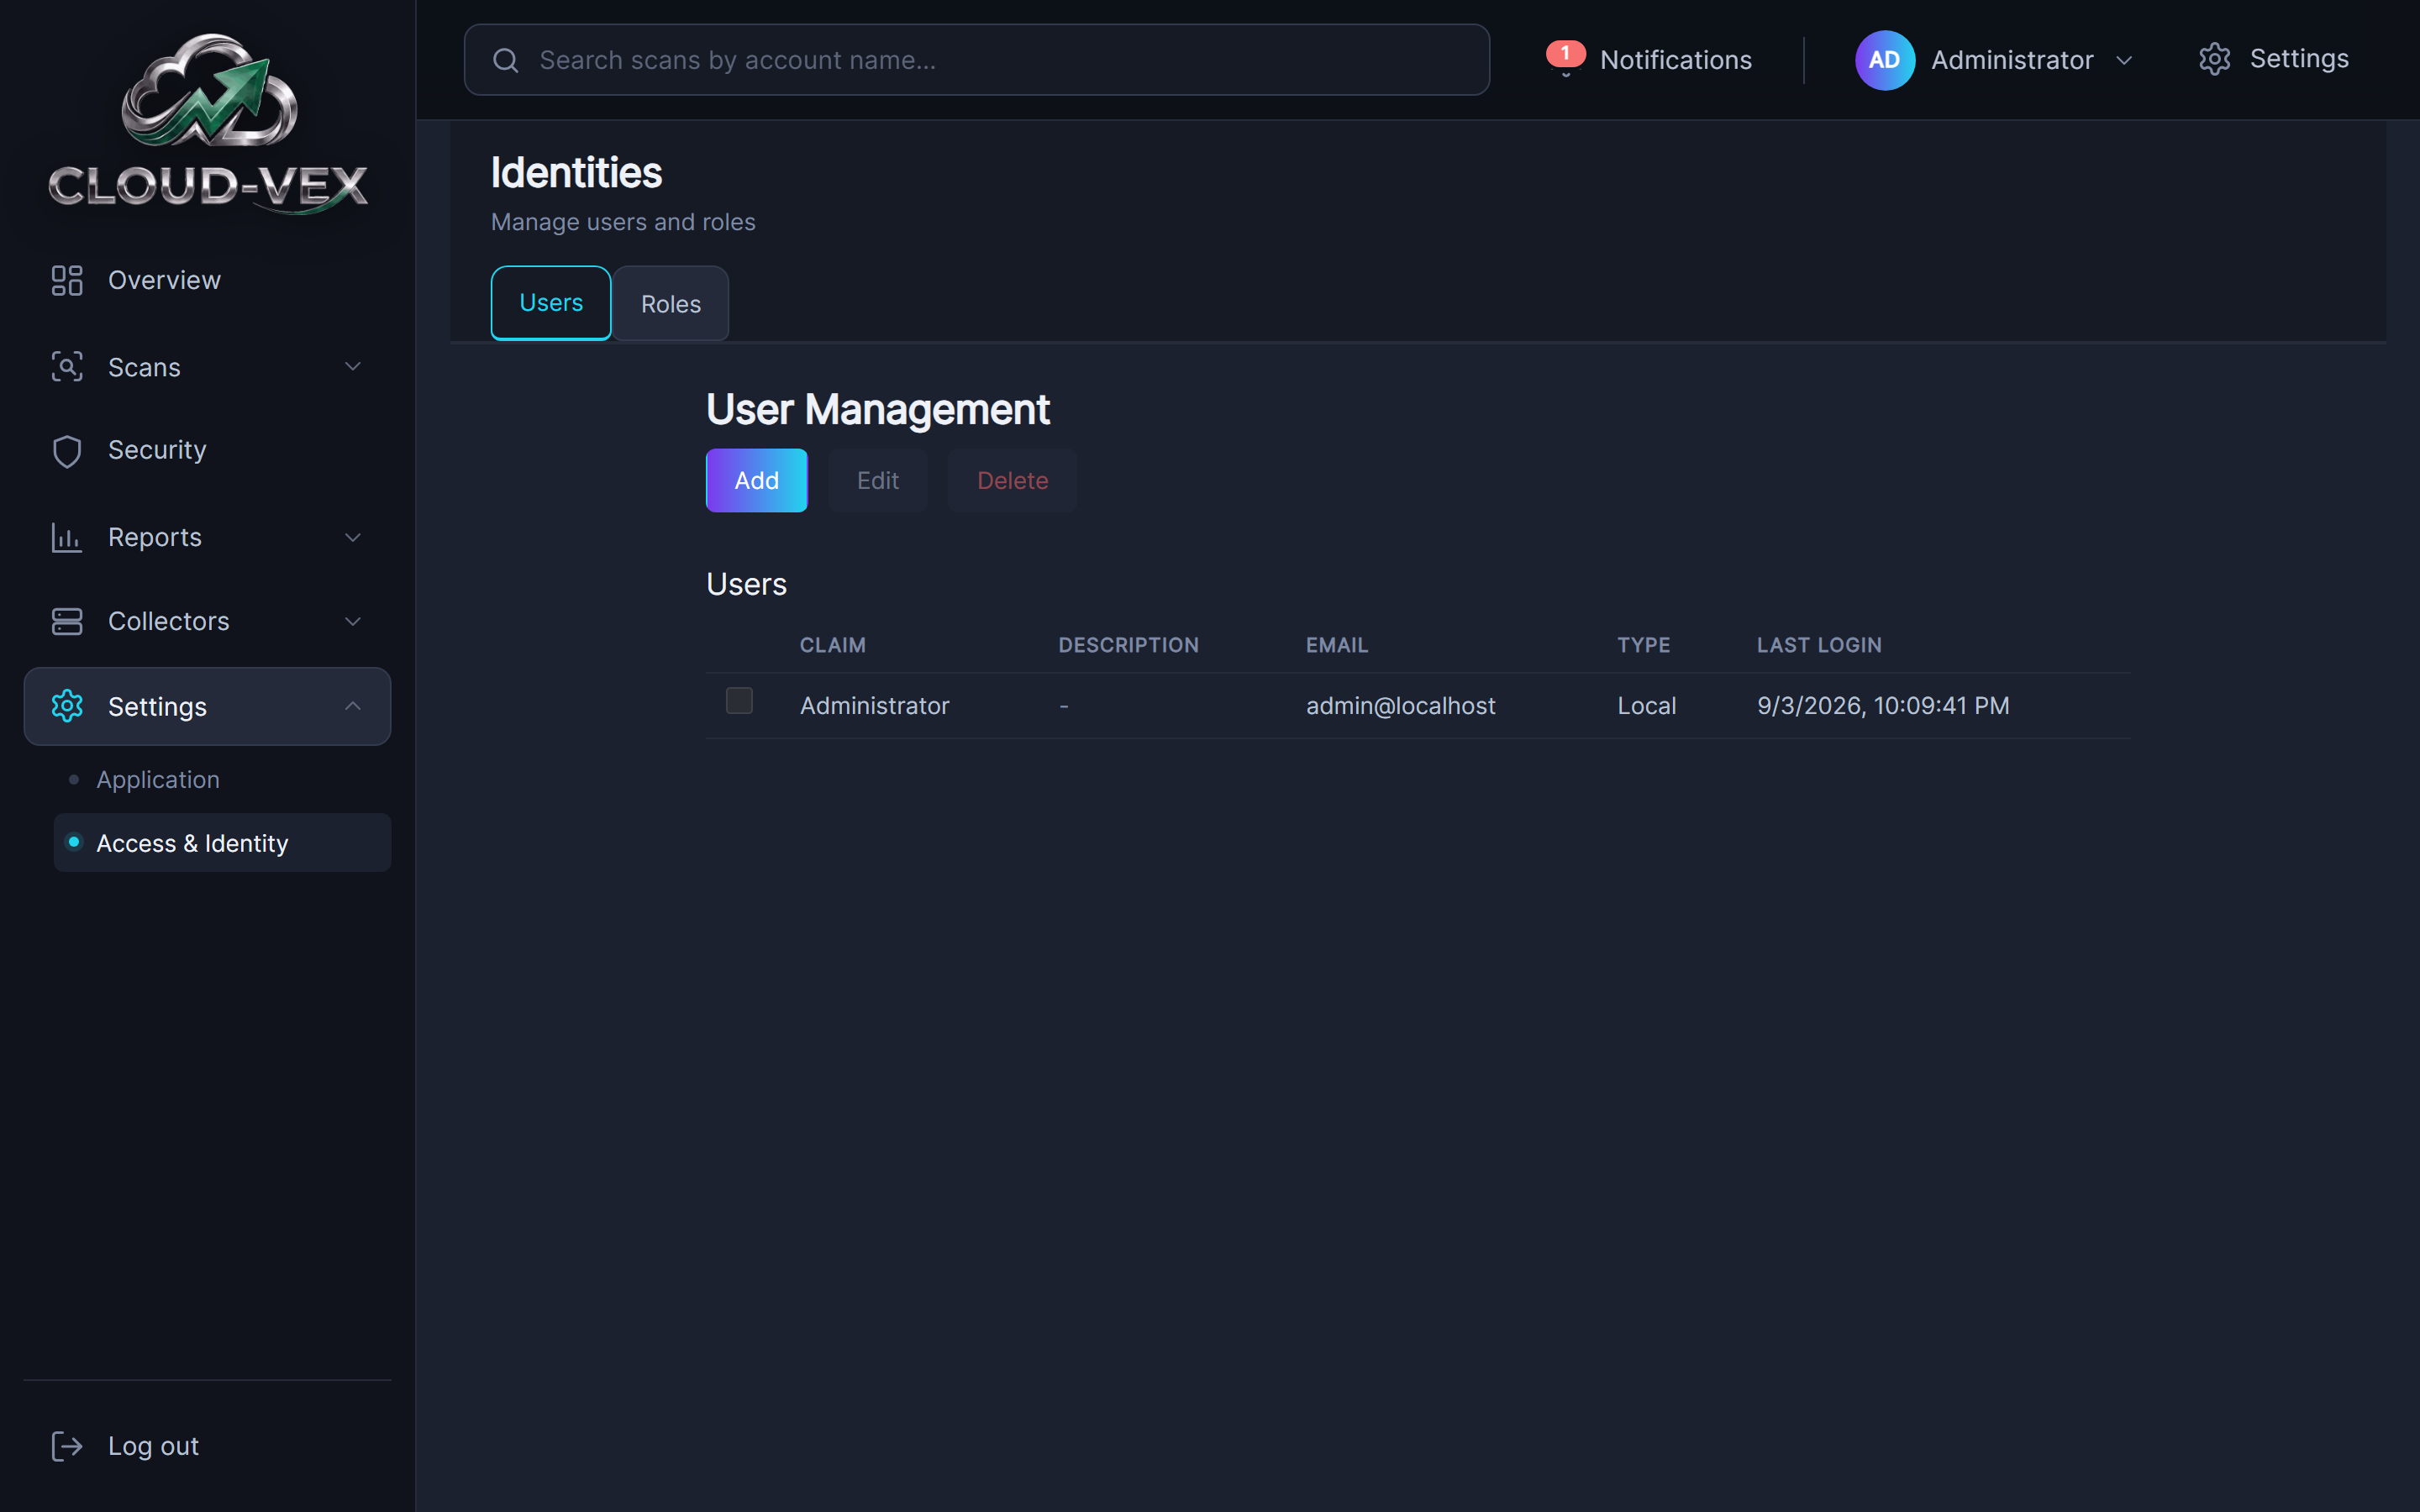
Under Settings › Access & Identity › Roles. Two ideas sit behind this page and the Users page next to it, and it only makes sense once you have both:
- A role is a named bundle of permissions — what someone can see and do once they're in. This is the "what."
- A claim is a value read off how someone signed in — a group name or subject your identity provider vouches for in the OAuth token it hands back. Cloud-Vex doesn't issue or manage these; it just recognizes them. This is the "who."
A role does nothing until a claim is attached to it. Attaching one is the grant itself: anyone who signs in presenting that claim gets that role's permissions, automatically, every time — there's no invite step and no per-person setup beyond that one attachment. Remove the claim from the role and access stops the same way, without touching the identity provider at all.
Every install starts with one role, Administrator — full access to every permission, locked so its permission set can't be narrowed, though which claims are attached to it can still be edited. Add further roles here for anyone who shouldn't have full access, choosing exactly which permissions each one carries.
Configure claims
Before a claim can be attached to a role, Cloud-Vex has to know about it. That's what Settings › Access & Identity › Users is for: registering the exact claim value your identity provider will send — an OAuth role claim (e.g. a group name) or a specific OAuth subject — along with a description so it's recognizable in a list later. Registering it here grants nothing by itself; it only makes the value selectable from a role's claims editor back on the Roles page, which is the step that actually connects the two.
Which token claim gets checked against these registered values (role, name, or a fallback) is set in Configure SSO (OAuth), in the same panel.
This page only manages claims, not accounts — there is no way to create another local username and password here. The single local account created during setup is the only one that will ever exist; it's kept on as break-glass access for if the identity provider is ever unreachable, not as a template for adding more like it. See Login for how that account and claim-based sign-in differ day to day.
Configure SSO (OAuth)
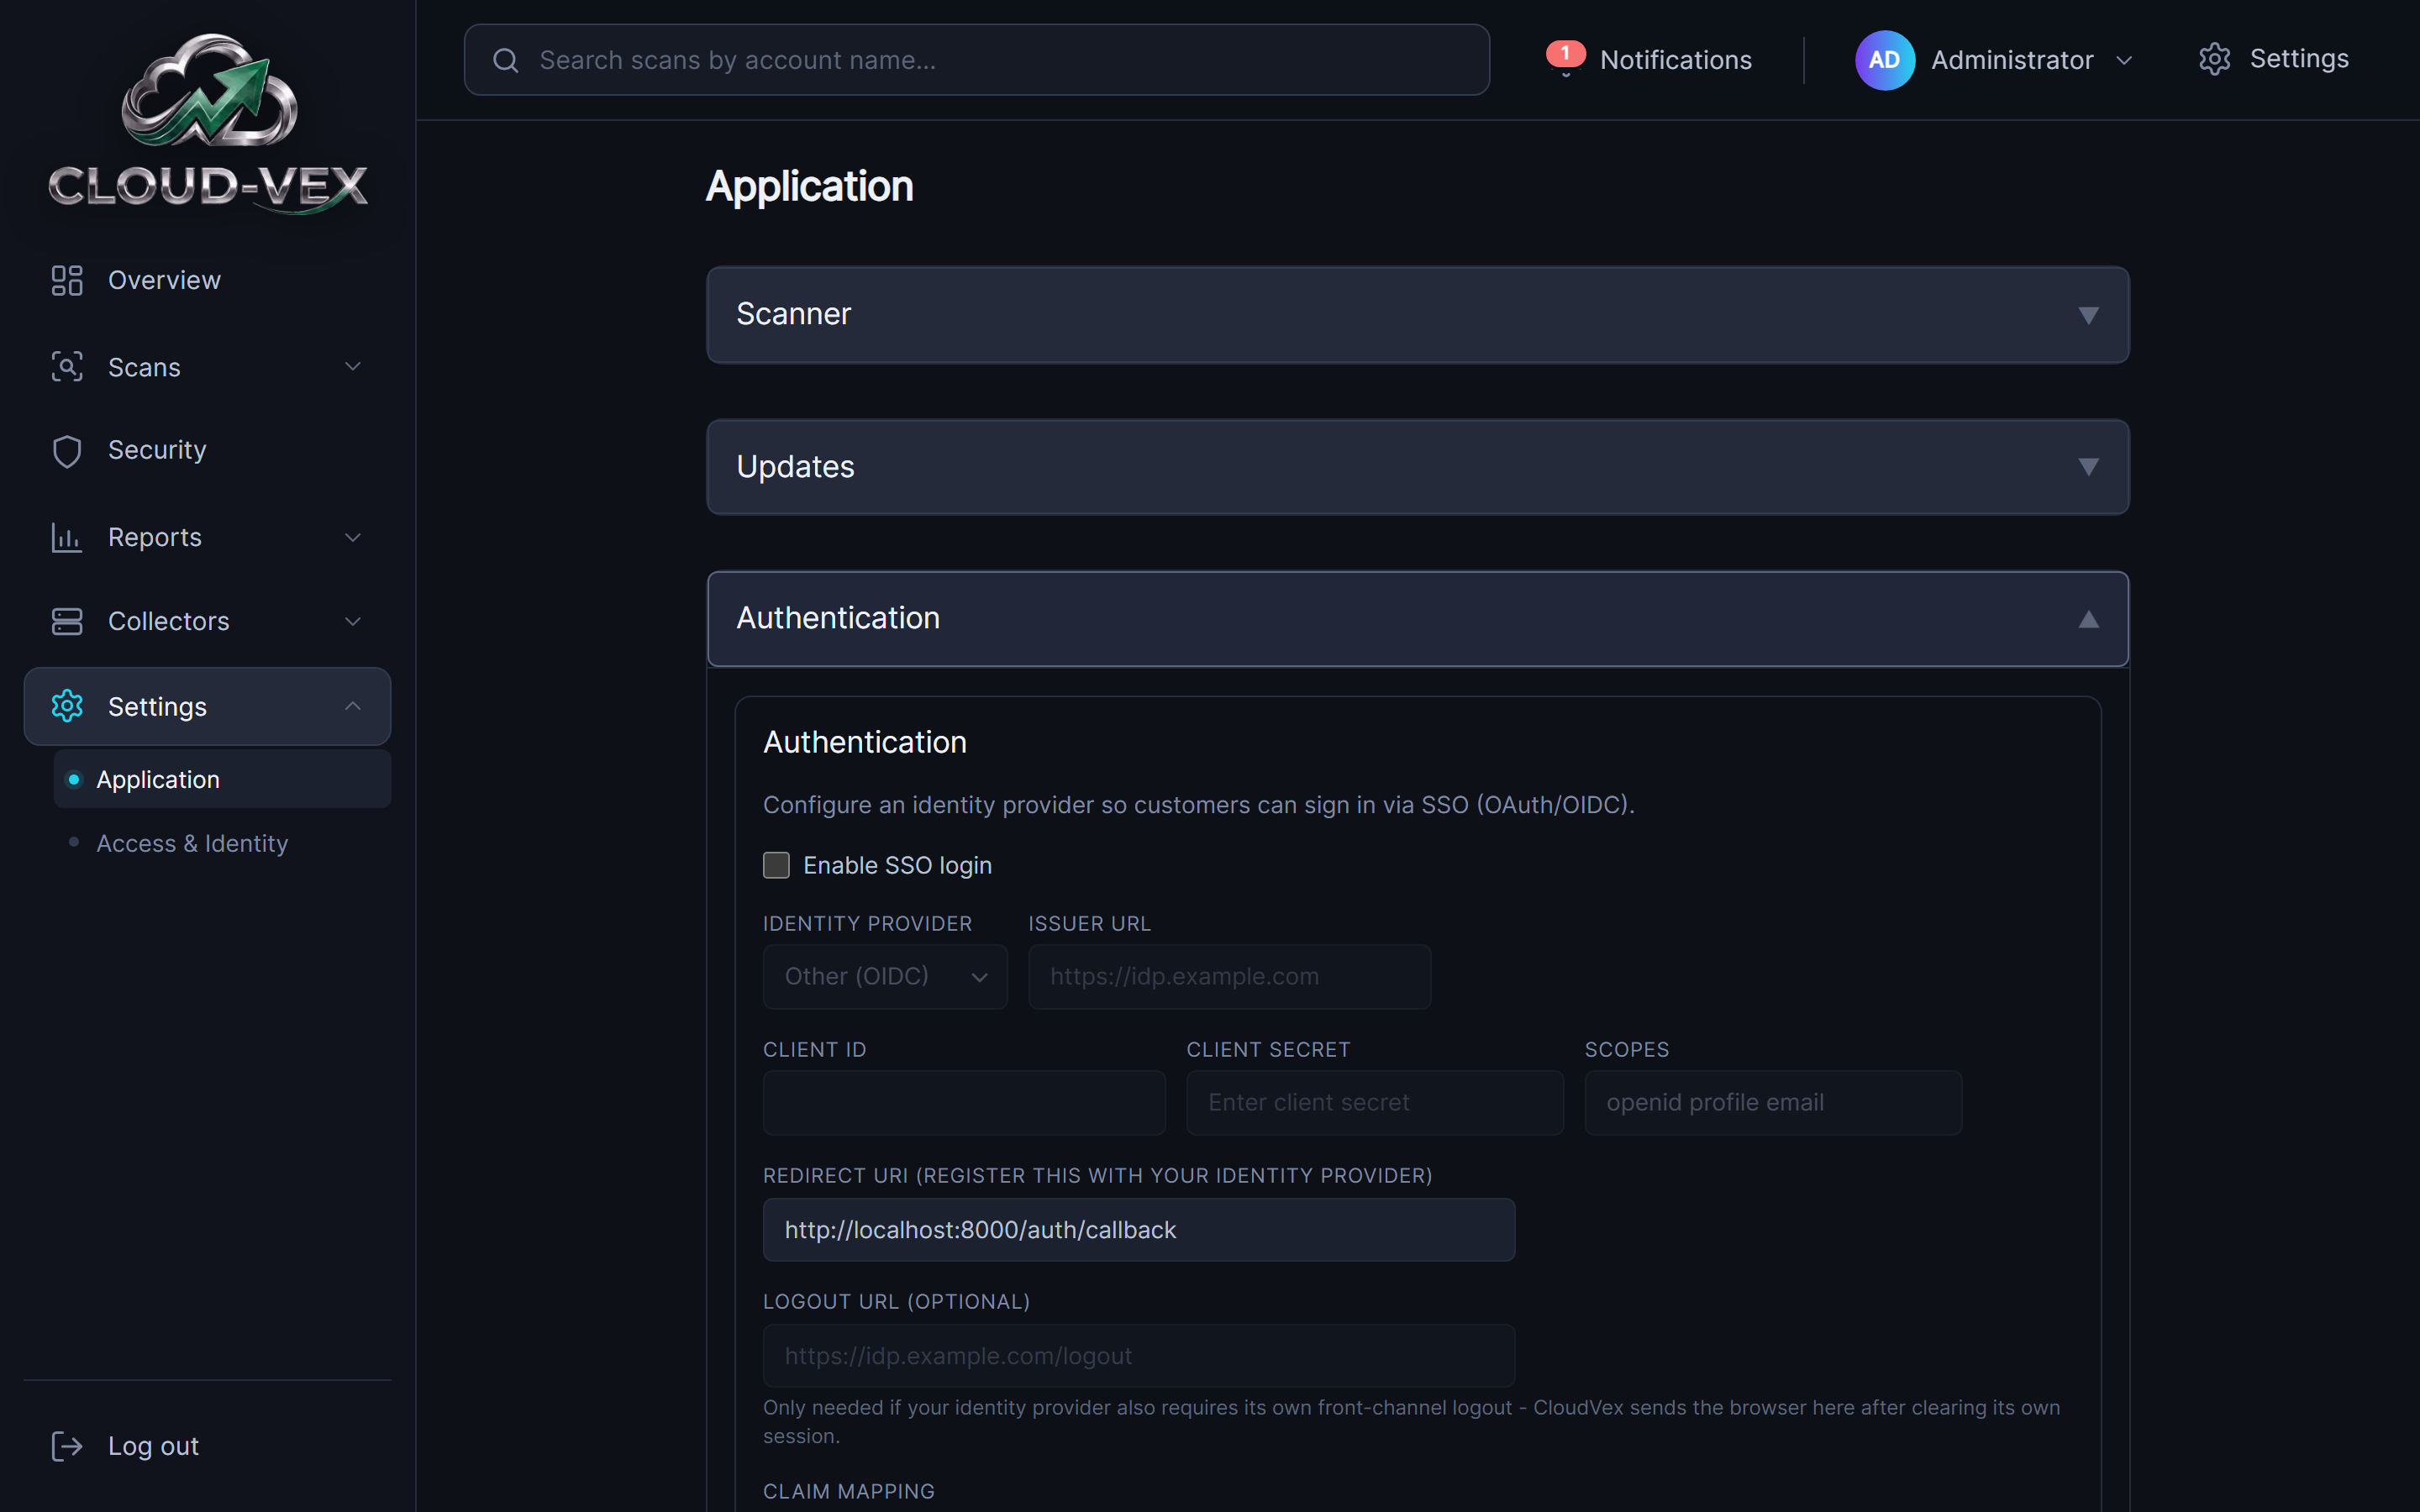
Under Settings › Application › Authentication. Turning on Enable SSO login reveals the identity provider connection, starting with an Identity Provider picker: Other (OIDC) (a generic issuer URL, for any standards-compliant provider), Microsoft Entra ID (tenant ID), PingOne (environment ID and region), or Auth0 (domain) — each swaps in the one or two fields that provider needs in place of a generic issuer URL. Client ID, client secret, and scopes are the same across all four. The redirect URI is fixed by the deployment itself — register that exact value with your identity provider, not one you choose. A logout URL is only needed if your provider also requires its own front-channel logout.
Claim mapping, at the bottom of
the same panel, is what ties a signed-in user back to a role: the role
claim (default roles), the name claim (default
name), and a fallback claim (default email)
used when the others aren't present.
Configure application settings
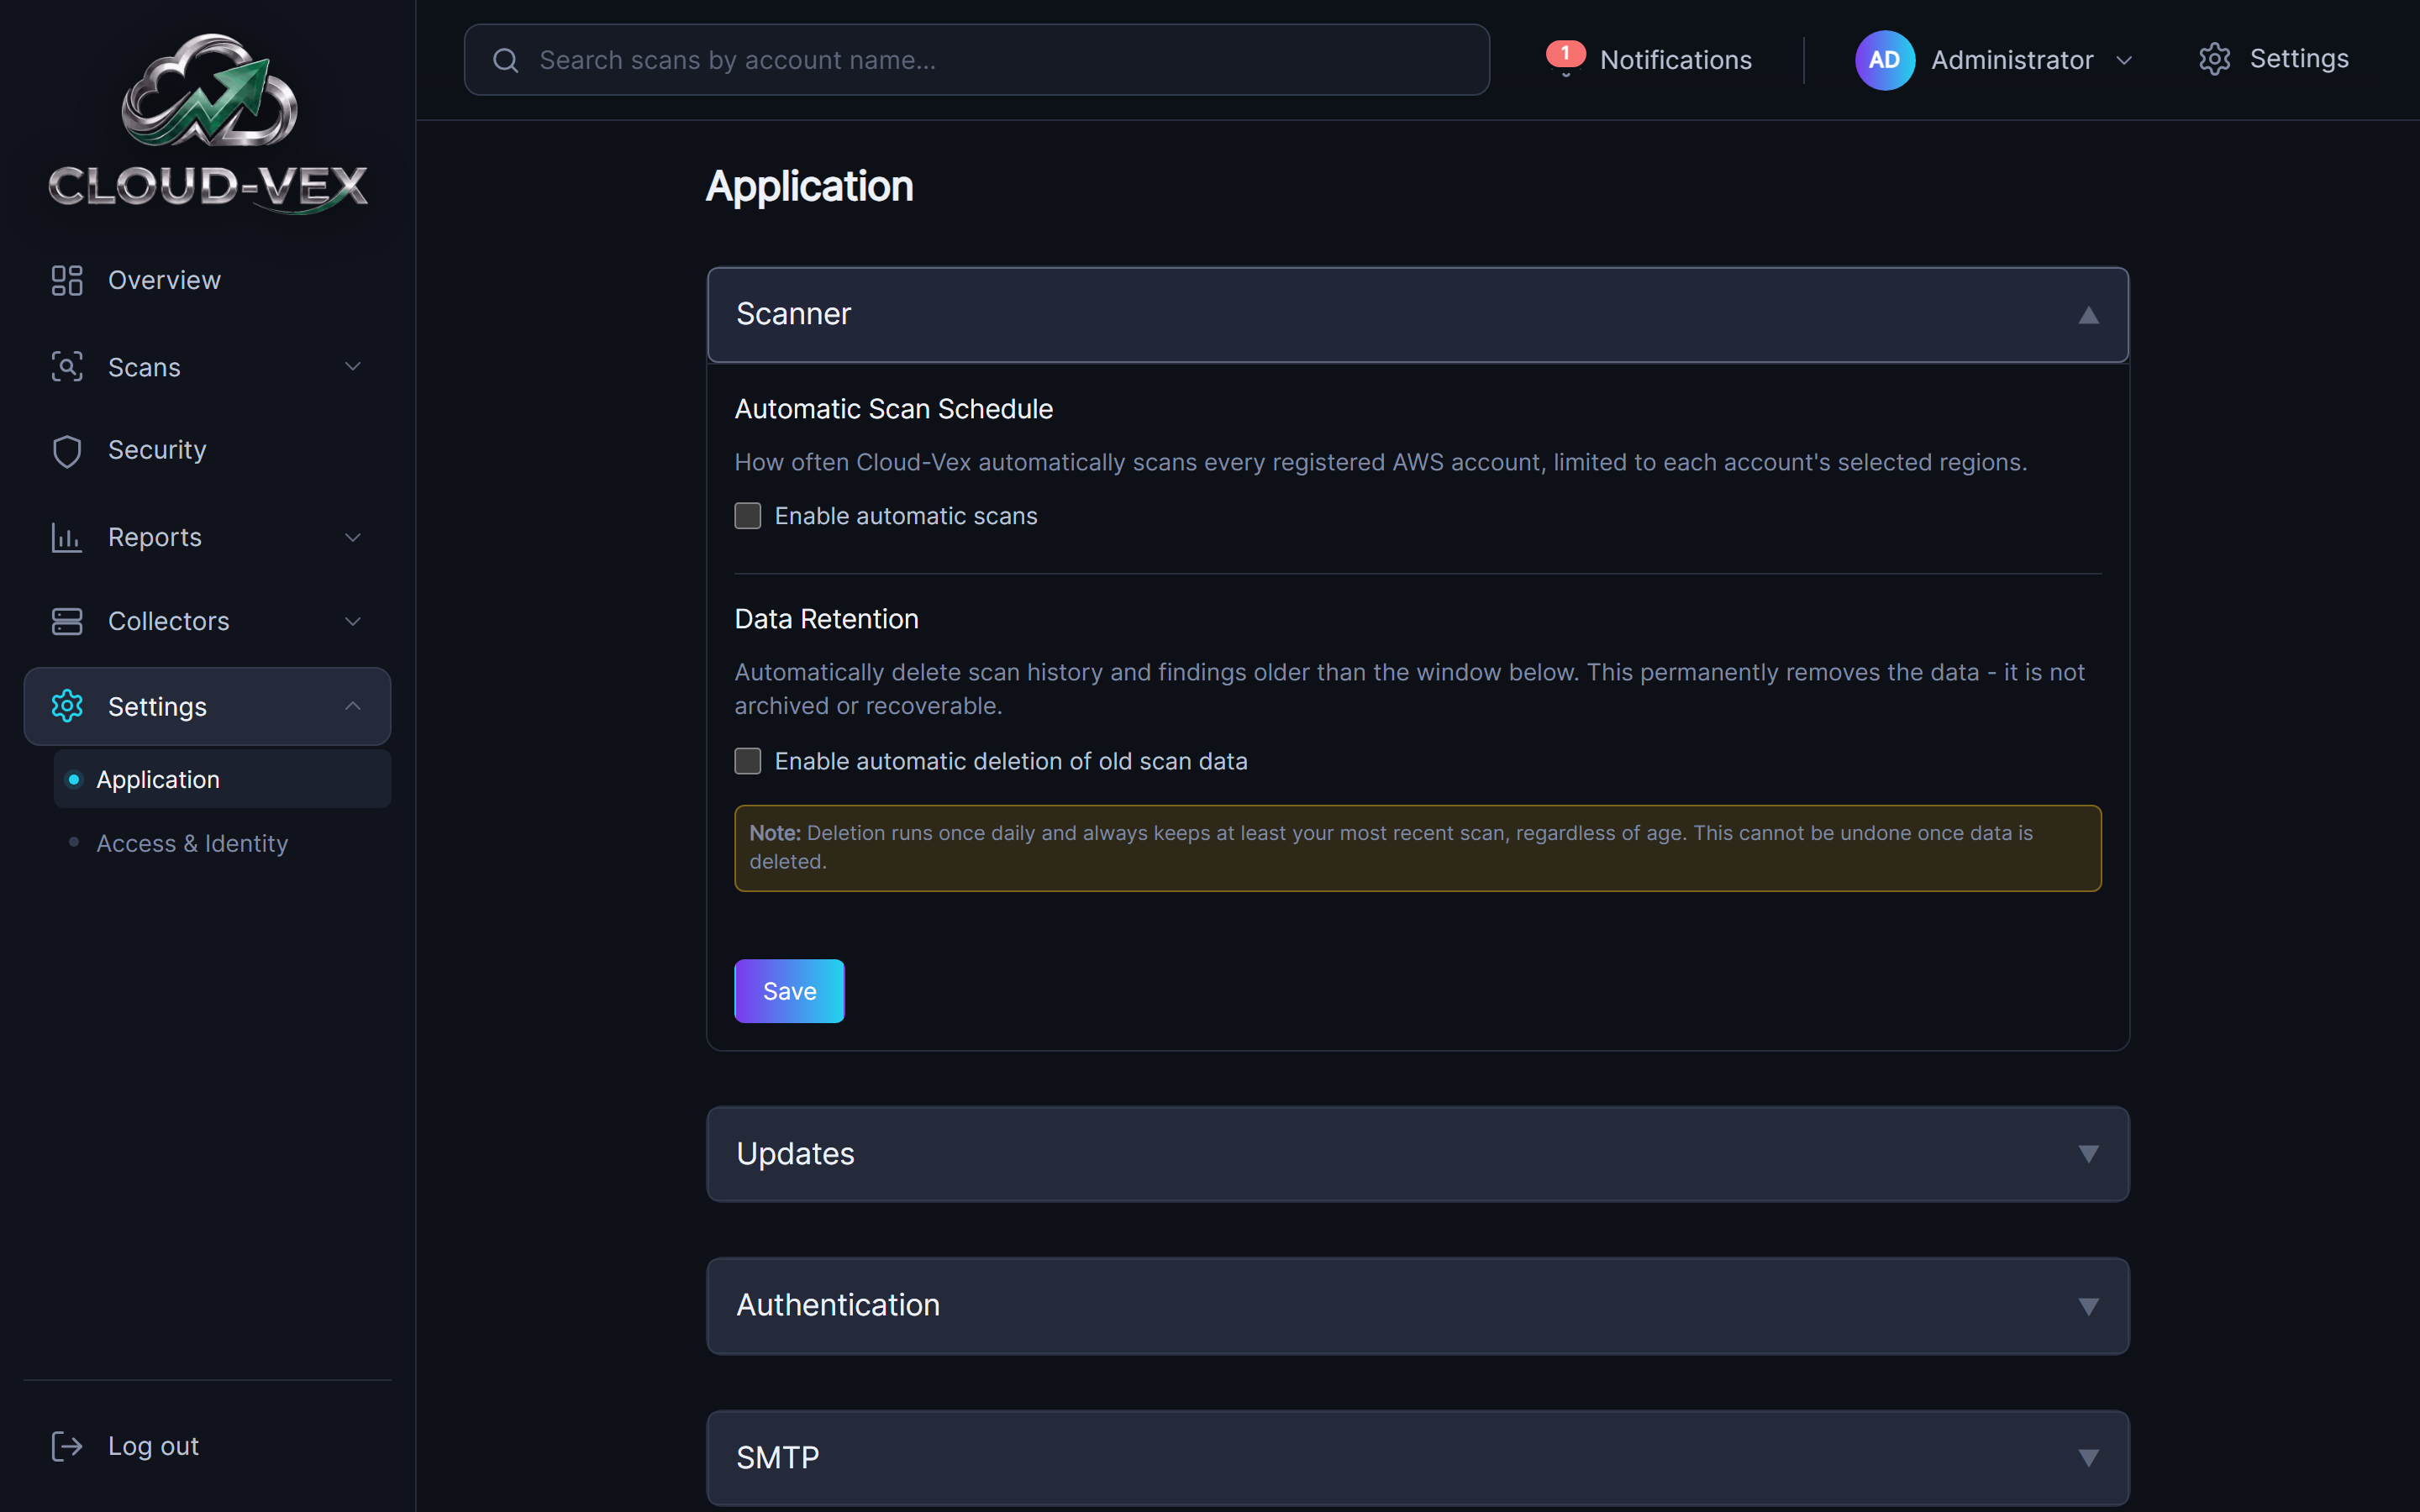
The rest of Settings › Application lives in five collapsible panels — click a heading to expand it:
- Scanner — how often Cloud-Vex automatically scans every registered account, plus a Data Retention setting that permanently deletes scan history and findings older than a window you choose (days, weeks, or months). This is real deletion, not archival — it cannot be undone, and it always keeps at least your most recent scan regardless of age.
- Updates — whether the deployment checks daily for a newer Cloud-Vex release (one public file, nothing about the deployment is sent), plus a one-click Update to <version> button that applies it in place once one is found, and a License panel to check your subscription's status on demand.
- Authentication — the same SSO configuration covered in Configure SSO (OAuth) below.
- SMTP — outbound email for scan notifications, alerts, and scheduled reports, covered in Configure SMTP below.
- User Experience — the inactivity timeout before an idle session is signed out.
The Updates panel, expanded — current and latest available version, a manual Check for Update button, and the License status card below it (status, days remaining, and renewal date, refreshed with Check License):
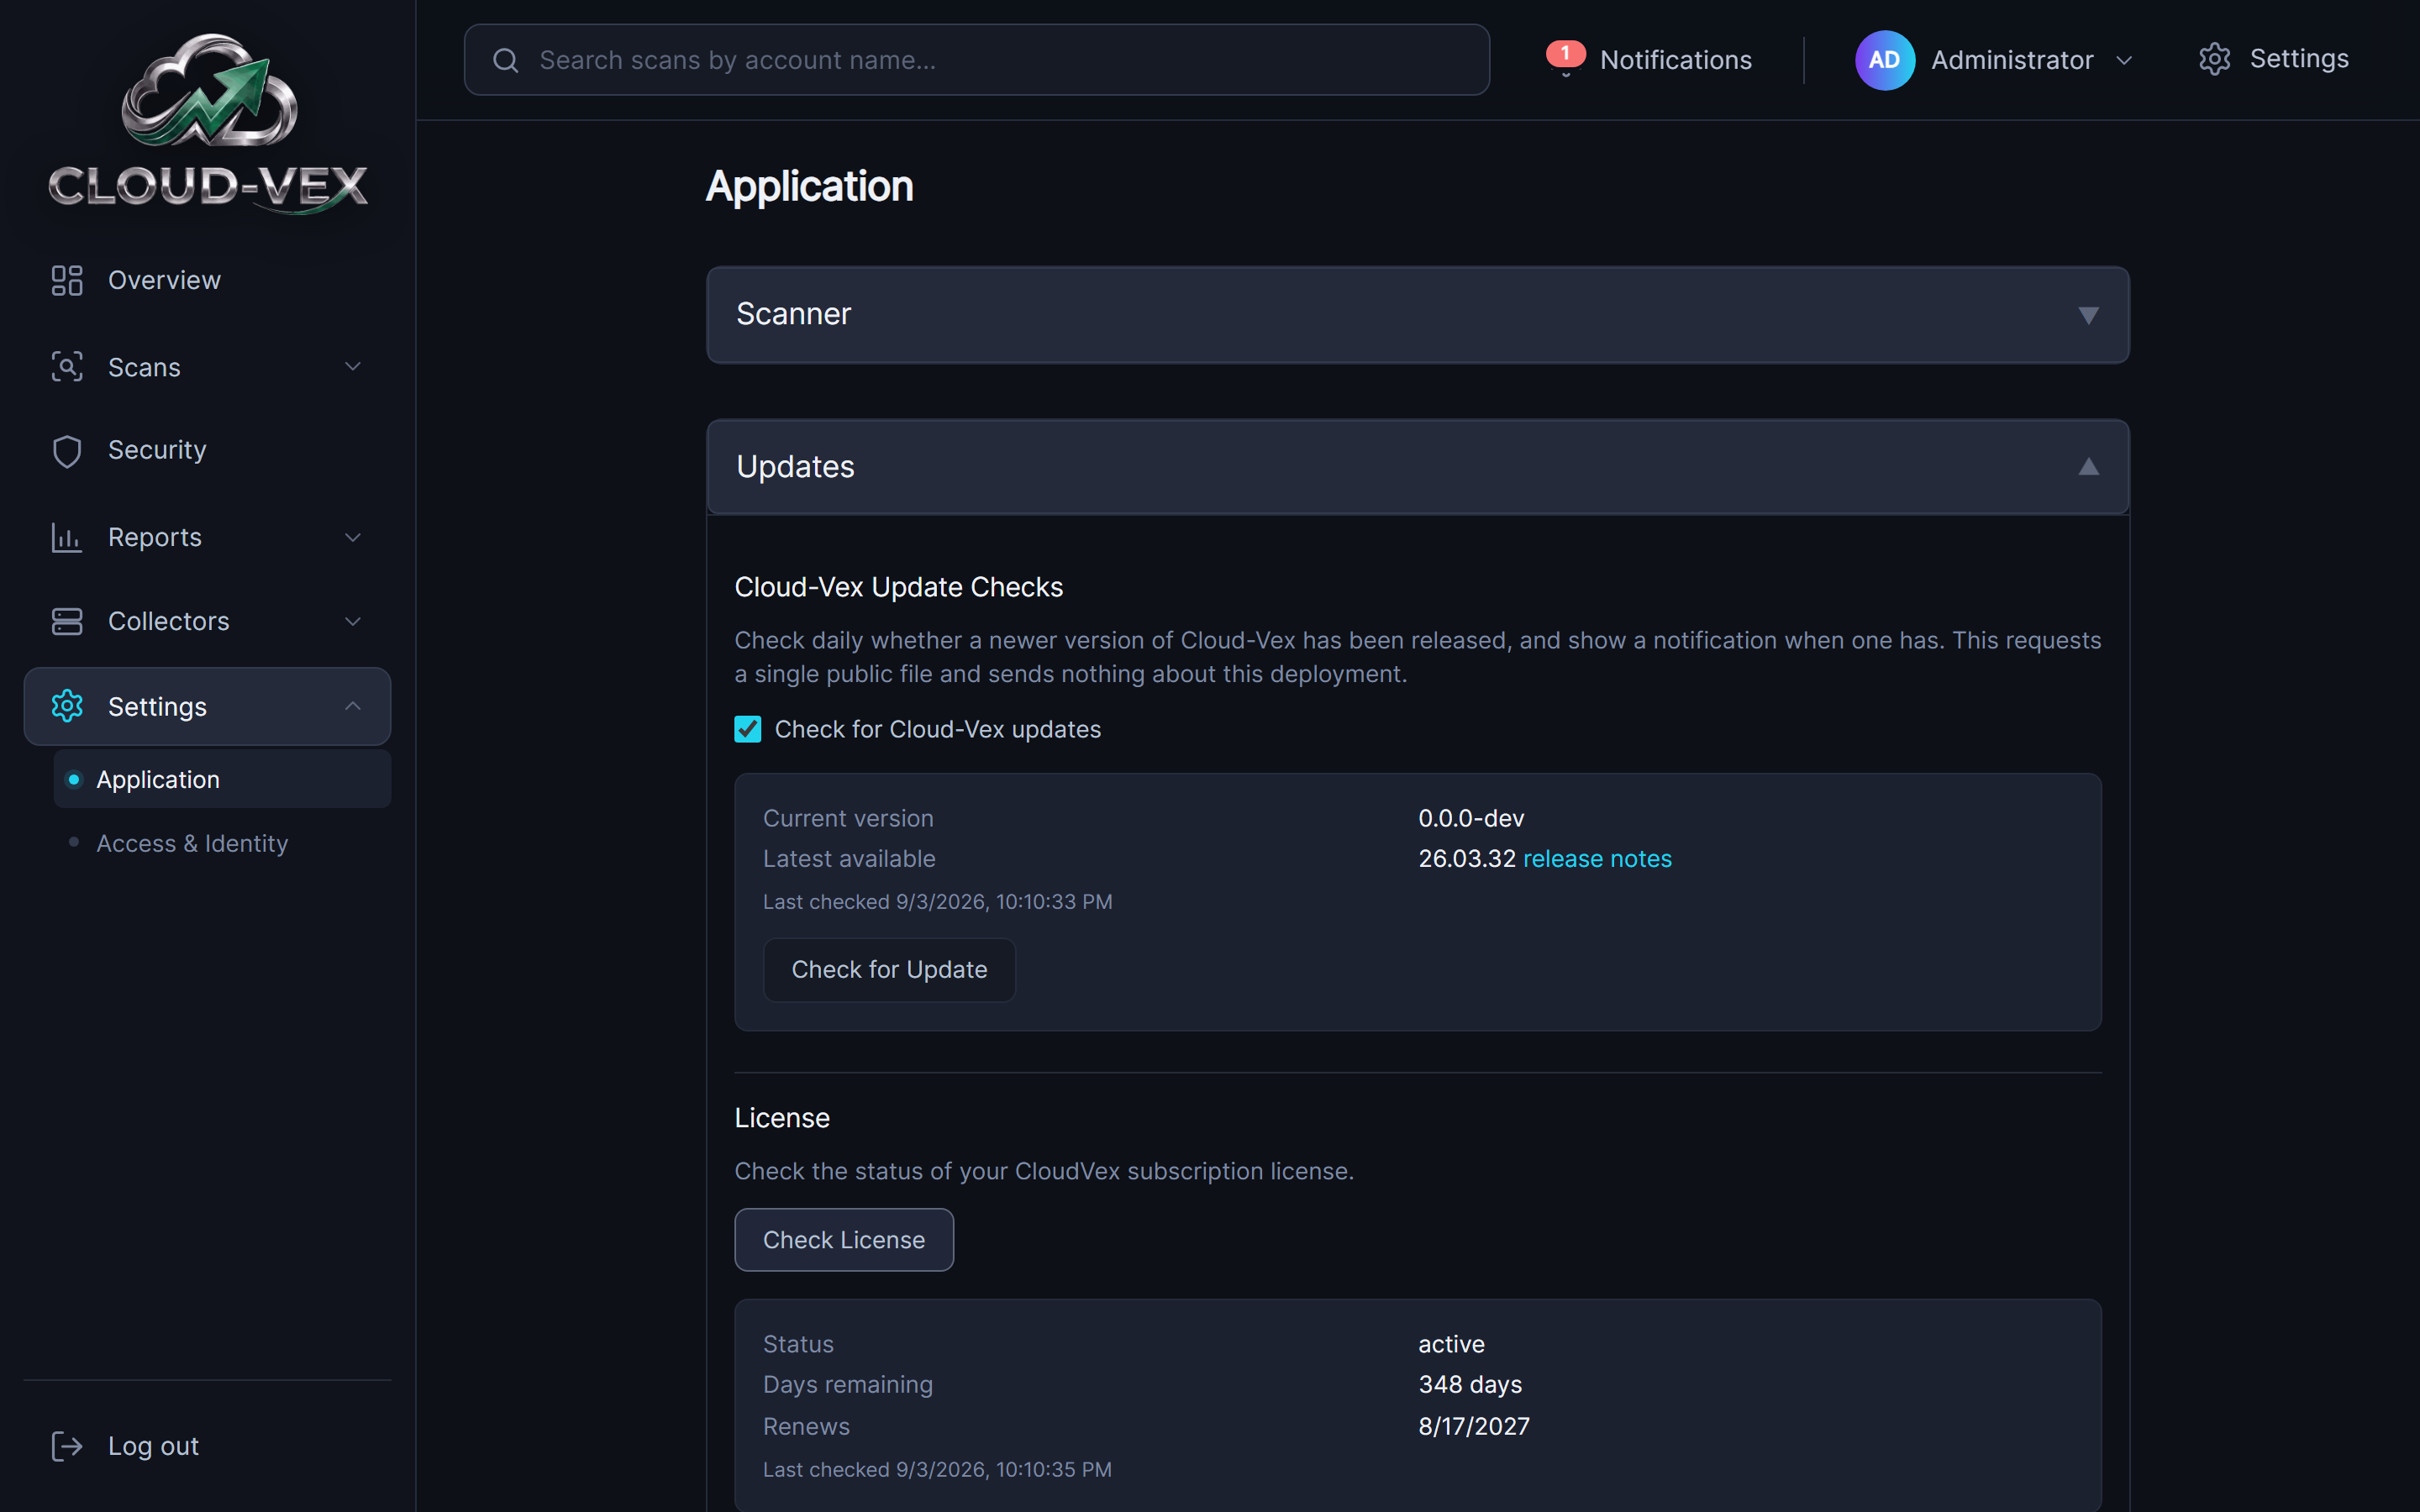
Applying an update replaces the running deployment in place — the dashboard stays reachable throughout and you will not be signed out, though a scan already in progress may be interrupted if it's still running when its task is replaced. If an update fails partway through, the deployment automatically rolls back to the version it was already running; CloudFormation does not leave a partial update applied.
Configure SMTP
Also under Settings › Application: host, port, and the from address, with a Use TLS toggle and an optional authentication requirement — leave that unchecked for an internal relay that accepts mail with no login, which is common on a private network. Send a test email to any address before relying on it for scan notifications and alerts.
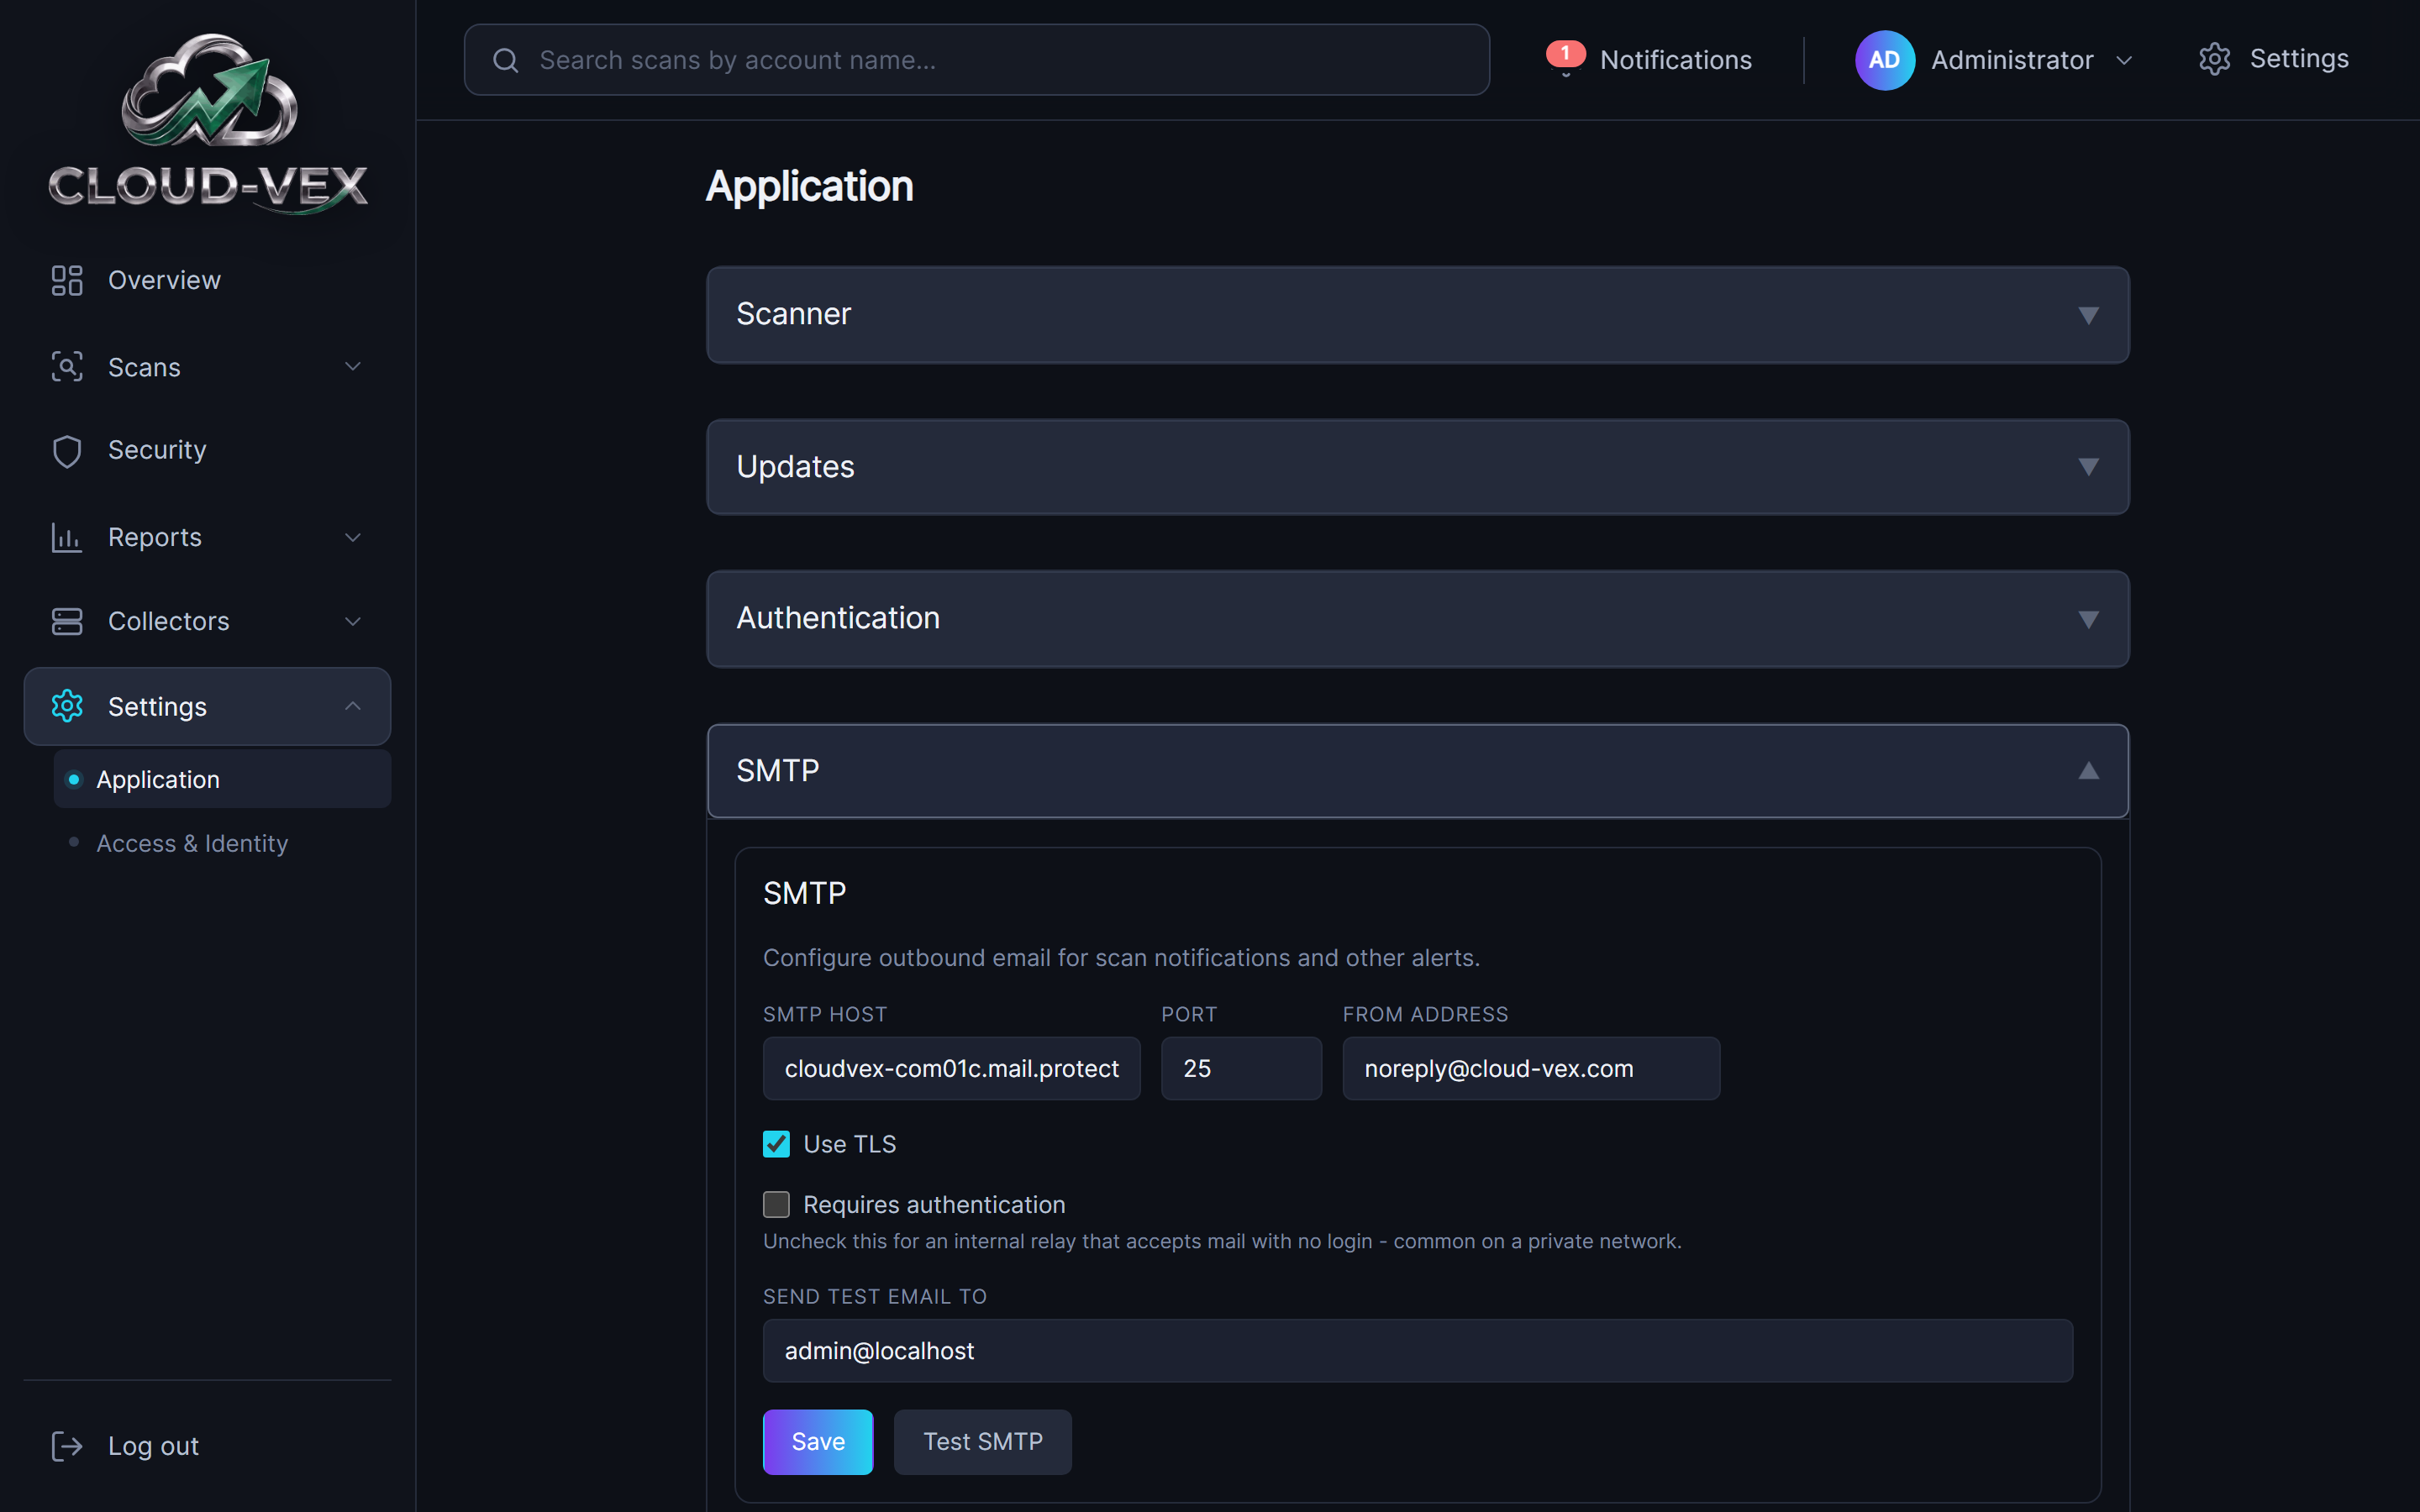
Port 25 fails with “Network is unreachable”? That’s an AWS account-level restriction, not a Cloud-Vex problem — AWS blocks outbound traffic on port 25 by default for every EC2/Fargate task and NAT Gateway in a new account, to prevent spam abuse. It’s enforced below the layer your deployment's security groups and route tables control, so opening them up doesn't help. Two ways around it: switch to an authenticated submission port instead — most providers (Microsoft 365, Google Workspace, SendGrid, Postmark, etc.) accept mail on 587 (STARTTLS) or 465 with a username/password, which AWS does not restrict, and this is what Requires authentication above is for. If port 25 itself is required — an on-prem relay that only accepts anonymous relay on 25, for example — open a case with AWS Support: “EC2 instance is unable to send email through port 25.” That request type is available even on the free Basic support plan and is typically resolved in 24–72 hours.
4. Login
There are two ways to sign in: the initial administrator's local username and password, or single sign-on through the identity provider connected in Configure SSO (OAuth).
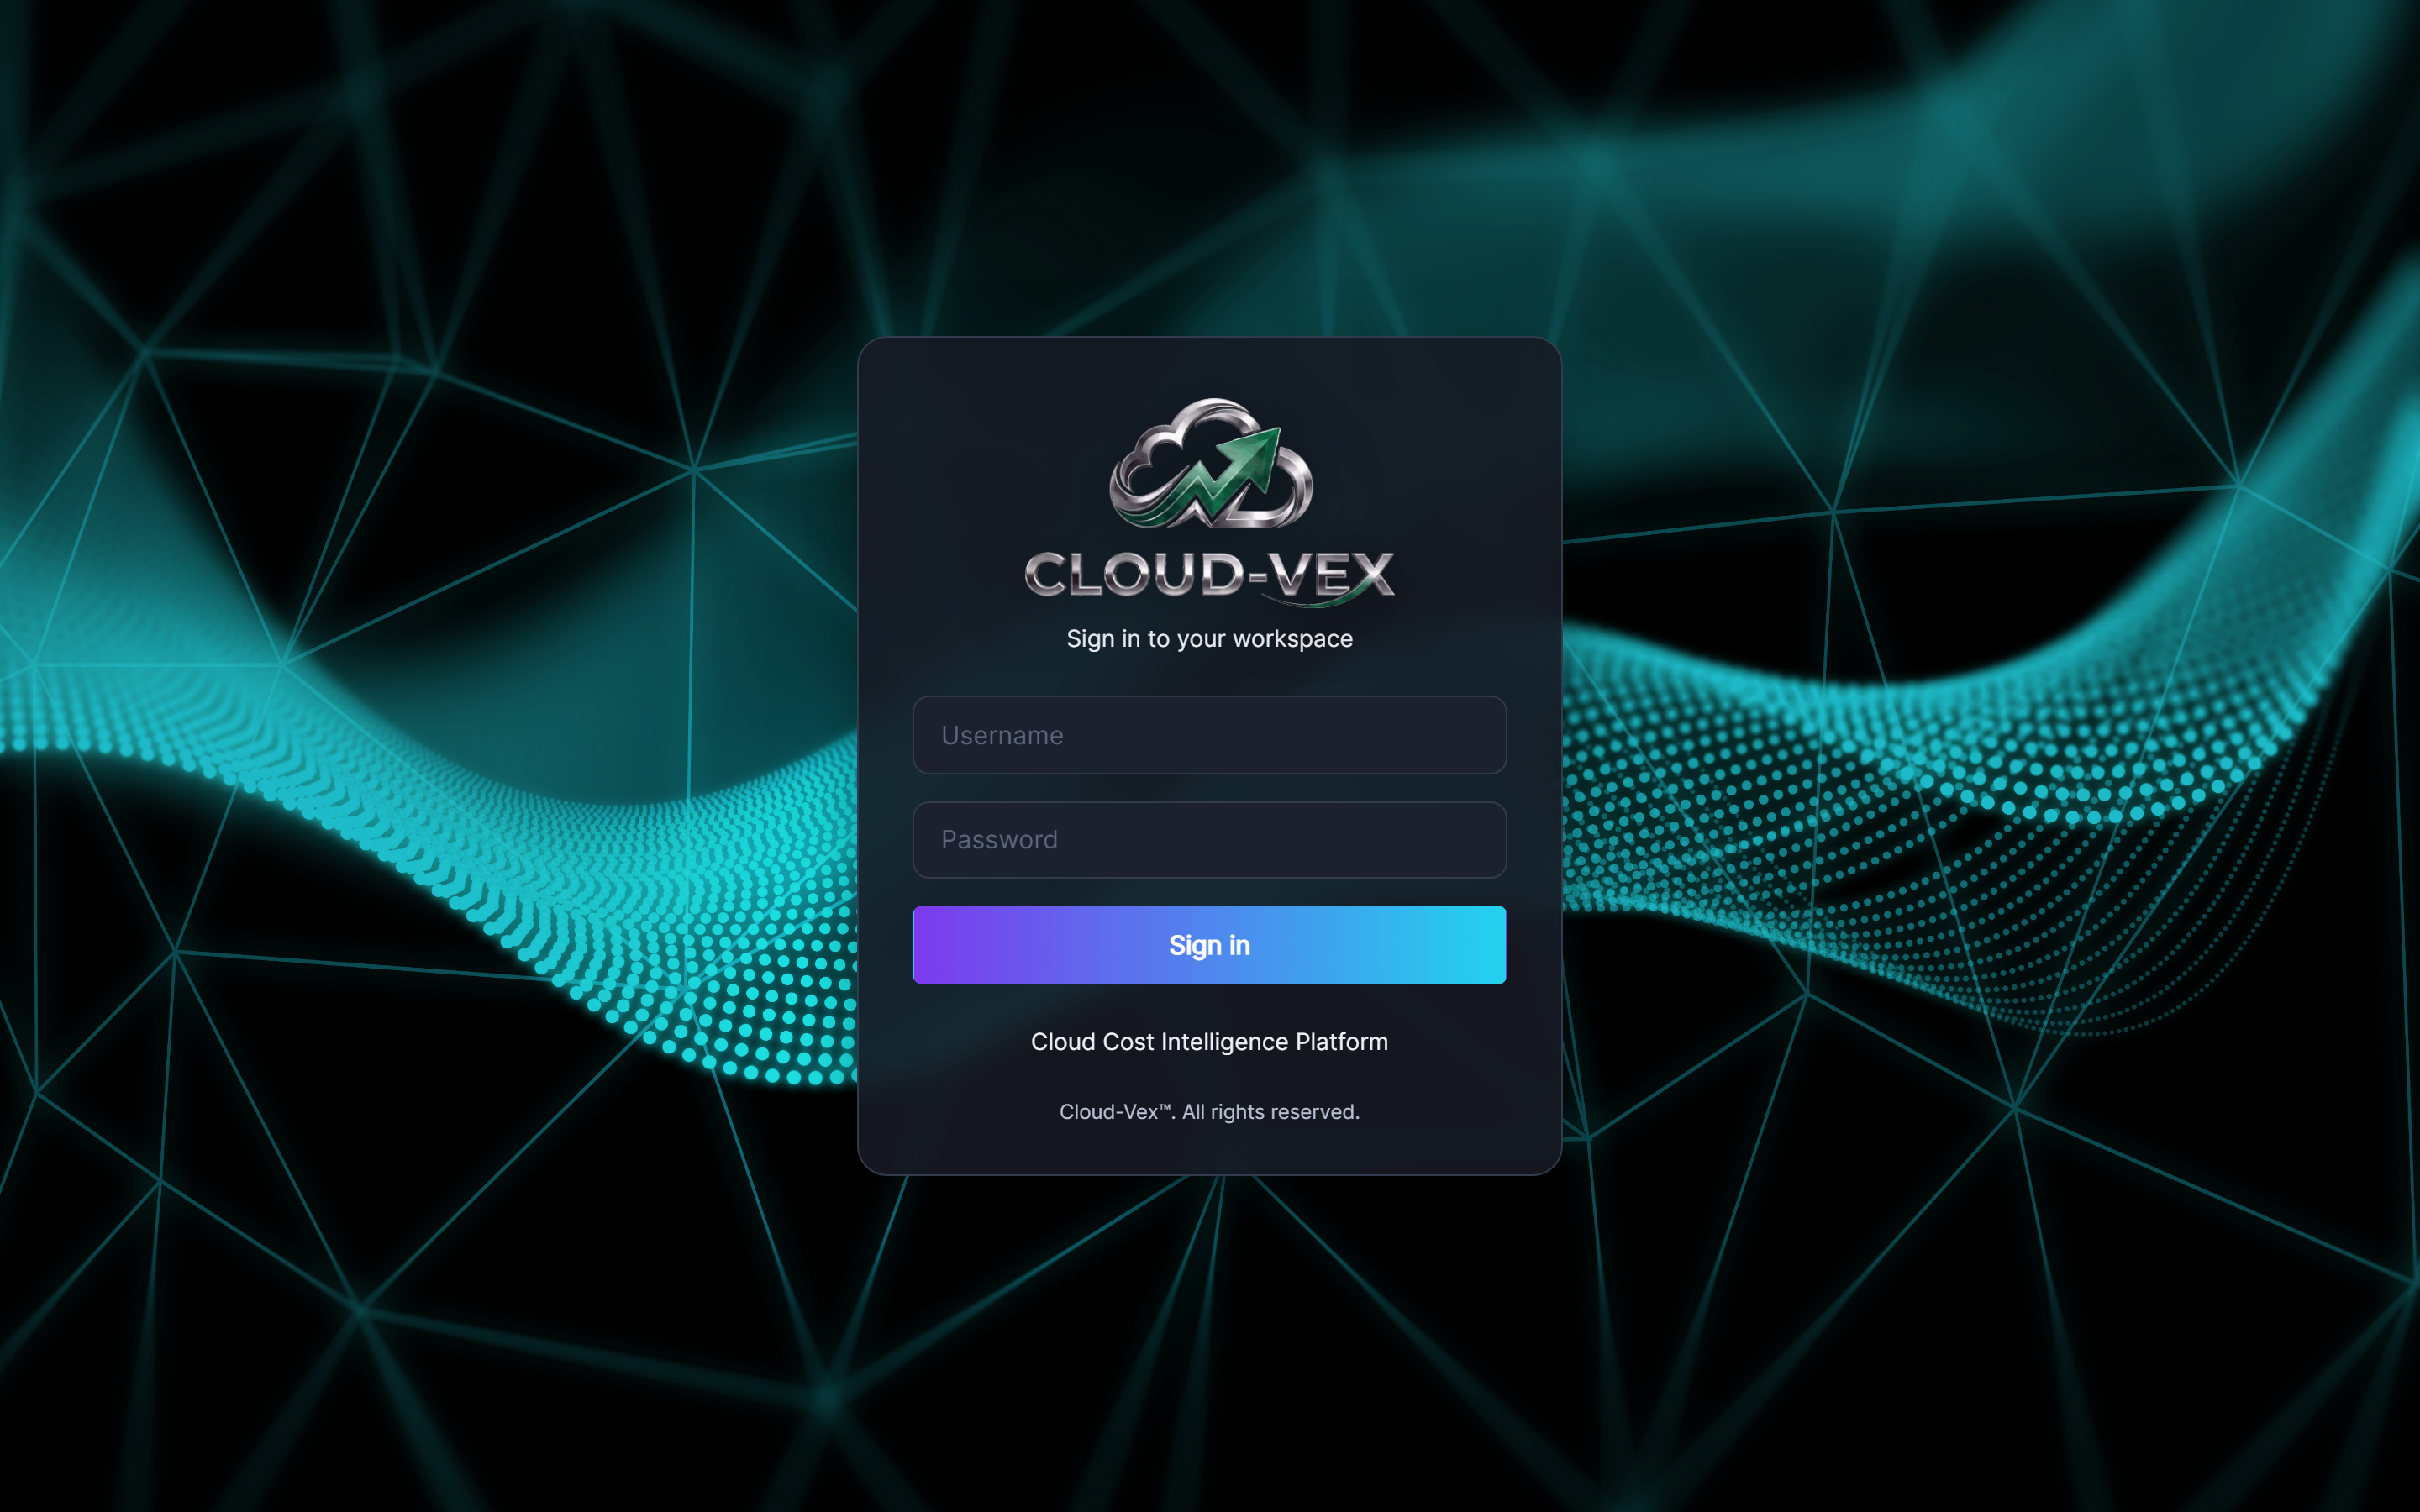
Local account
There is exactly one local account: the initial administrator created during setup. Enter its username and password to sign in. On its very first sign-in it's required to set a new password before it can do anything else — the credential it was created with stops working the moment that happens. After that, it's an ordinary sign-in.
It's also the only local account there will ever be — there's no way to create another one. Every other user gets in through the identity provider instead. Keep this account's credentials safe even after SSO is set up: it's break-glass access if the identity provider is ever unreachable.
SSO (OAuth)
This is how every user except the initial administrator signs in — there's no other way to add one. Once an identity provider is connected, the login page adds a provider selector above the username and password fields. Choosing it redirects to your identity provider, authenticates there, and returns you signed in — no separate password to manage.
What a user can do afterward depends on the role mapping set up in Configure roles: a user whose groups or claims don't map to a role can authenticate with the identity provider but won't be let in.
5. Overview
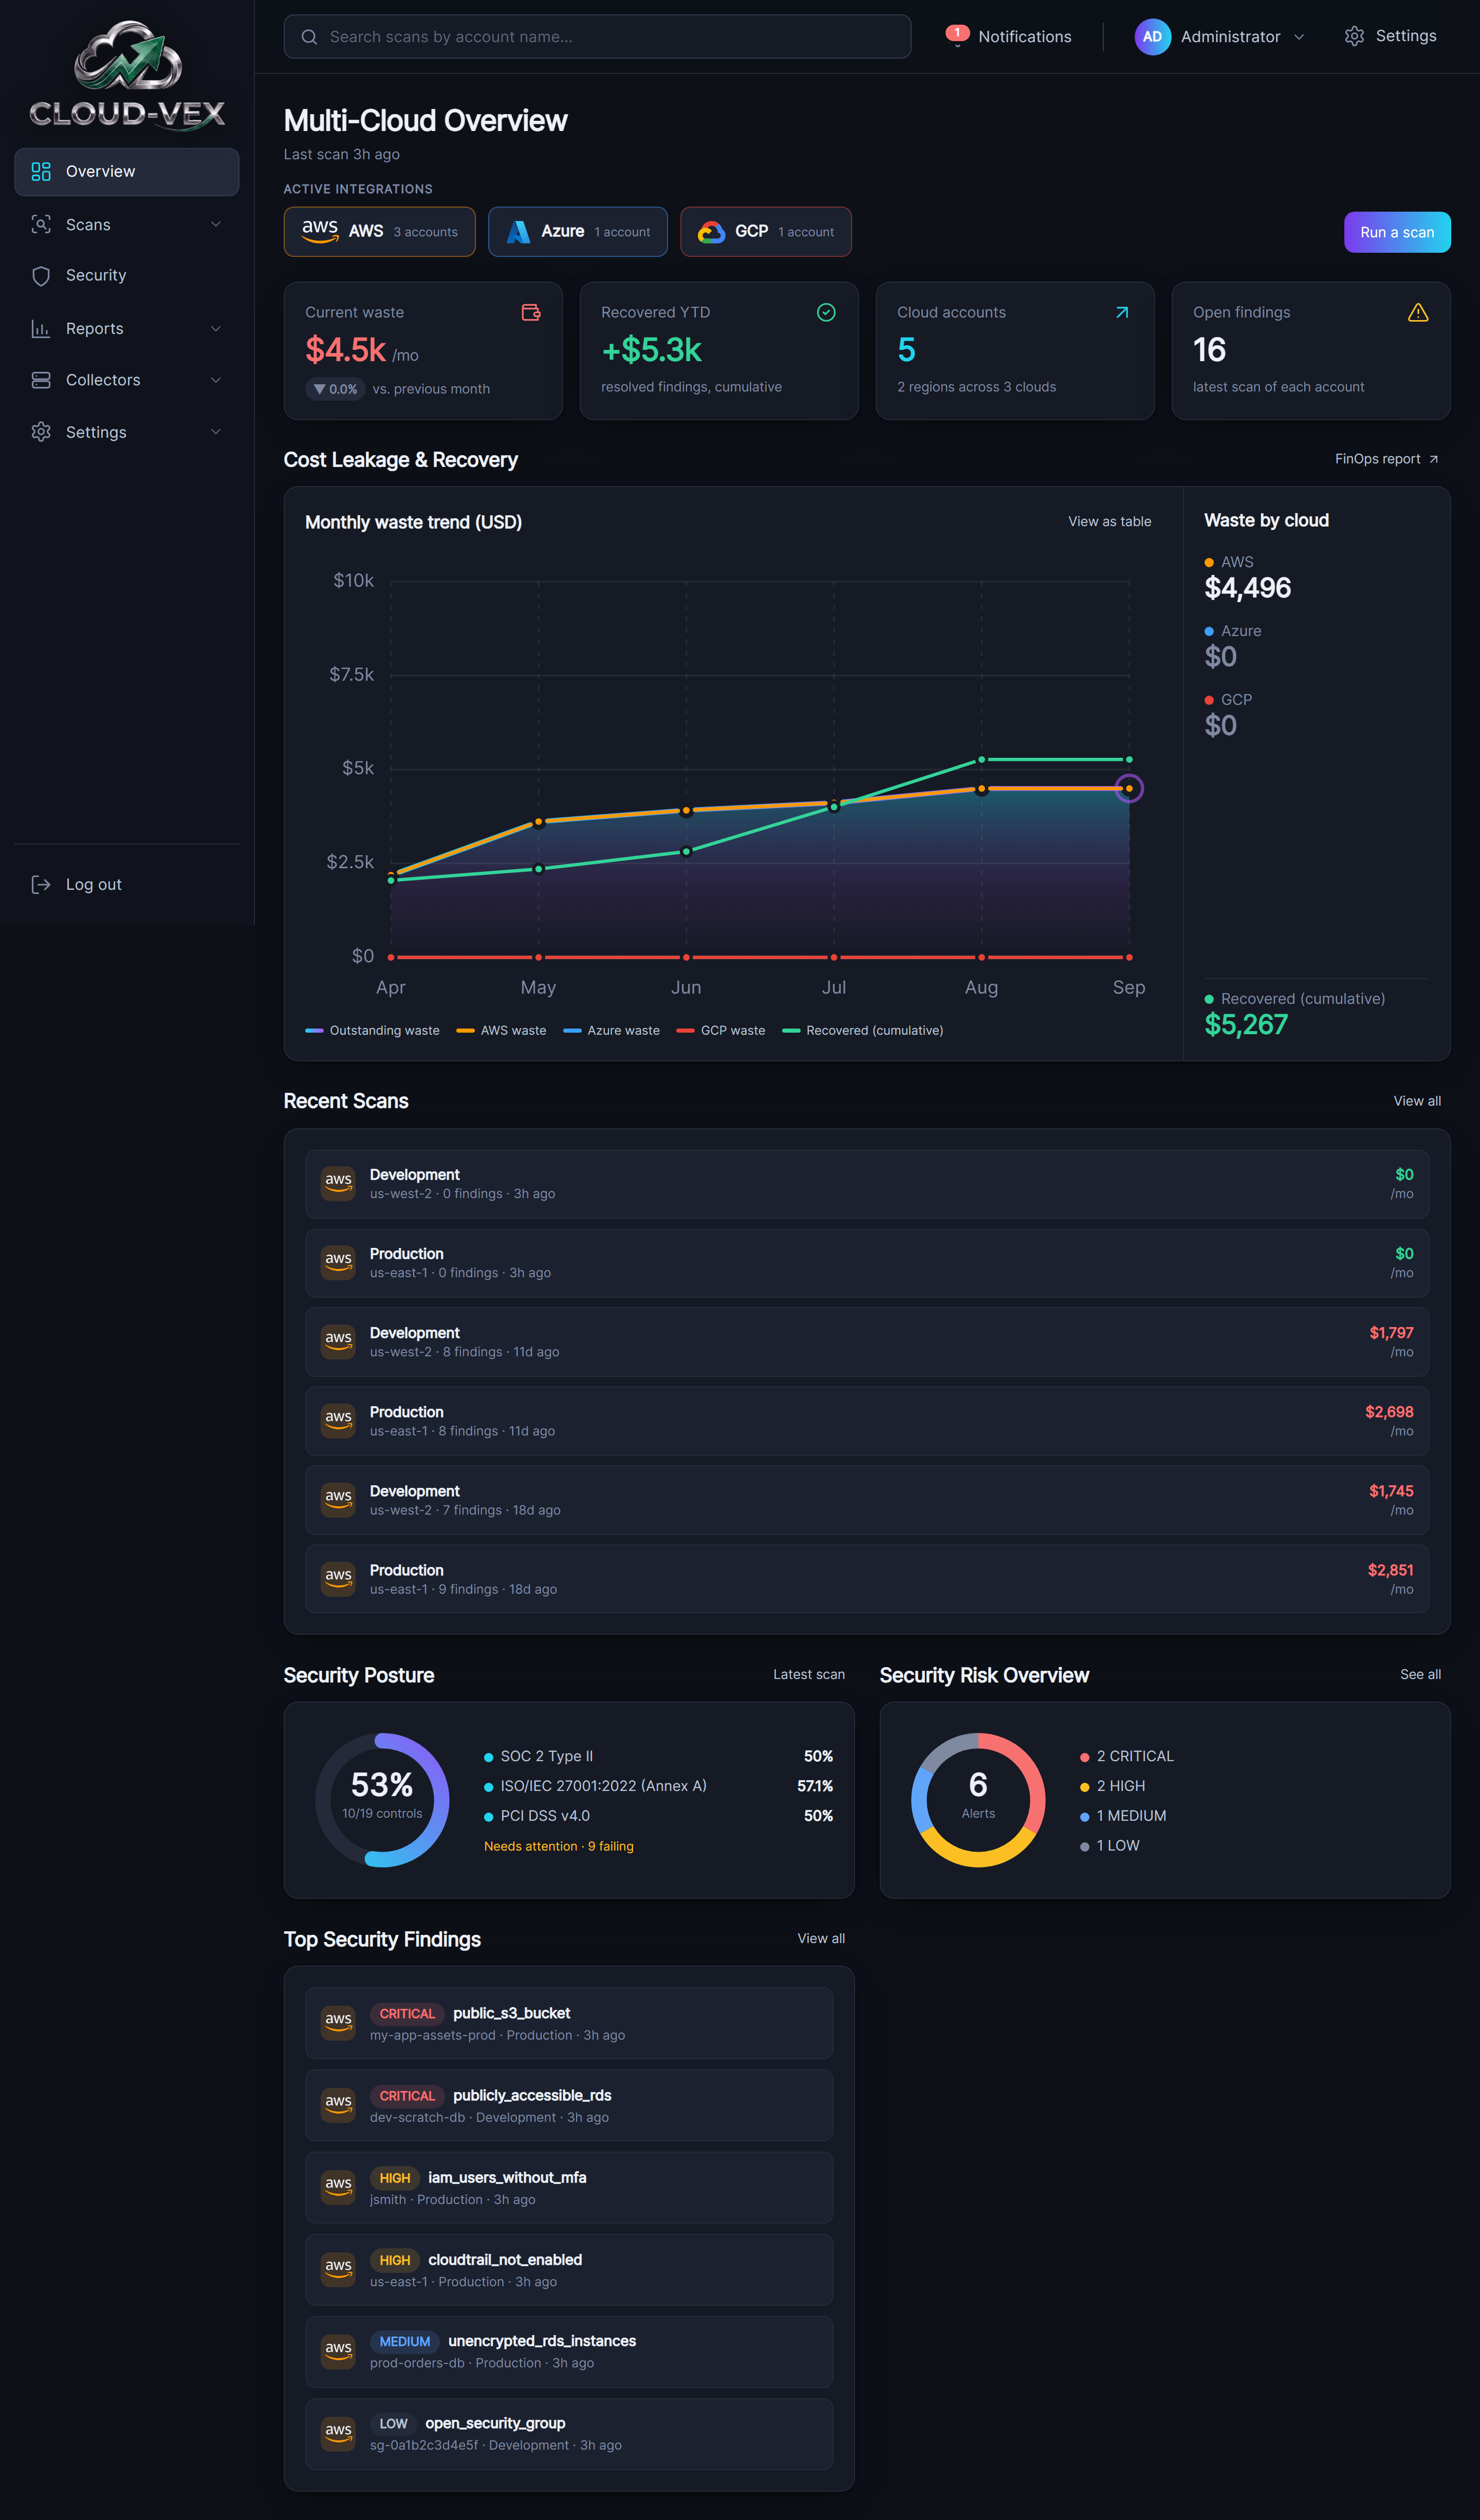
The app shell around every page is a dark sidebar on the left — Overview, Scans, Security, Reports, Collectors, Settings — and a top bar with a scan search box, a Notifications bell, your account menu, and a Settings shortcut. Overview is what you land on after signing in, and it's built to answer one question at a glance: where do you stand, right now, both within each cloud provider and across every cloud account in the deployment.
Active integrations
One chip per cloud — AWS, Azure, Google Cloud — showing how many accounts are connected on each, or “not connected” if none are yet. Click a chip to jump straight to Collector Management. Run a scan, to the right, jumps to Manual Scan.
Stat tiles
Four headline numbers: Current waste (with the trend against last month once there's a prior month to compare), Recovered YTD, Cloud accounts (with the region and cloud count behind it), and Open findings — each account's latest scan only, not every scan ever run.
Cost Leakage & Recovery
A monthly waste trend chart for the last six months, alongside a Waste by cloud breakdown (AWS, Azure, GCP) and the cumulative recovered total. A View as table toggle switches the chart to exact monthly figures, and FinOps report jumps to the full report behind these numbers.
Recent Scans
The six most recently completed scans, across every account and cloud — account, region, finding count, and estimated monthly waste. View all opens the full Scan History.
Security Posture, Security Risk Overview & Top Security Findings
The right column is the security half of the page. Security Posture is a donut of controls passing across every mapped framework (SOC 2, ISO/IEC 27001, PCI DSS), with each framework's own score listed beside it. Security Risk Overview is a second donut, this one segmented by severity across every open security finding rather than framework pass/fail. Top Security Findings lists the worst of those findings by severity. All three link through to the full Security page.
Notifications
The bell in the top bar carries a badge count when there's something worth flagging: a collector with an update available, a newer Cloud-Vex release, a licence problem or grace period, or a subscription term ending soon. Nothing shows here when there's nothing to report.
6. Scans
Scans covers the two things you do around a scan itself: running one on demand, and reviewing what's already run.
Manual scans
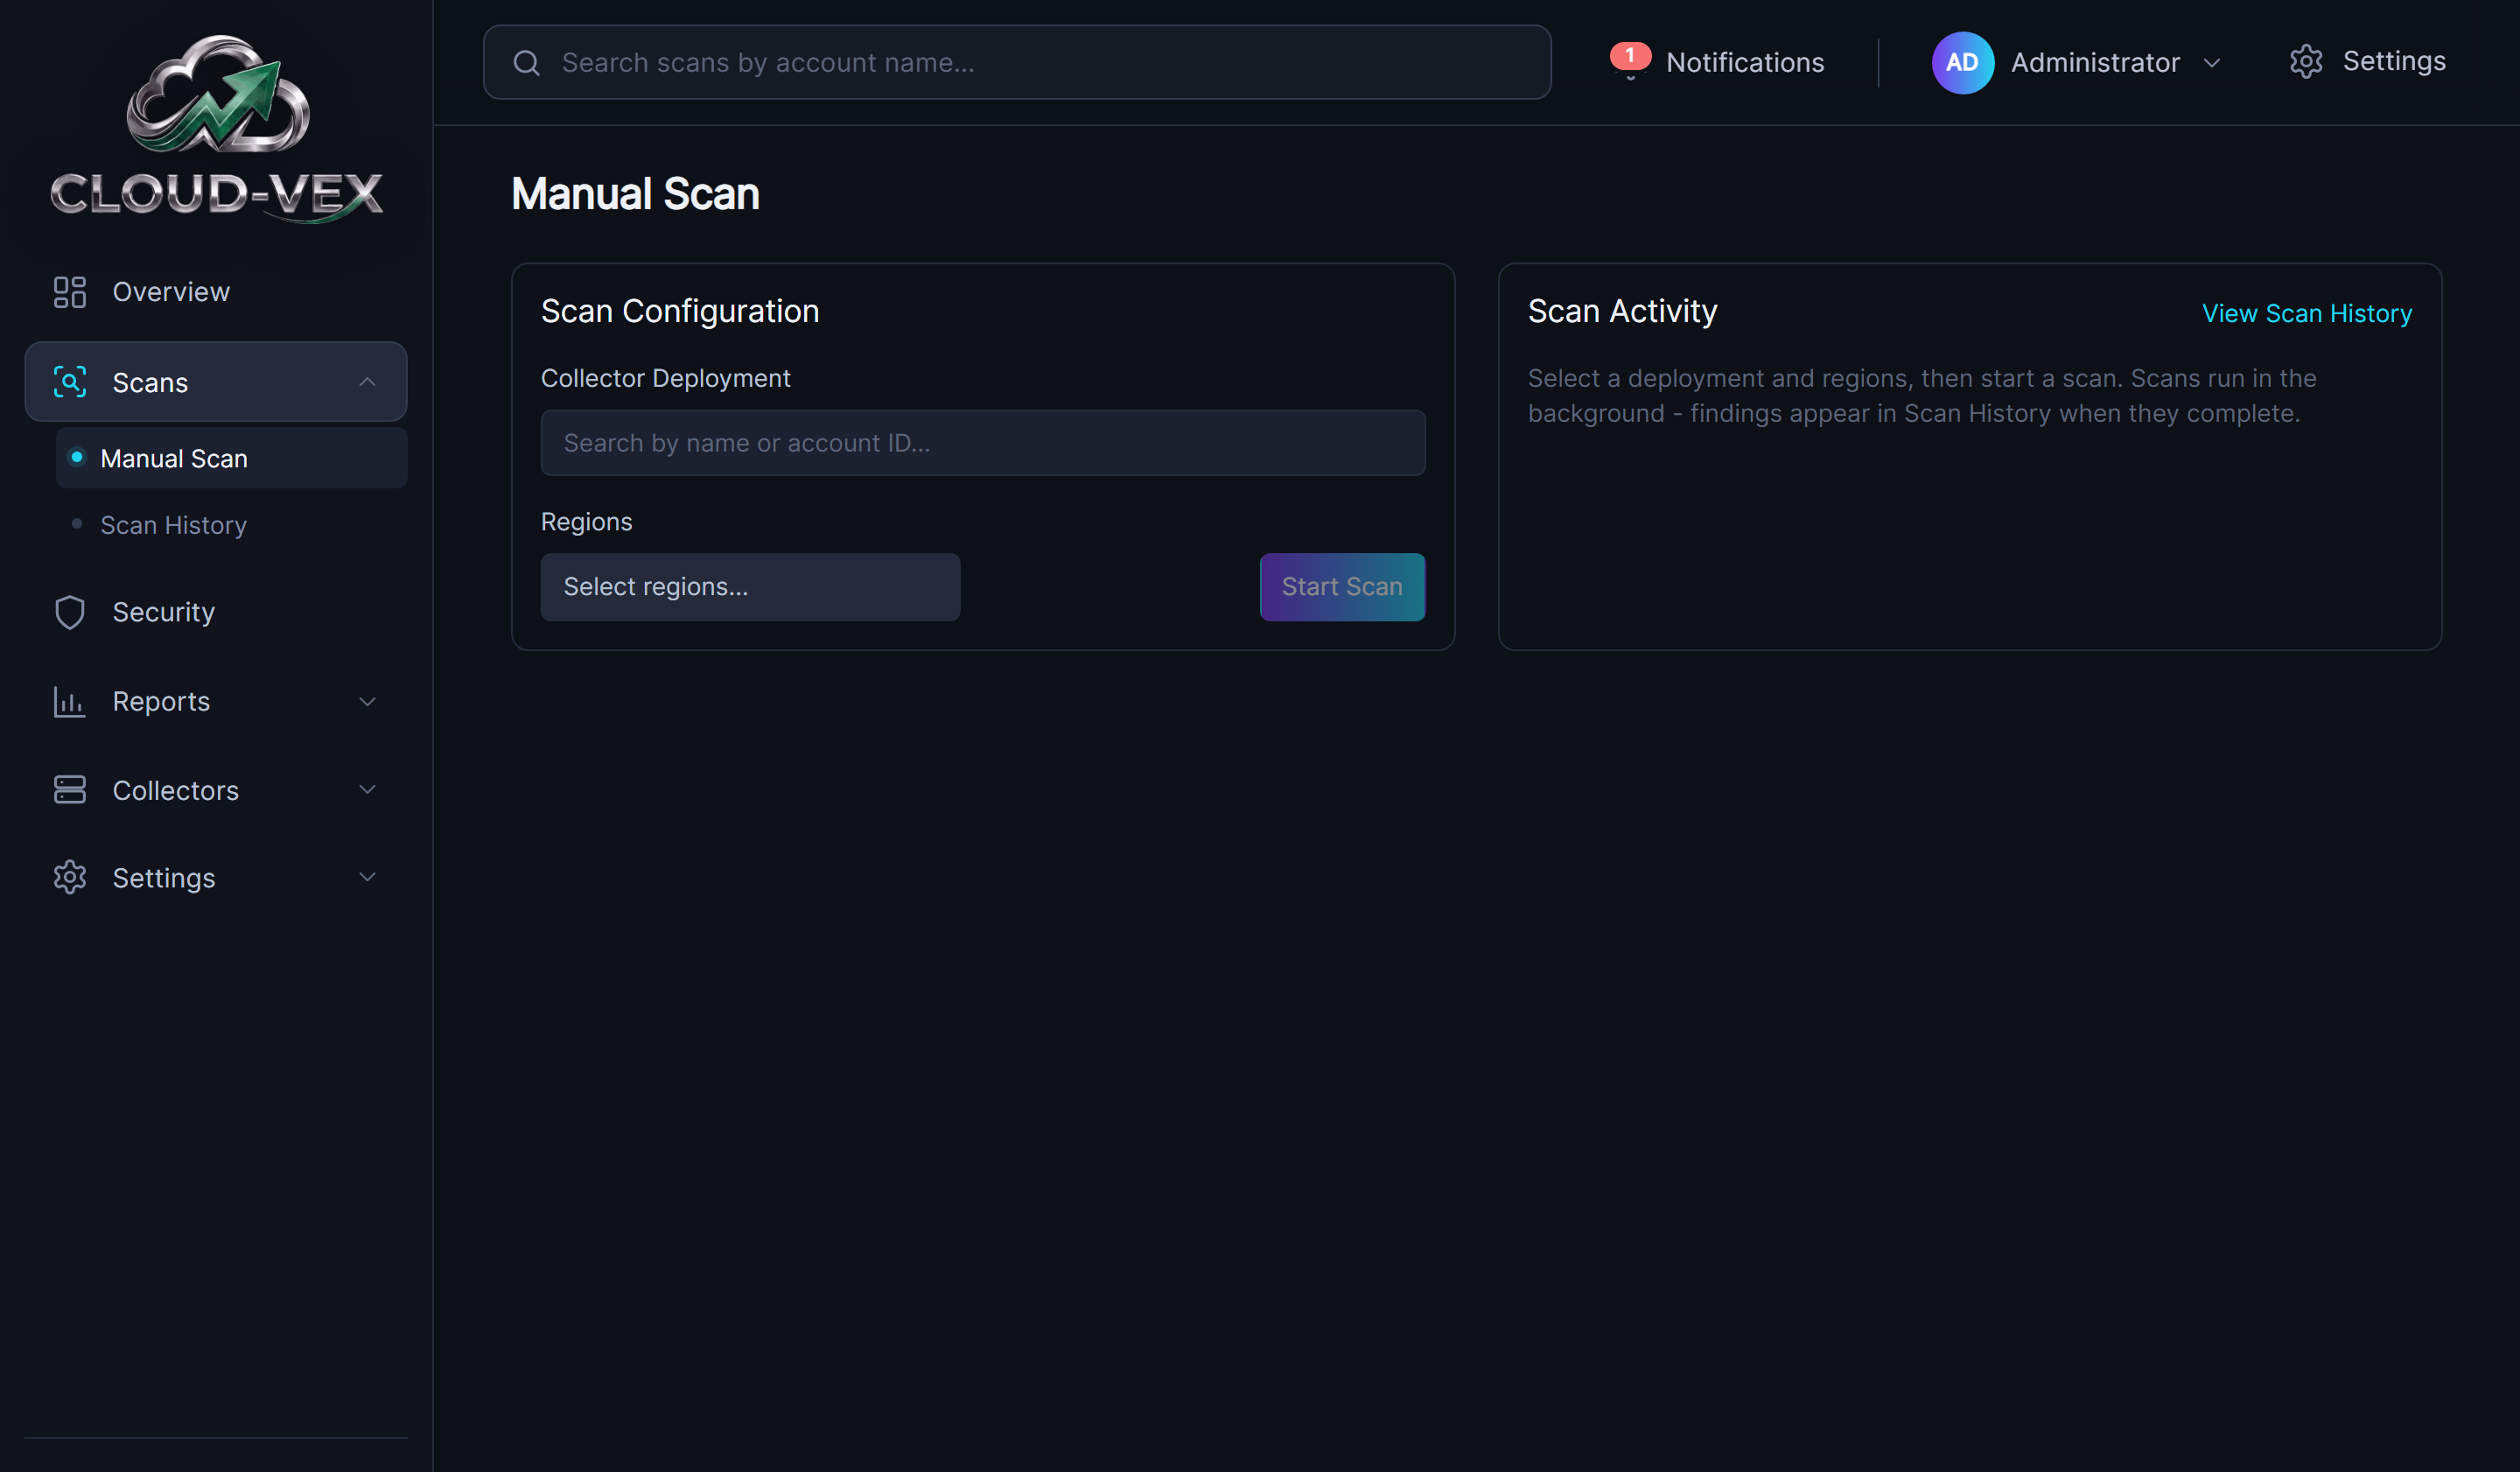
An ad hoc scan for any collector that's already deployed. Pick a collector deployment, then the specific regions to scan — not necessarily all of them — and run it. That's what sets it apart from the main scheduled scans, which cover every region: a manual scan lets you check a subset of regions for fresh data or a recent change, without waiting on or running the full sweep. Scans run in the background; once started, it shows up in Scan History when it completes.
Scan history
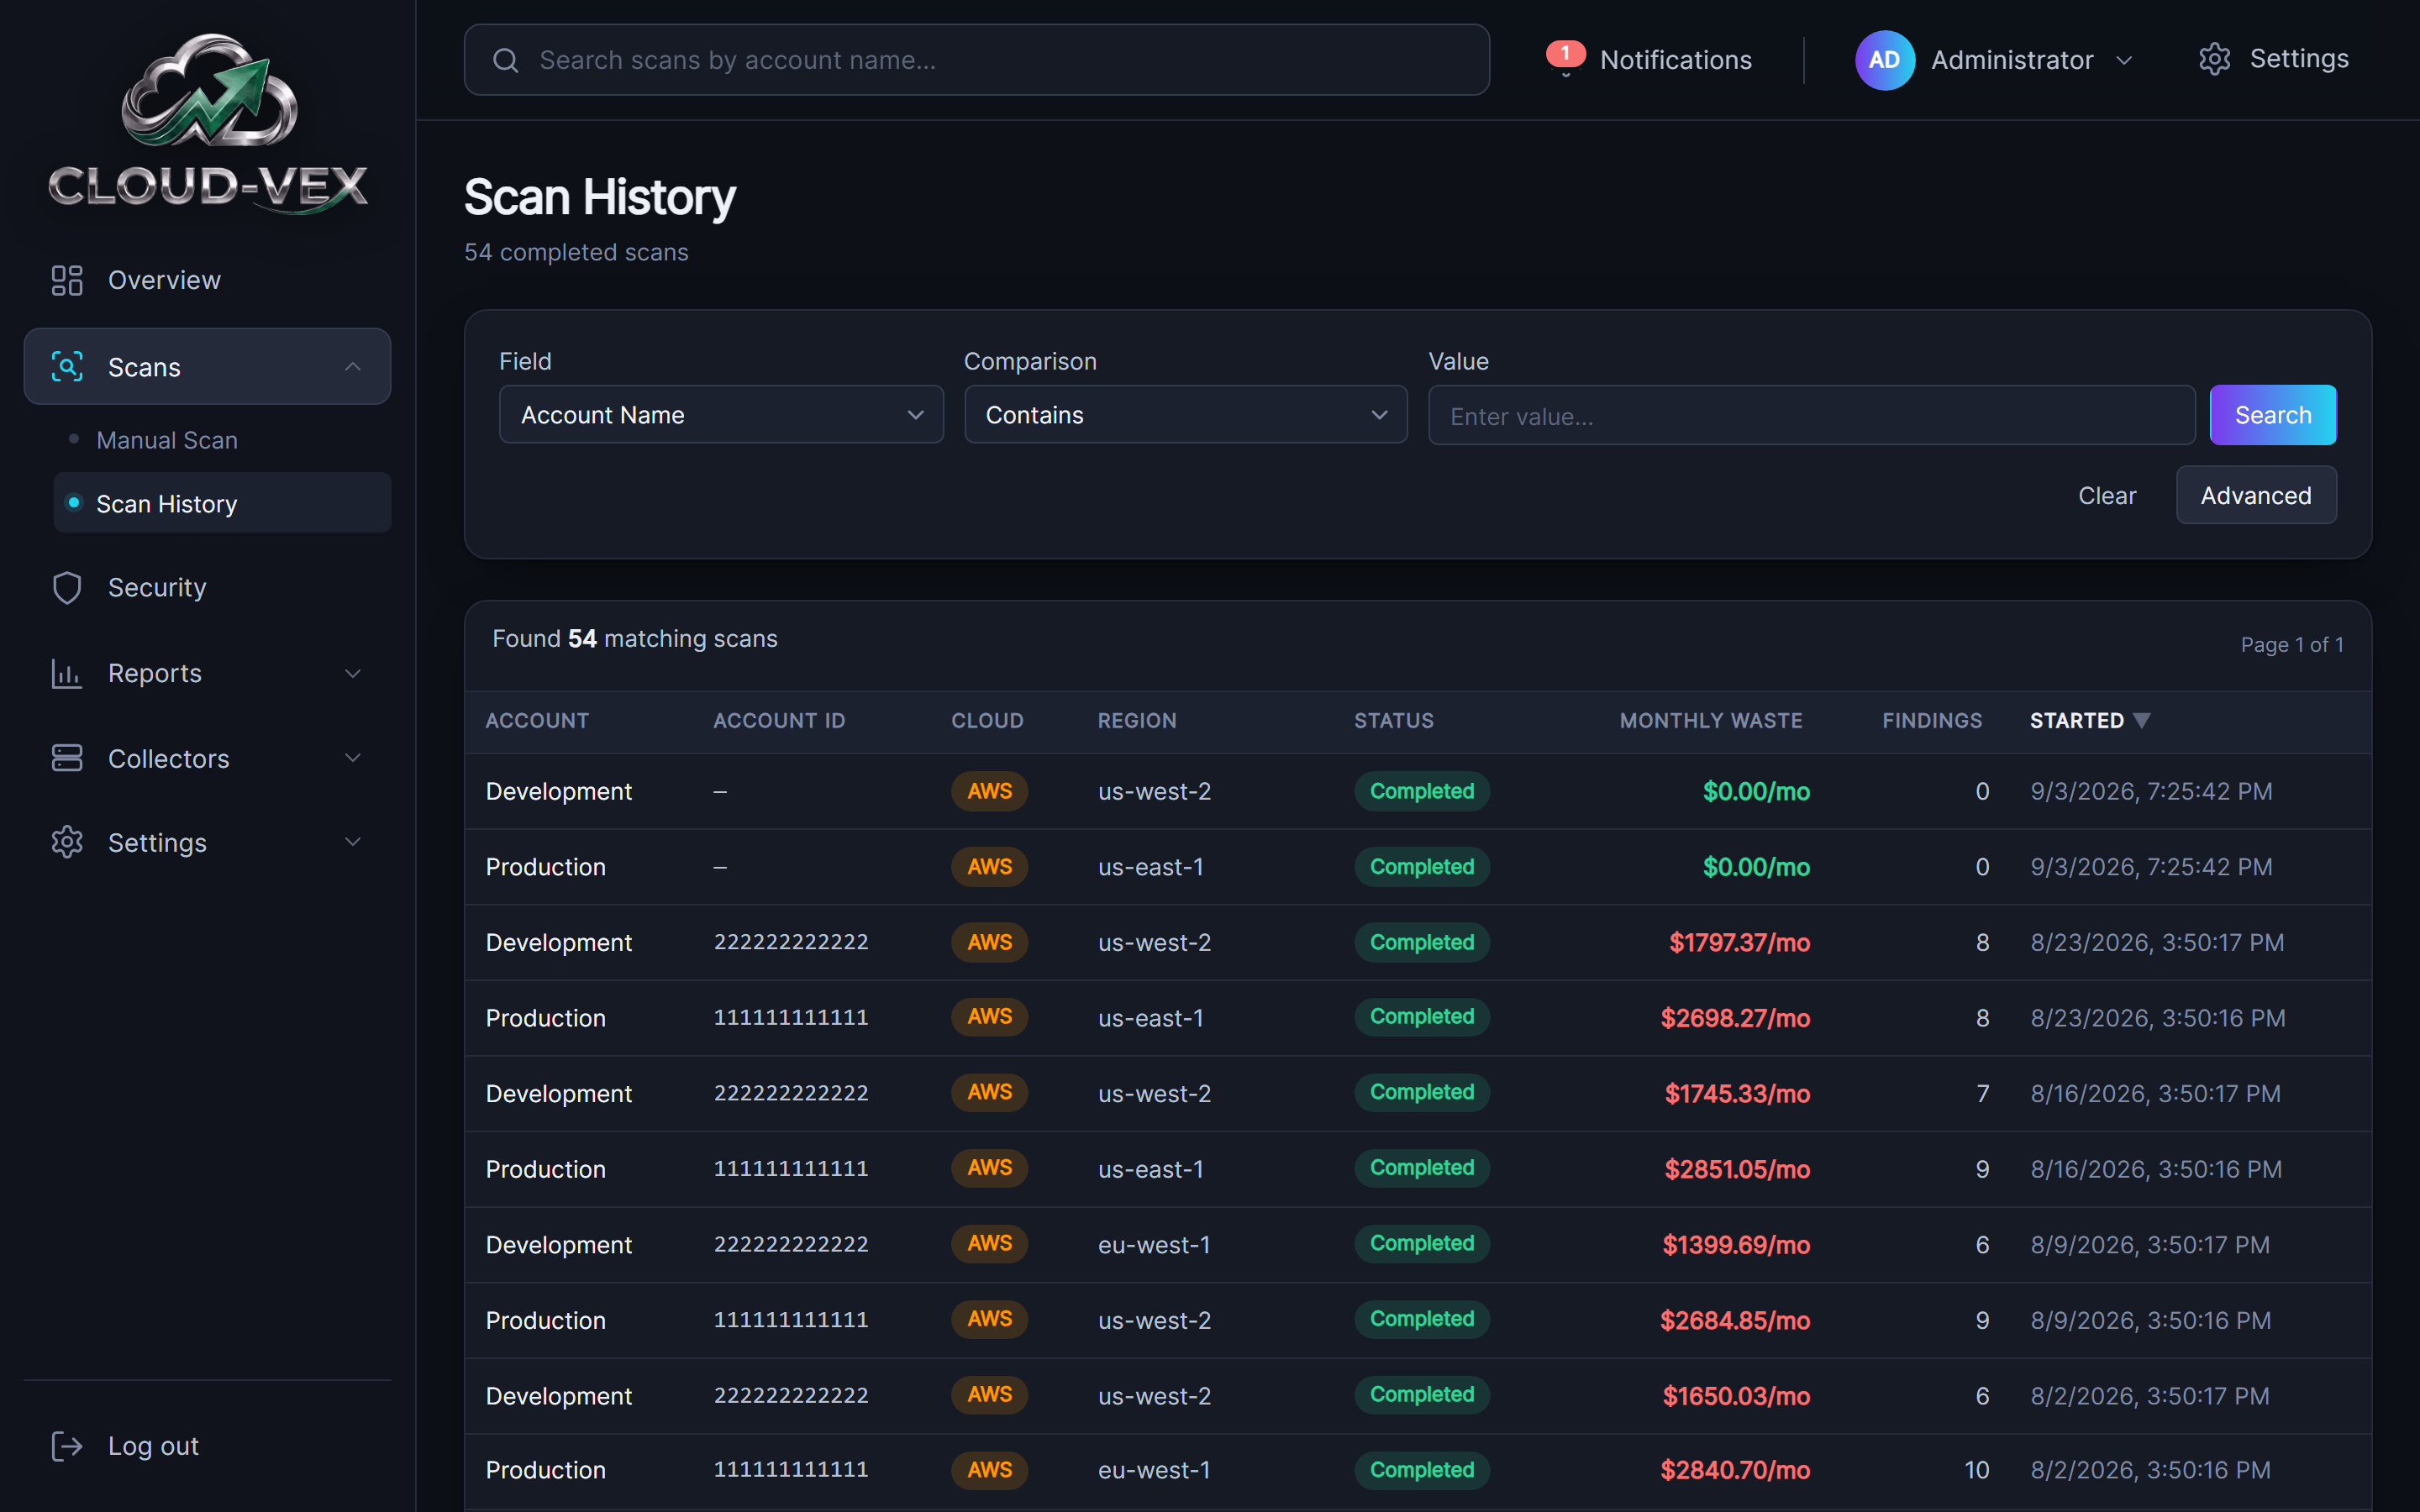
The full scan log — every scan that's ever run, not just the six most recent shown on Overview, filterable by field (including an Owner/Team tag, for cost attribution) and searchable. Every column header sorts the table — click anywhere on it, not just the label. Clicking into a row opens that scan's details.
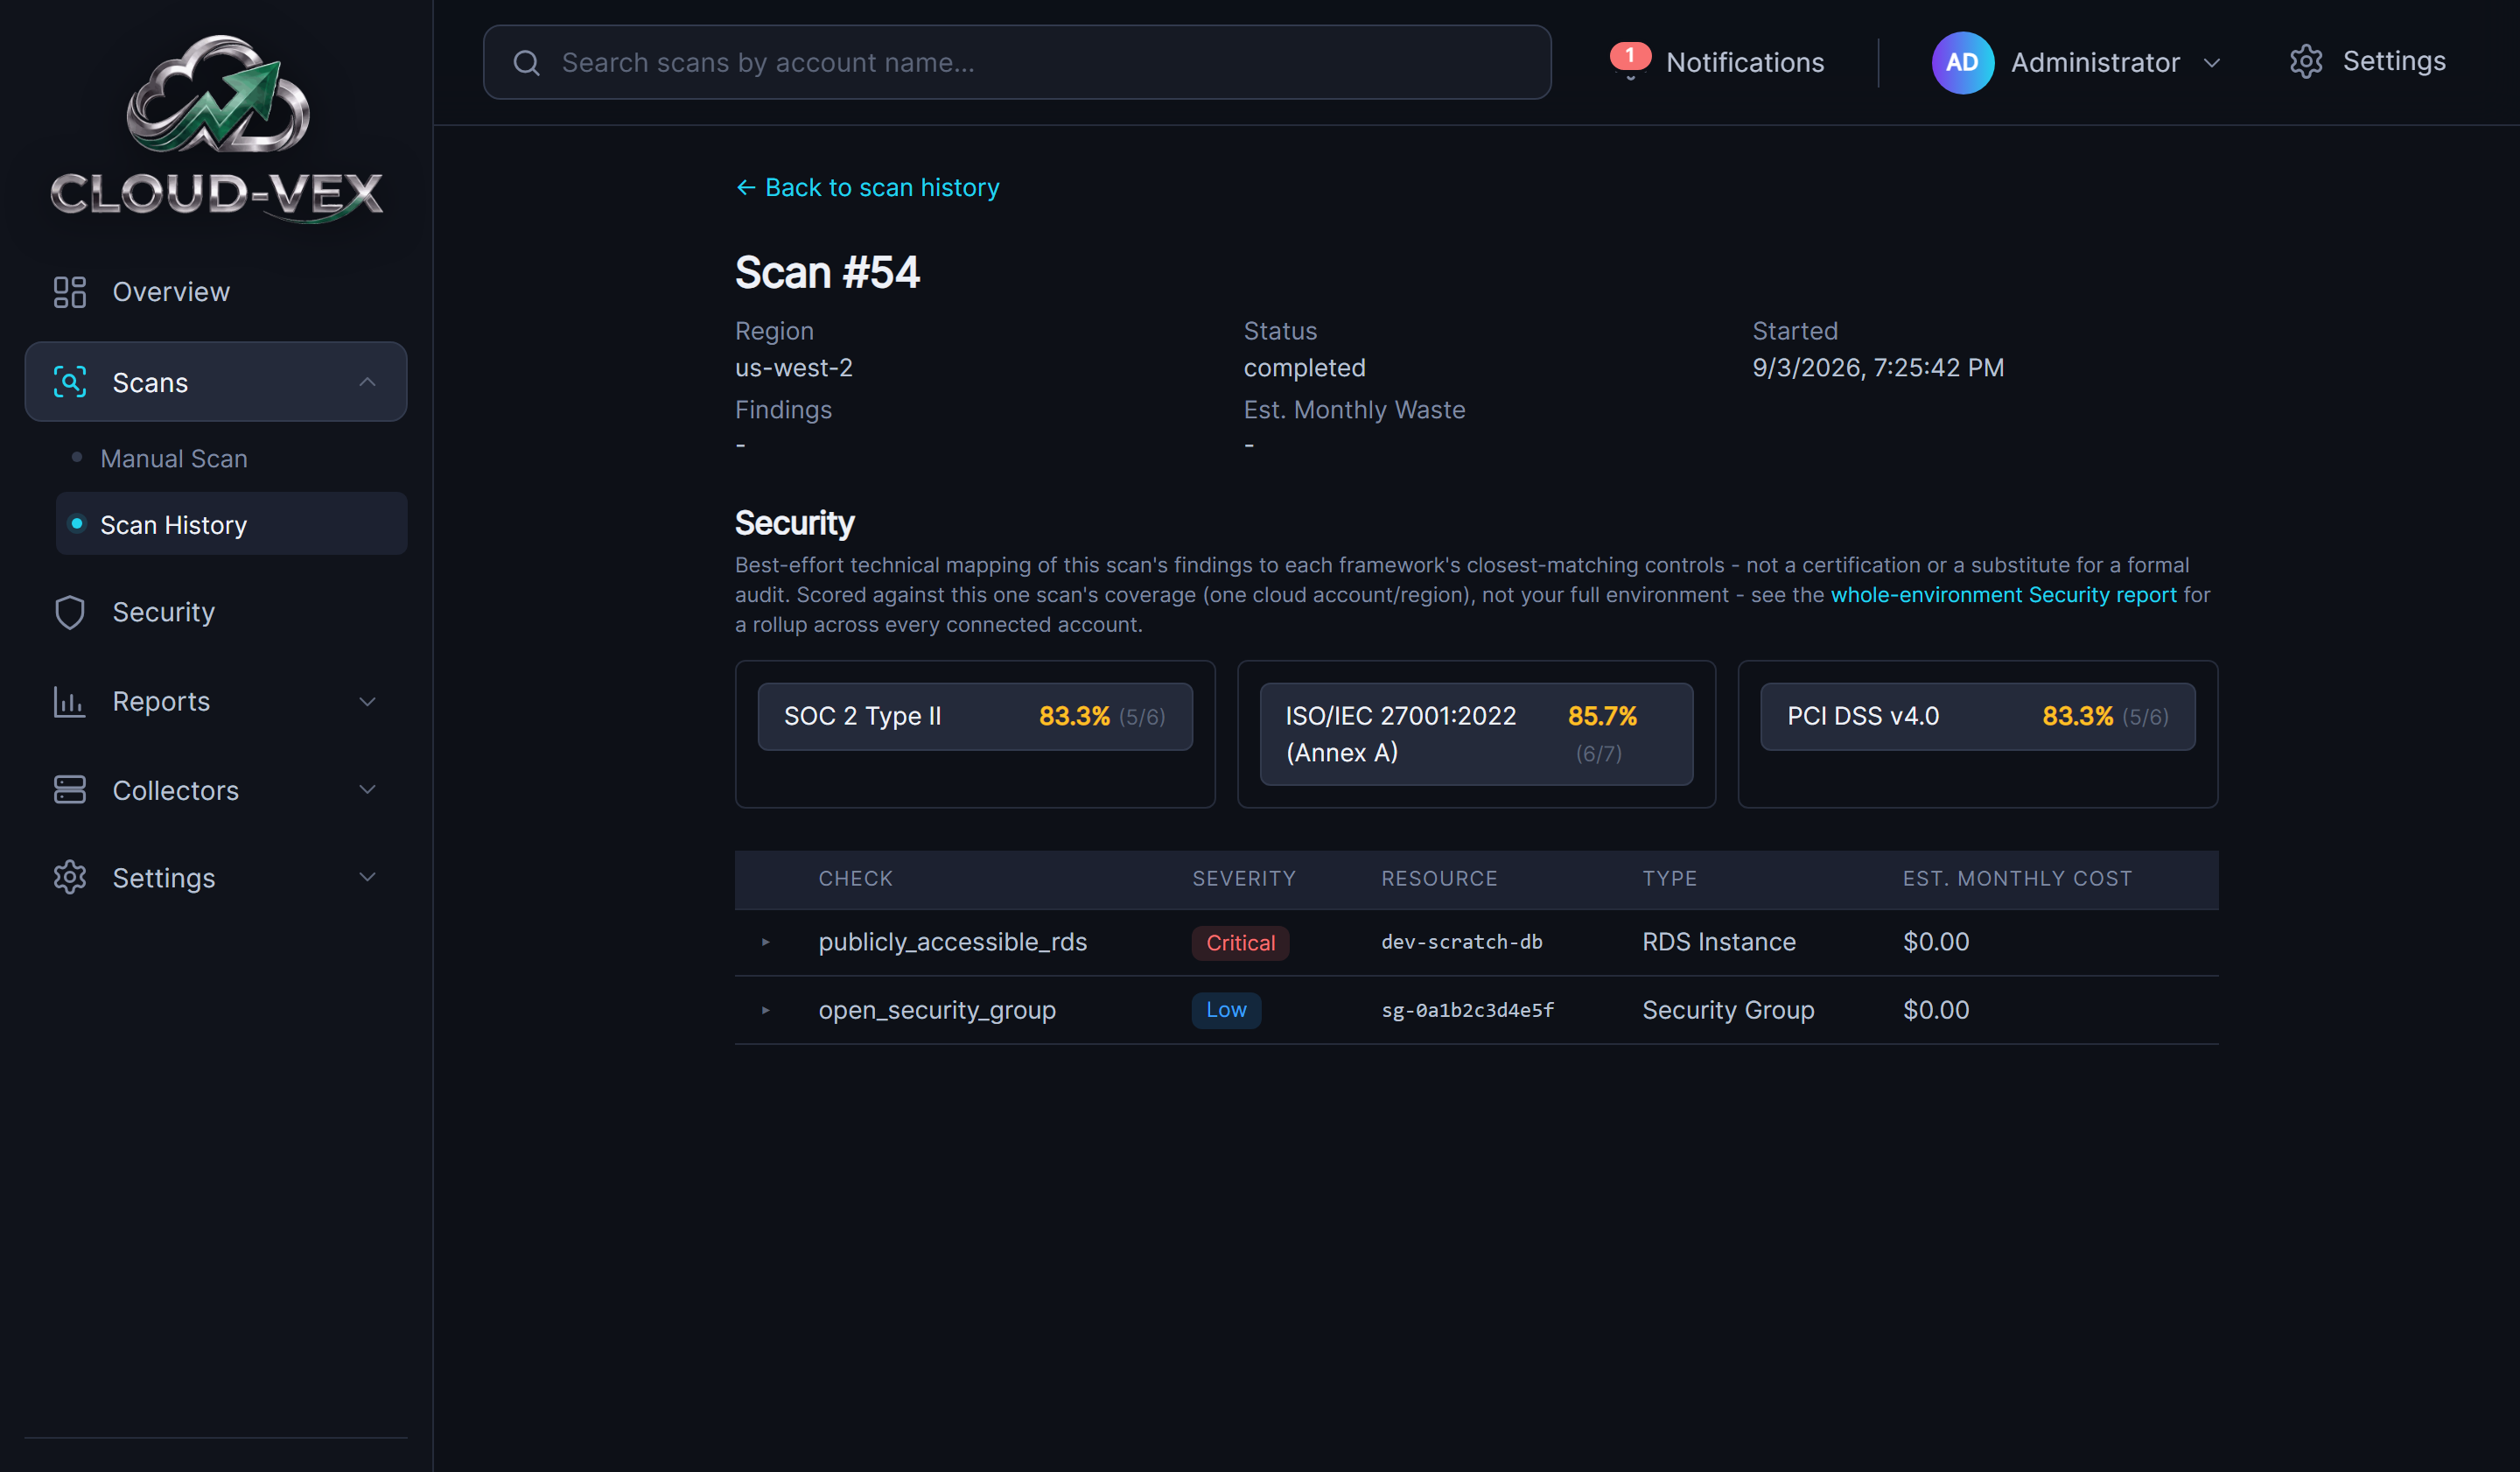
A single scan's detail view: the scan's own summary, a per-scan Security mapping (scored against this one scan's coverage only — see the Security Report for the whole-environment rollup), and a findings table with a severity badge per finding. Click a row to expand it into Detail and Remediation instead of showing them as their own columns.
7. Security
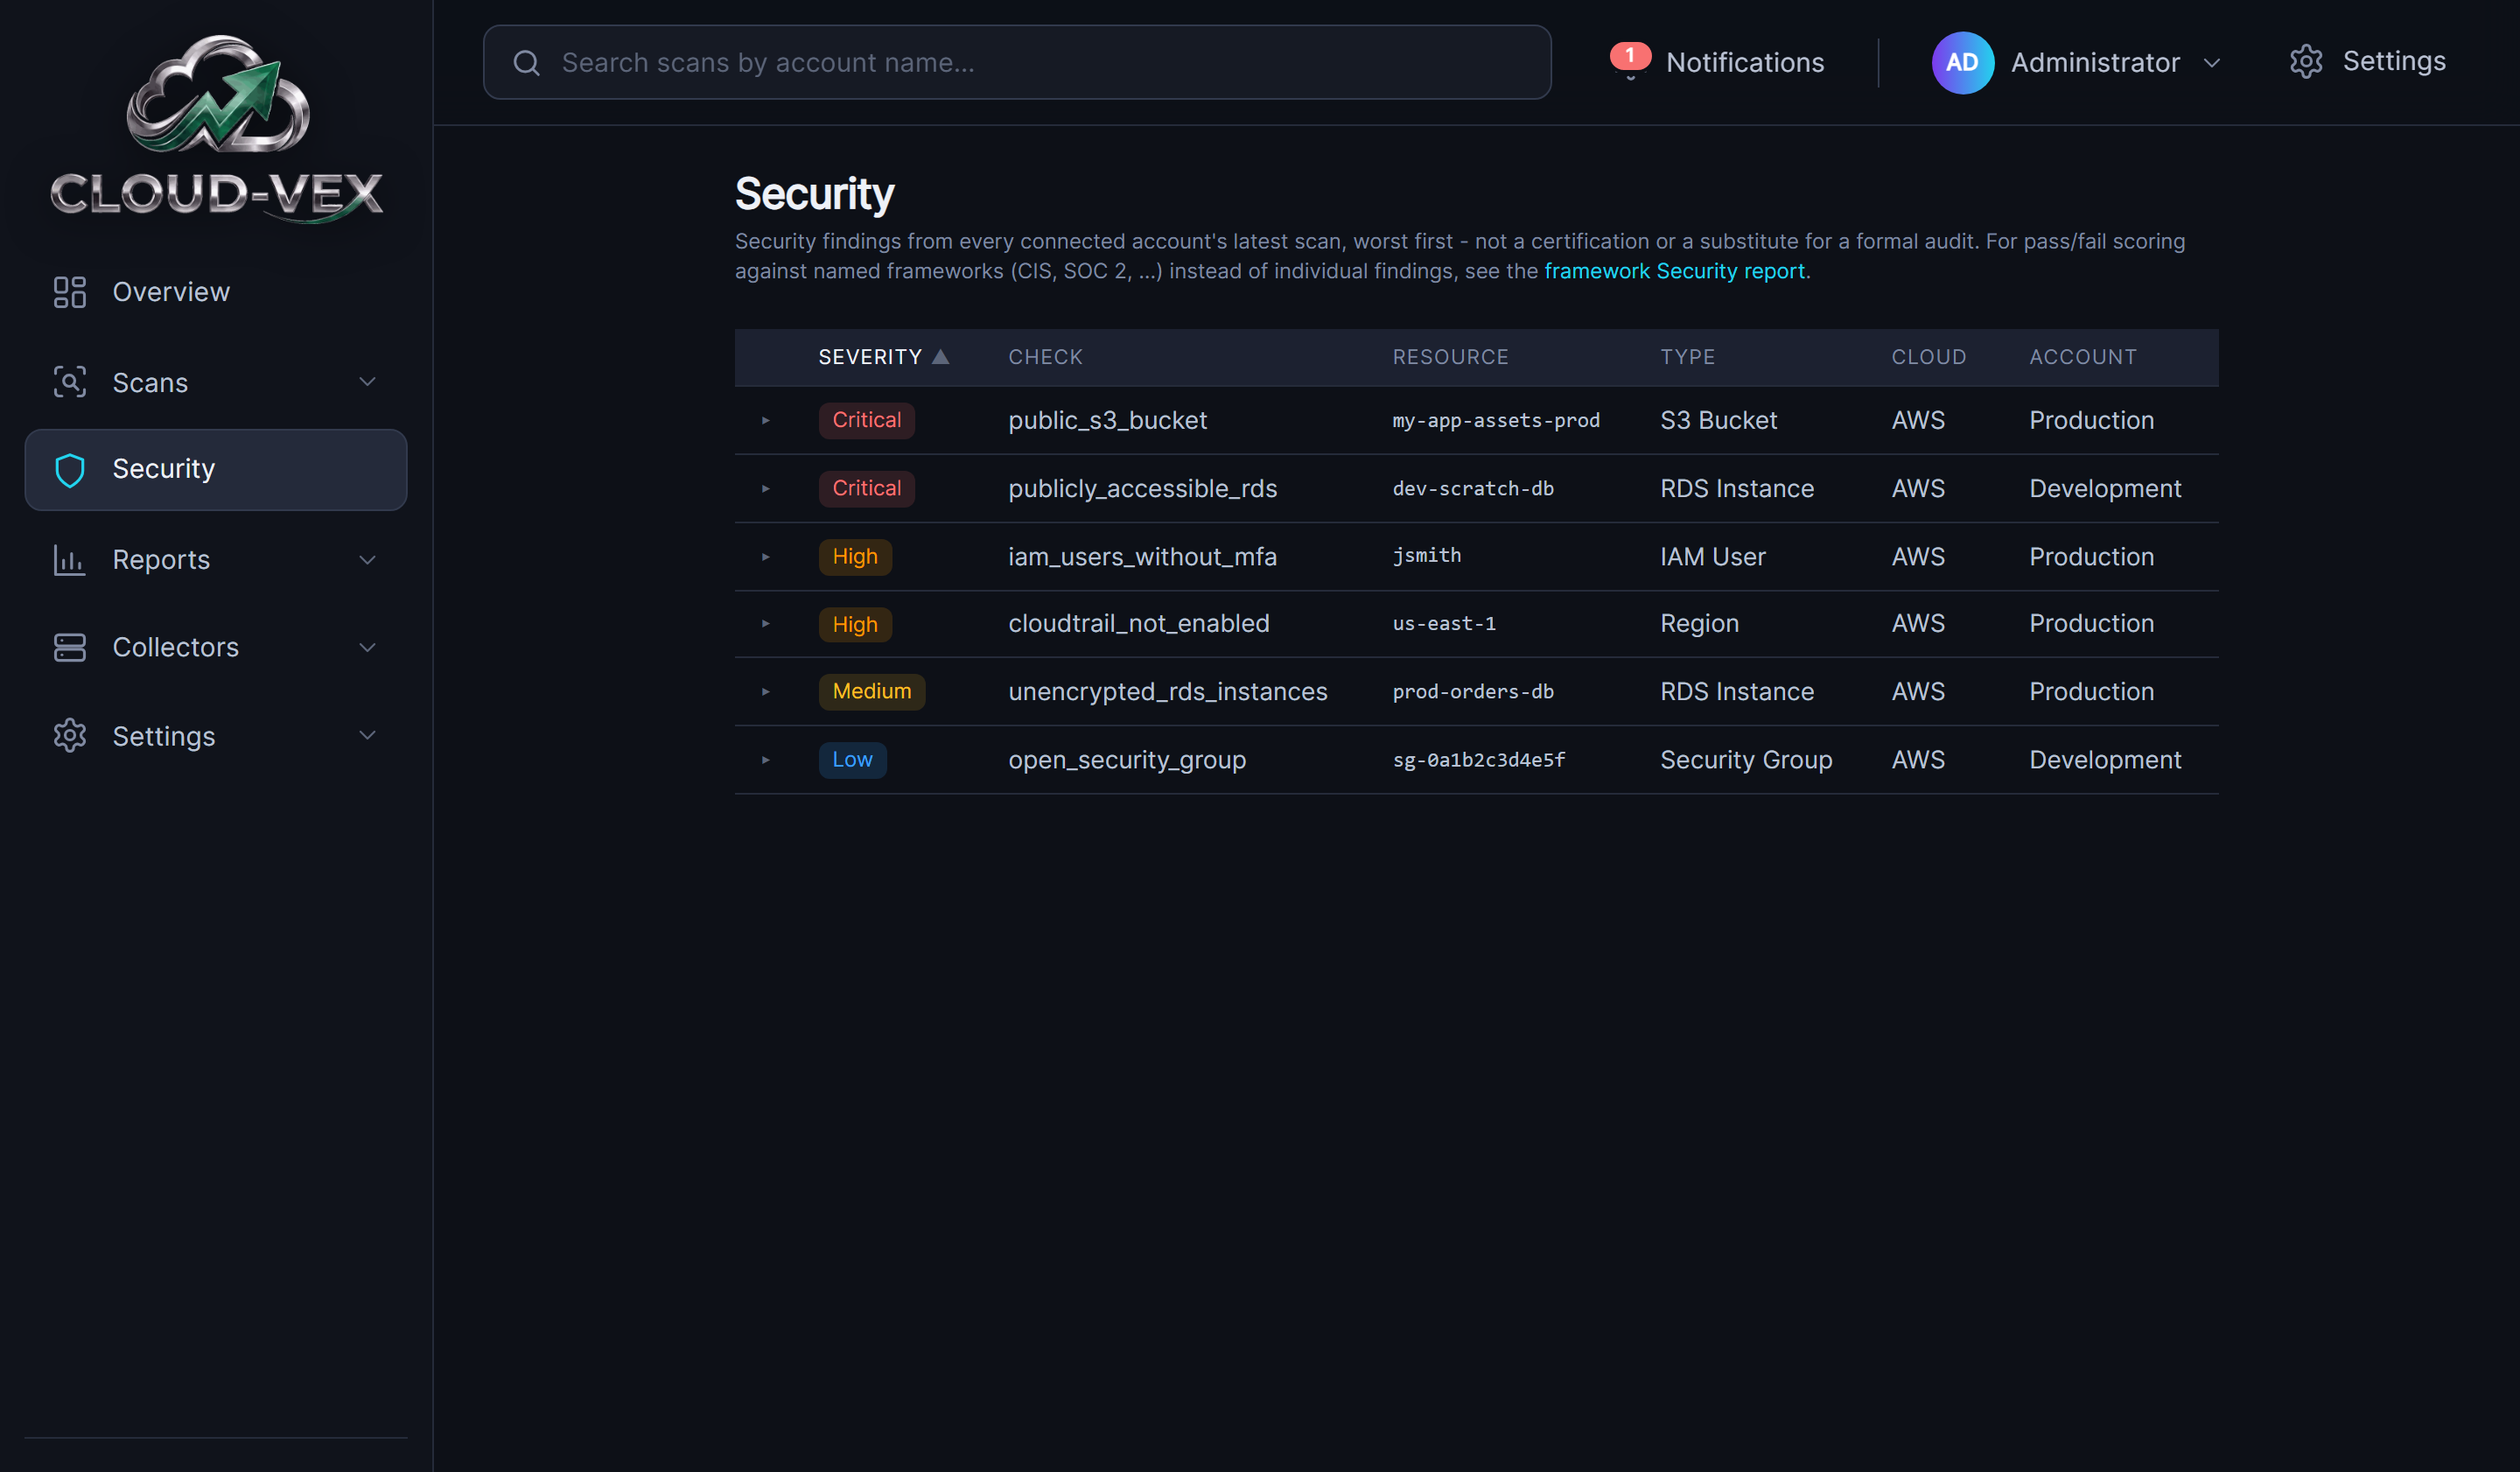
A single, whole-environment list of security findings — every connected account's latest scan, worst severity first. Not a certification or a substitute for a formal audit. Click a row to expand it into Detail and Remediation, the same pattern as a scan's own findings table, and sort by severity, check, resource, type, cloud, or account. For pass/fail scoring against named frameworks (SOC 2, ISO/IEC 27001, PCI DSS) instead of individual findings, see the Security Report.
8. Reports
Six persona-oriented reports, built from the same live scan and security data as the rest of the app — not a separate snapshot. Every report shares the same layout (summary metrics, a table or chart, and a short Key Insights callout) and the same Export PDF button, which renders a true vector PDF server-side — the CloudVex logo, brand colors, and real charts, not a screenshot of the page.
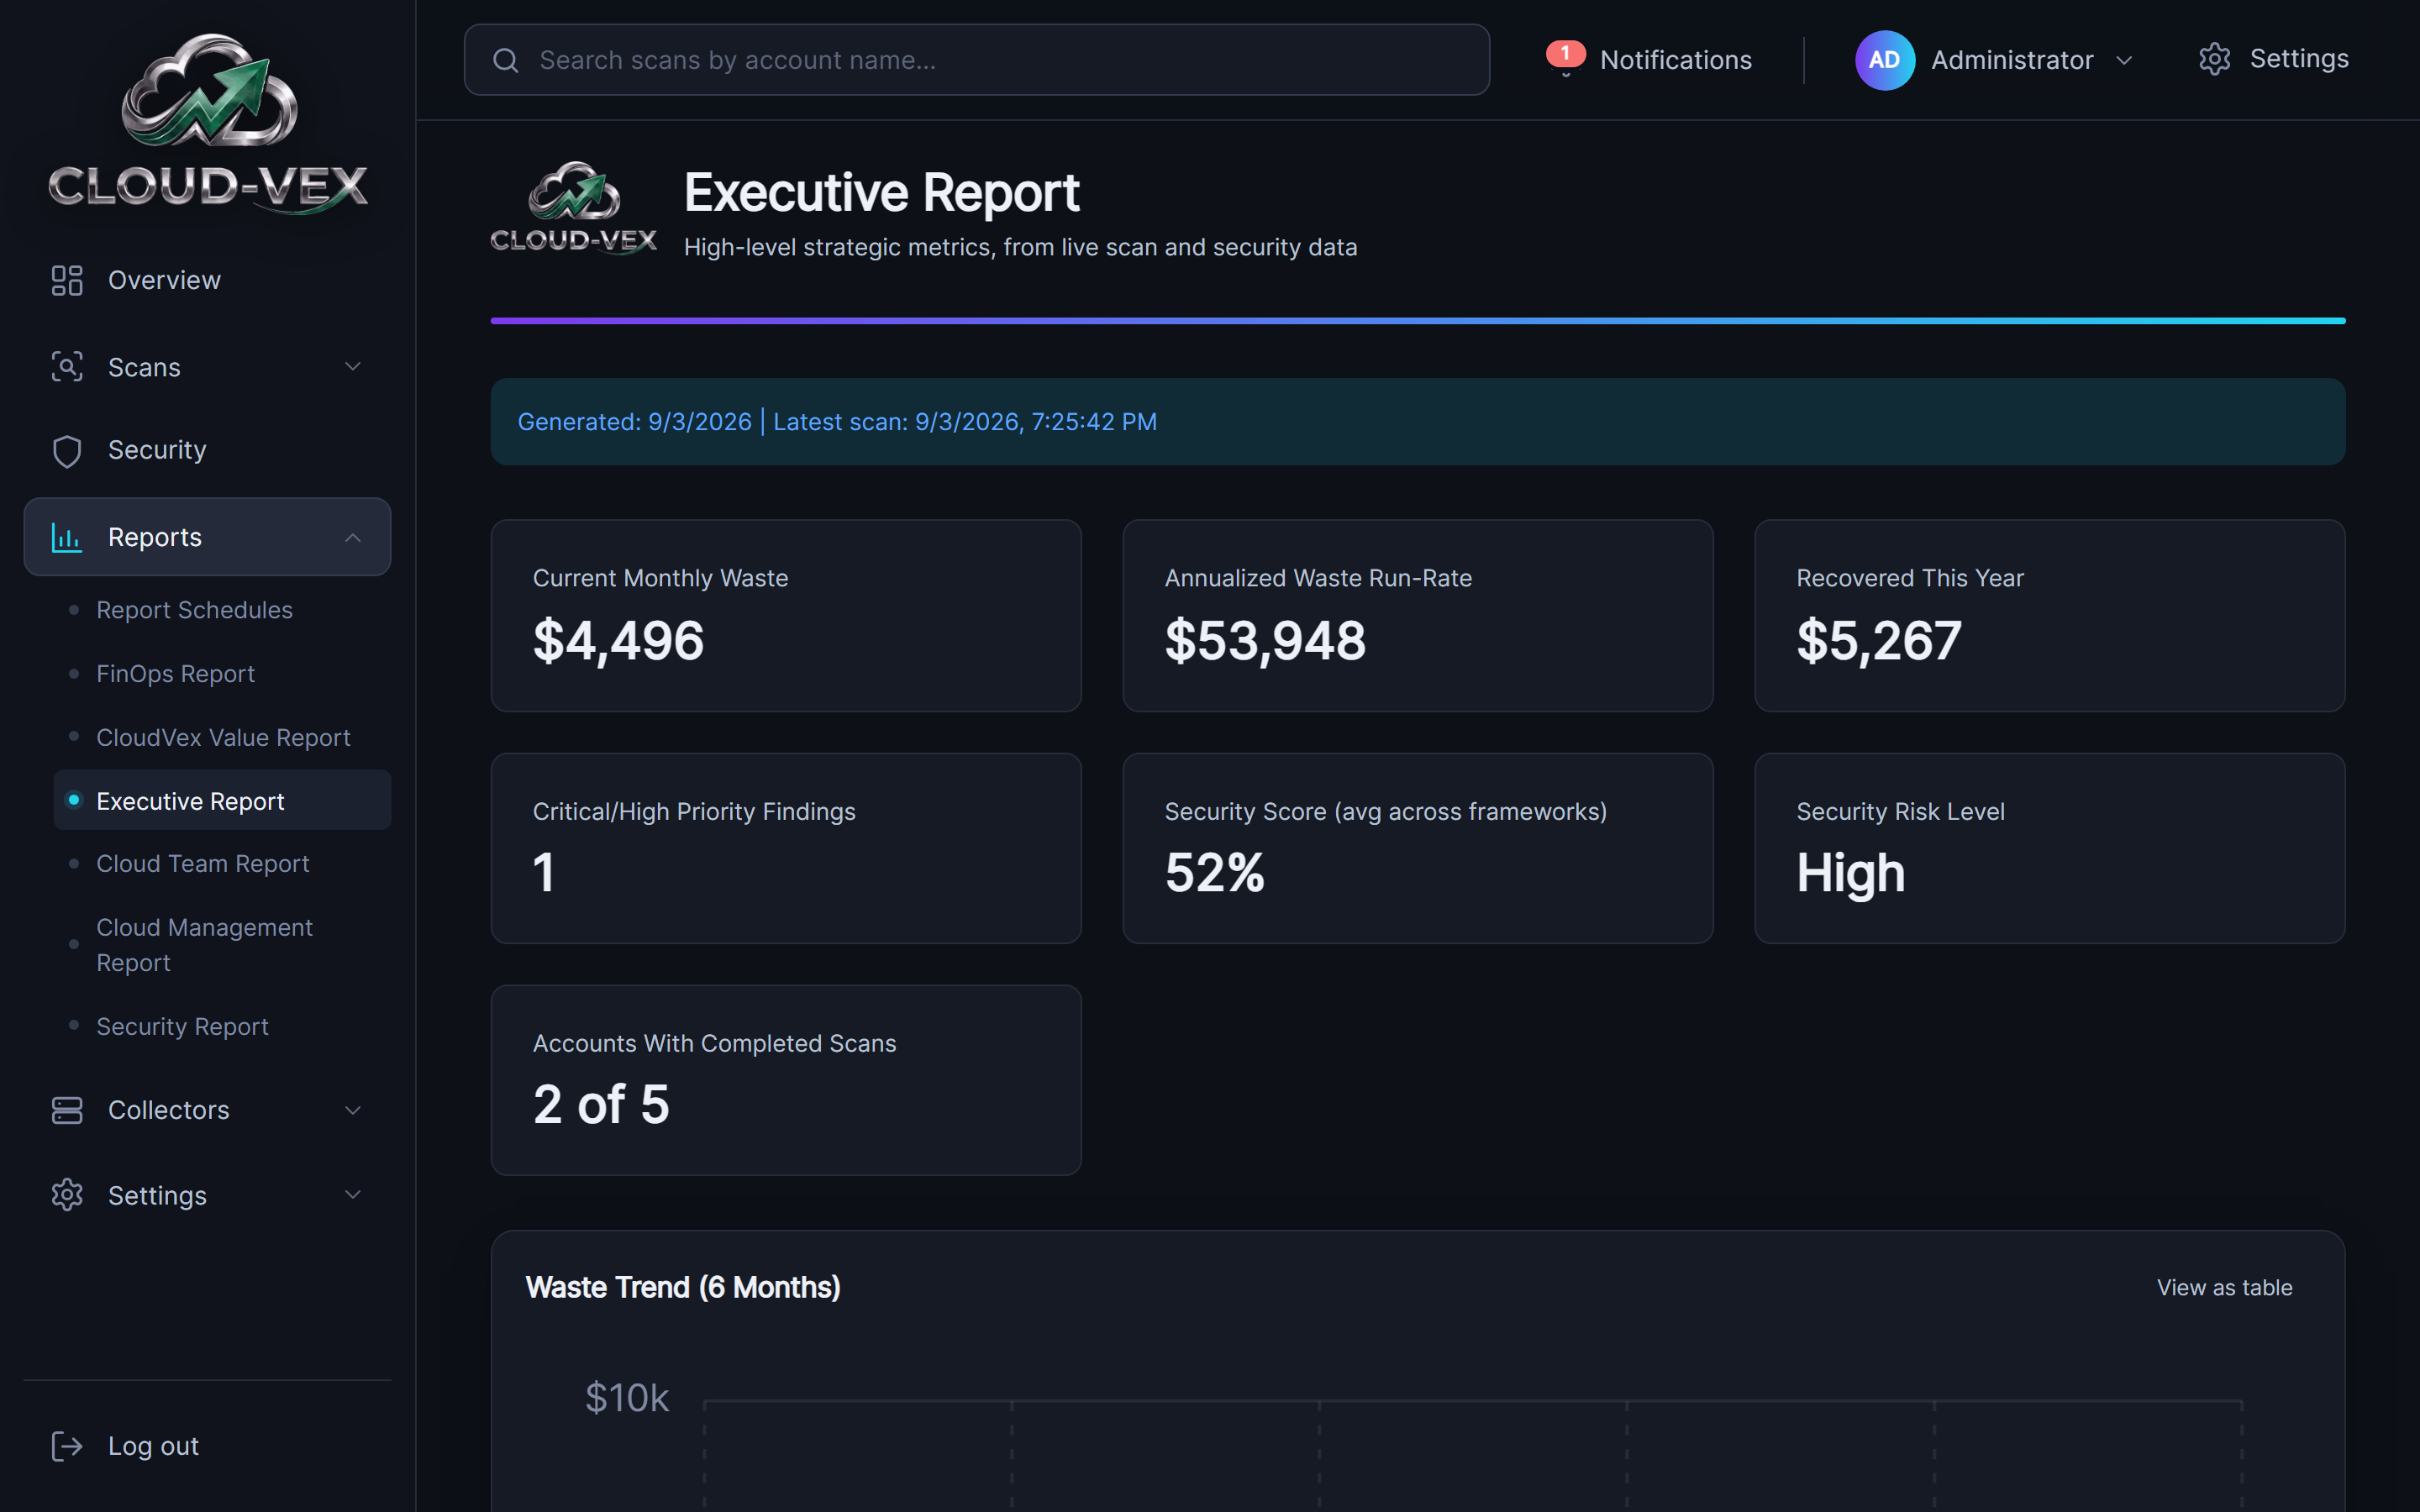
Report Schedules
Under Reports › Report Schedules, above the six reports themselves in the nav. Automatically generates and emails one or more of the reports below on a recurring basis, using the server configured under Configure SMTP — a schedule that isn't sending yet flags that plainly rather than failing silently. New Schedule opens a form: a name, which report(s) to include, one or more recipient email addresses, and a cadence (hourly through monthly, at a specific time in UTC). Each schedule's row shows its cadence in plain English and when it last sent; Send Now triggers an out-of-cycle send immediately, without waiting for or disturbing its normal schedule.
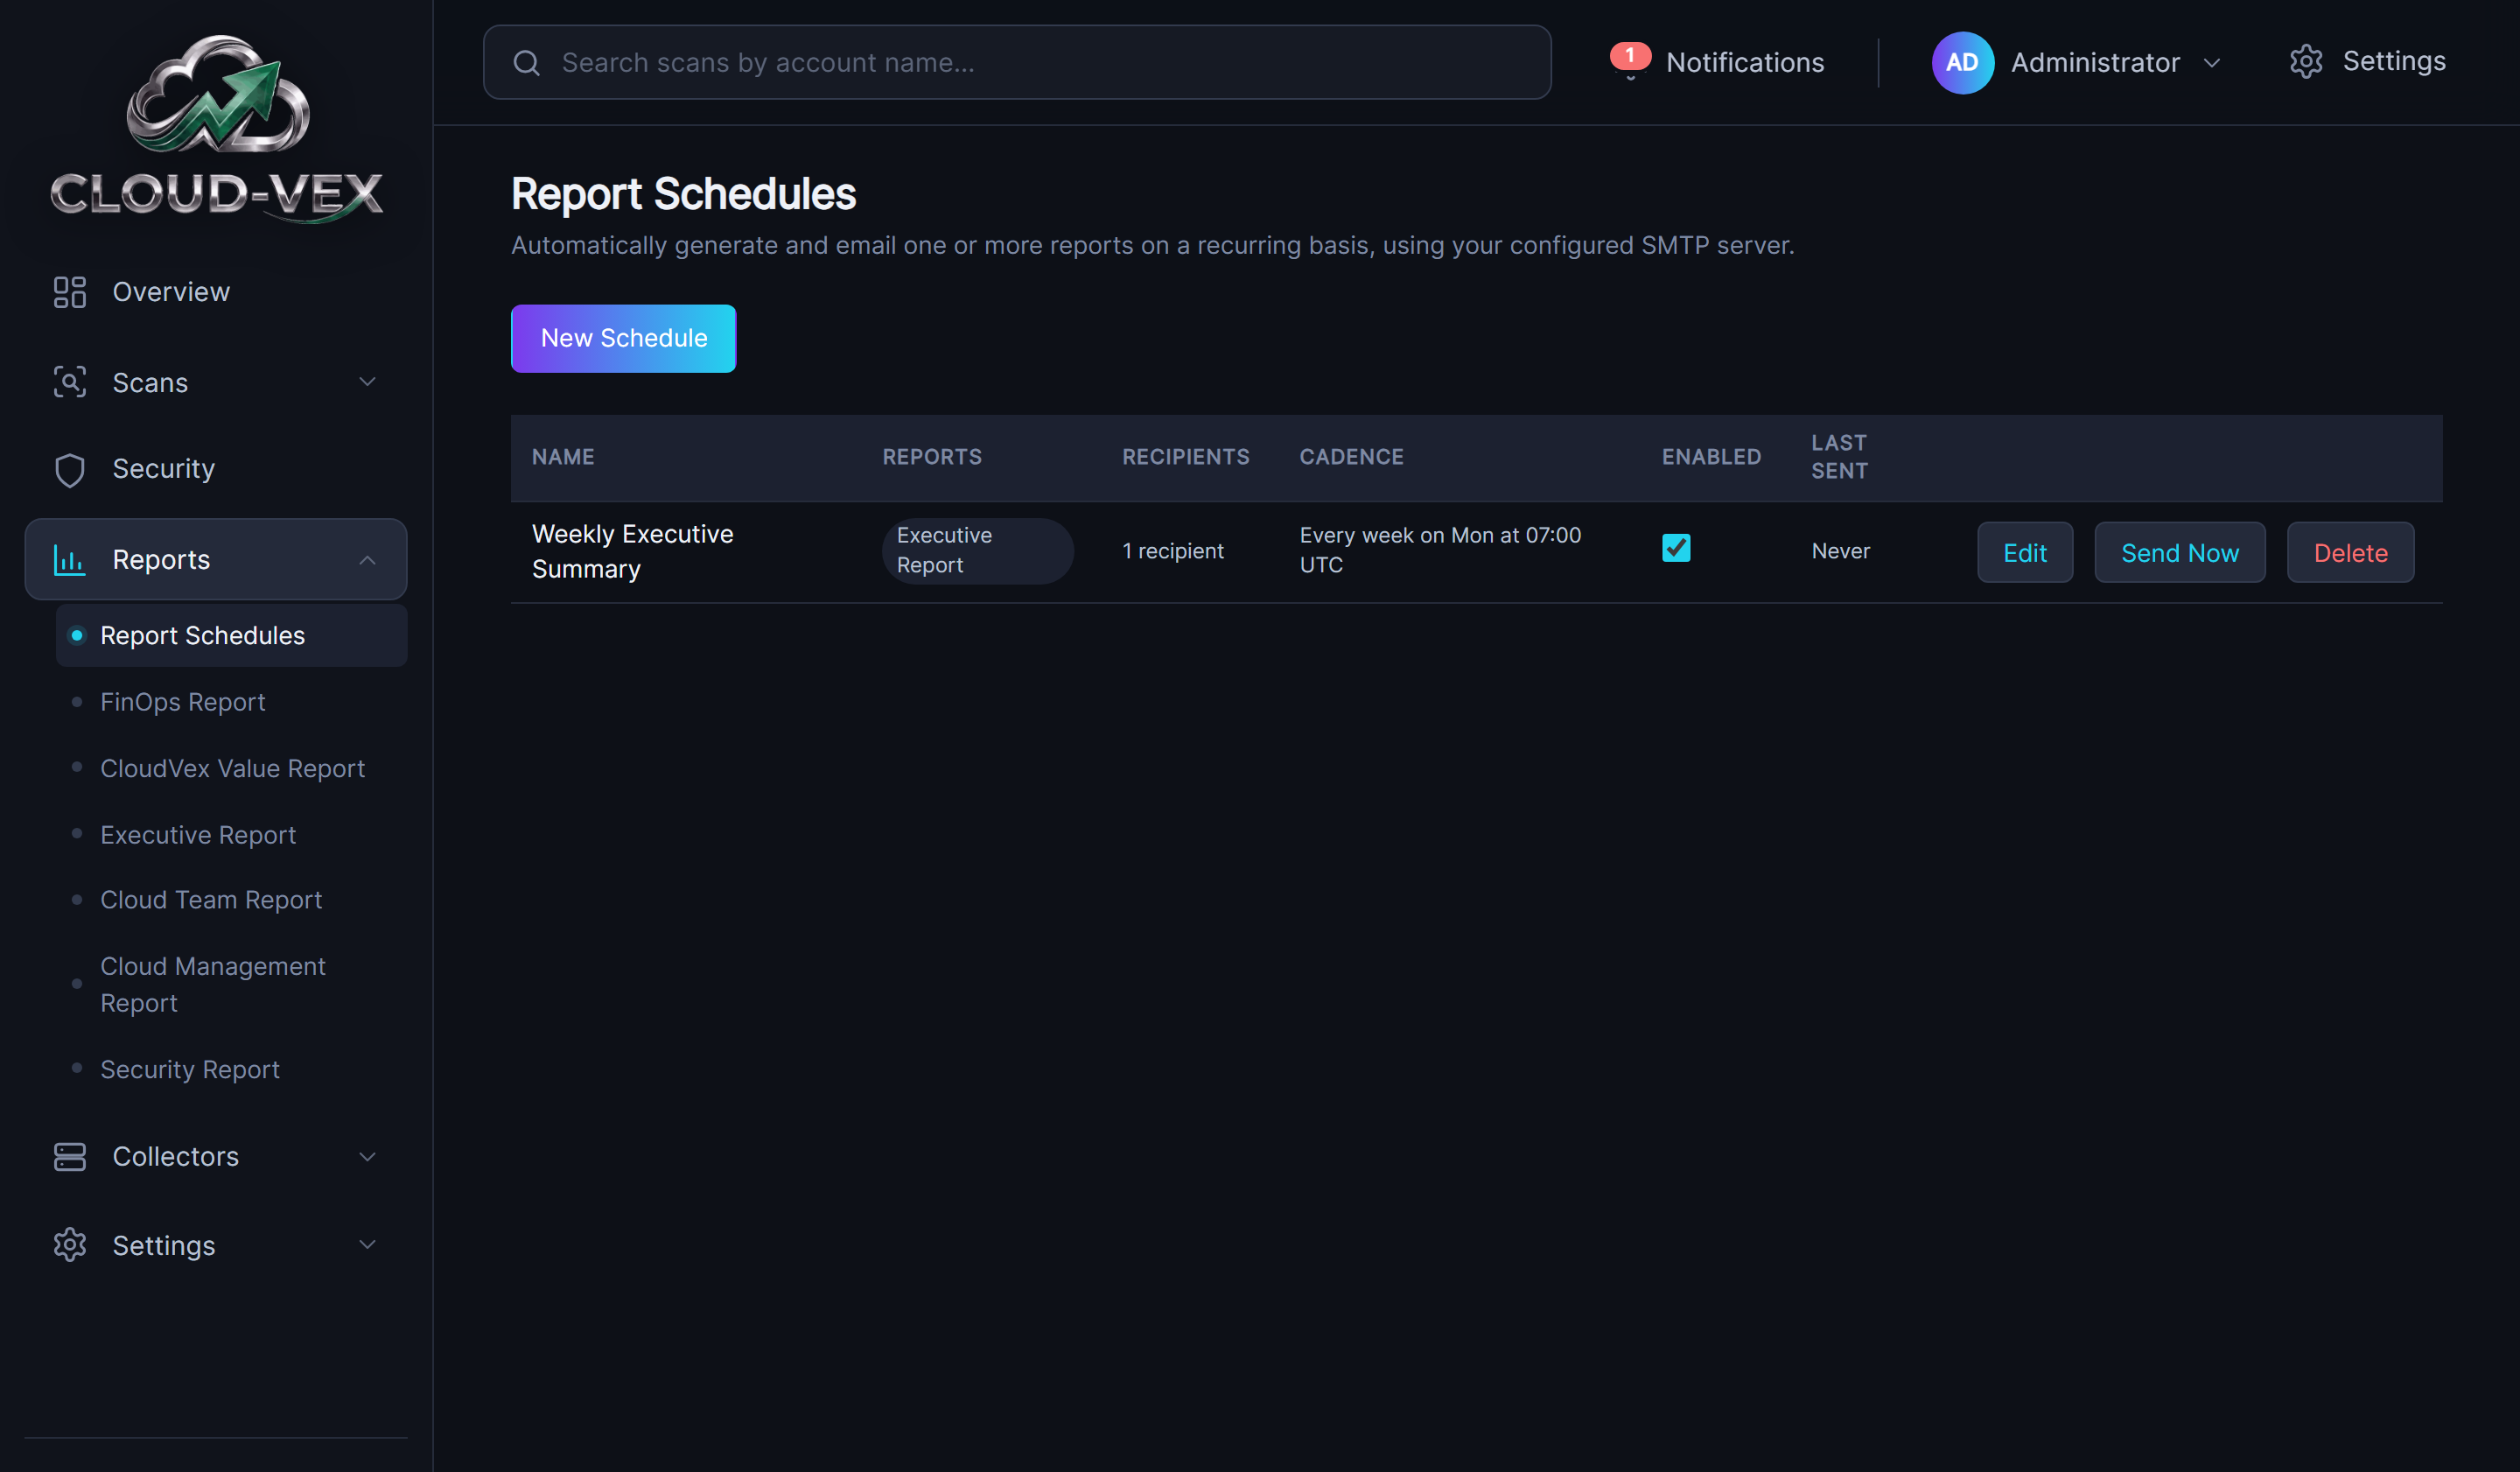
FinOps Report
Monthly cost analysis and optimization opportunities: current monthly waste, waste recovered this year and to date, open findings, and an annualized run-rate, plus a waste-and-recovery trend chart, top cost drivers by resource type, and the specific findings behind those numbers.
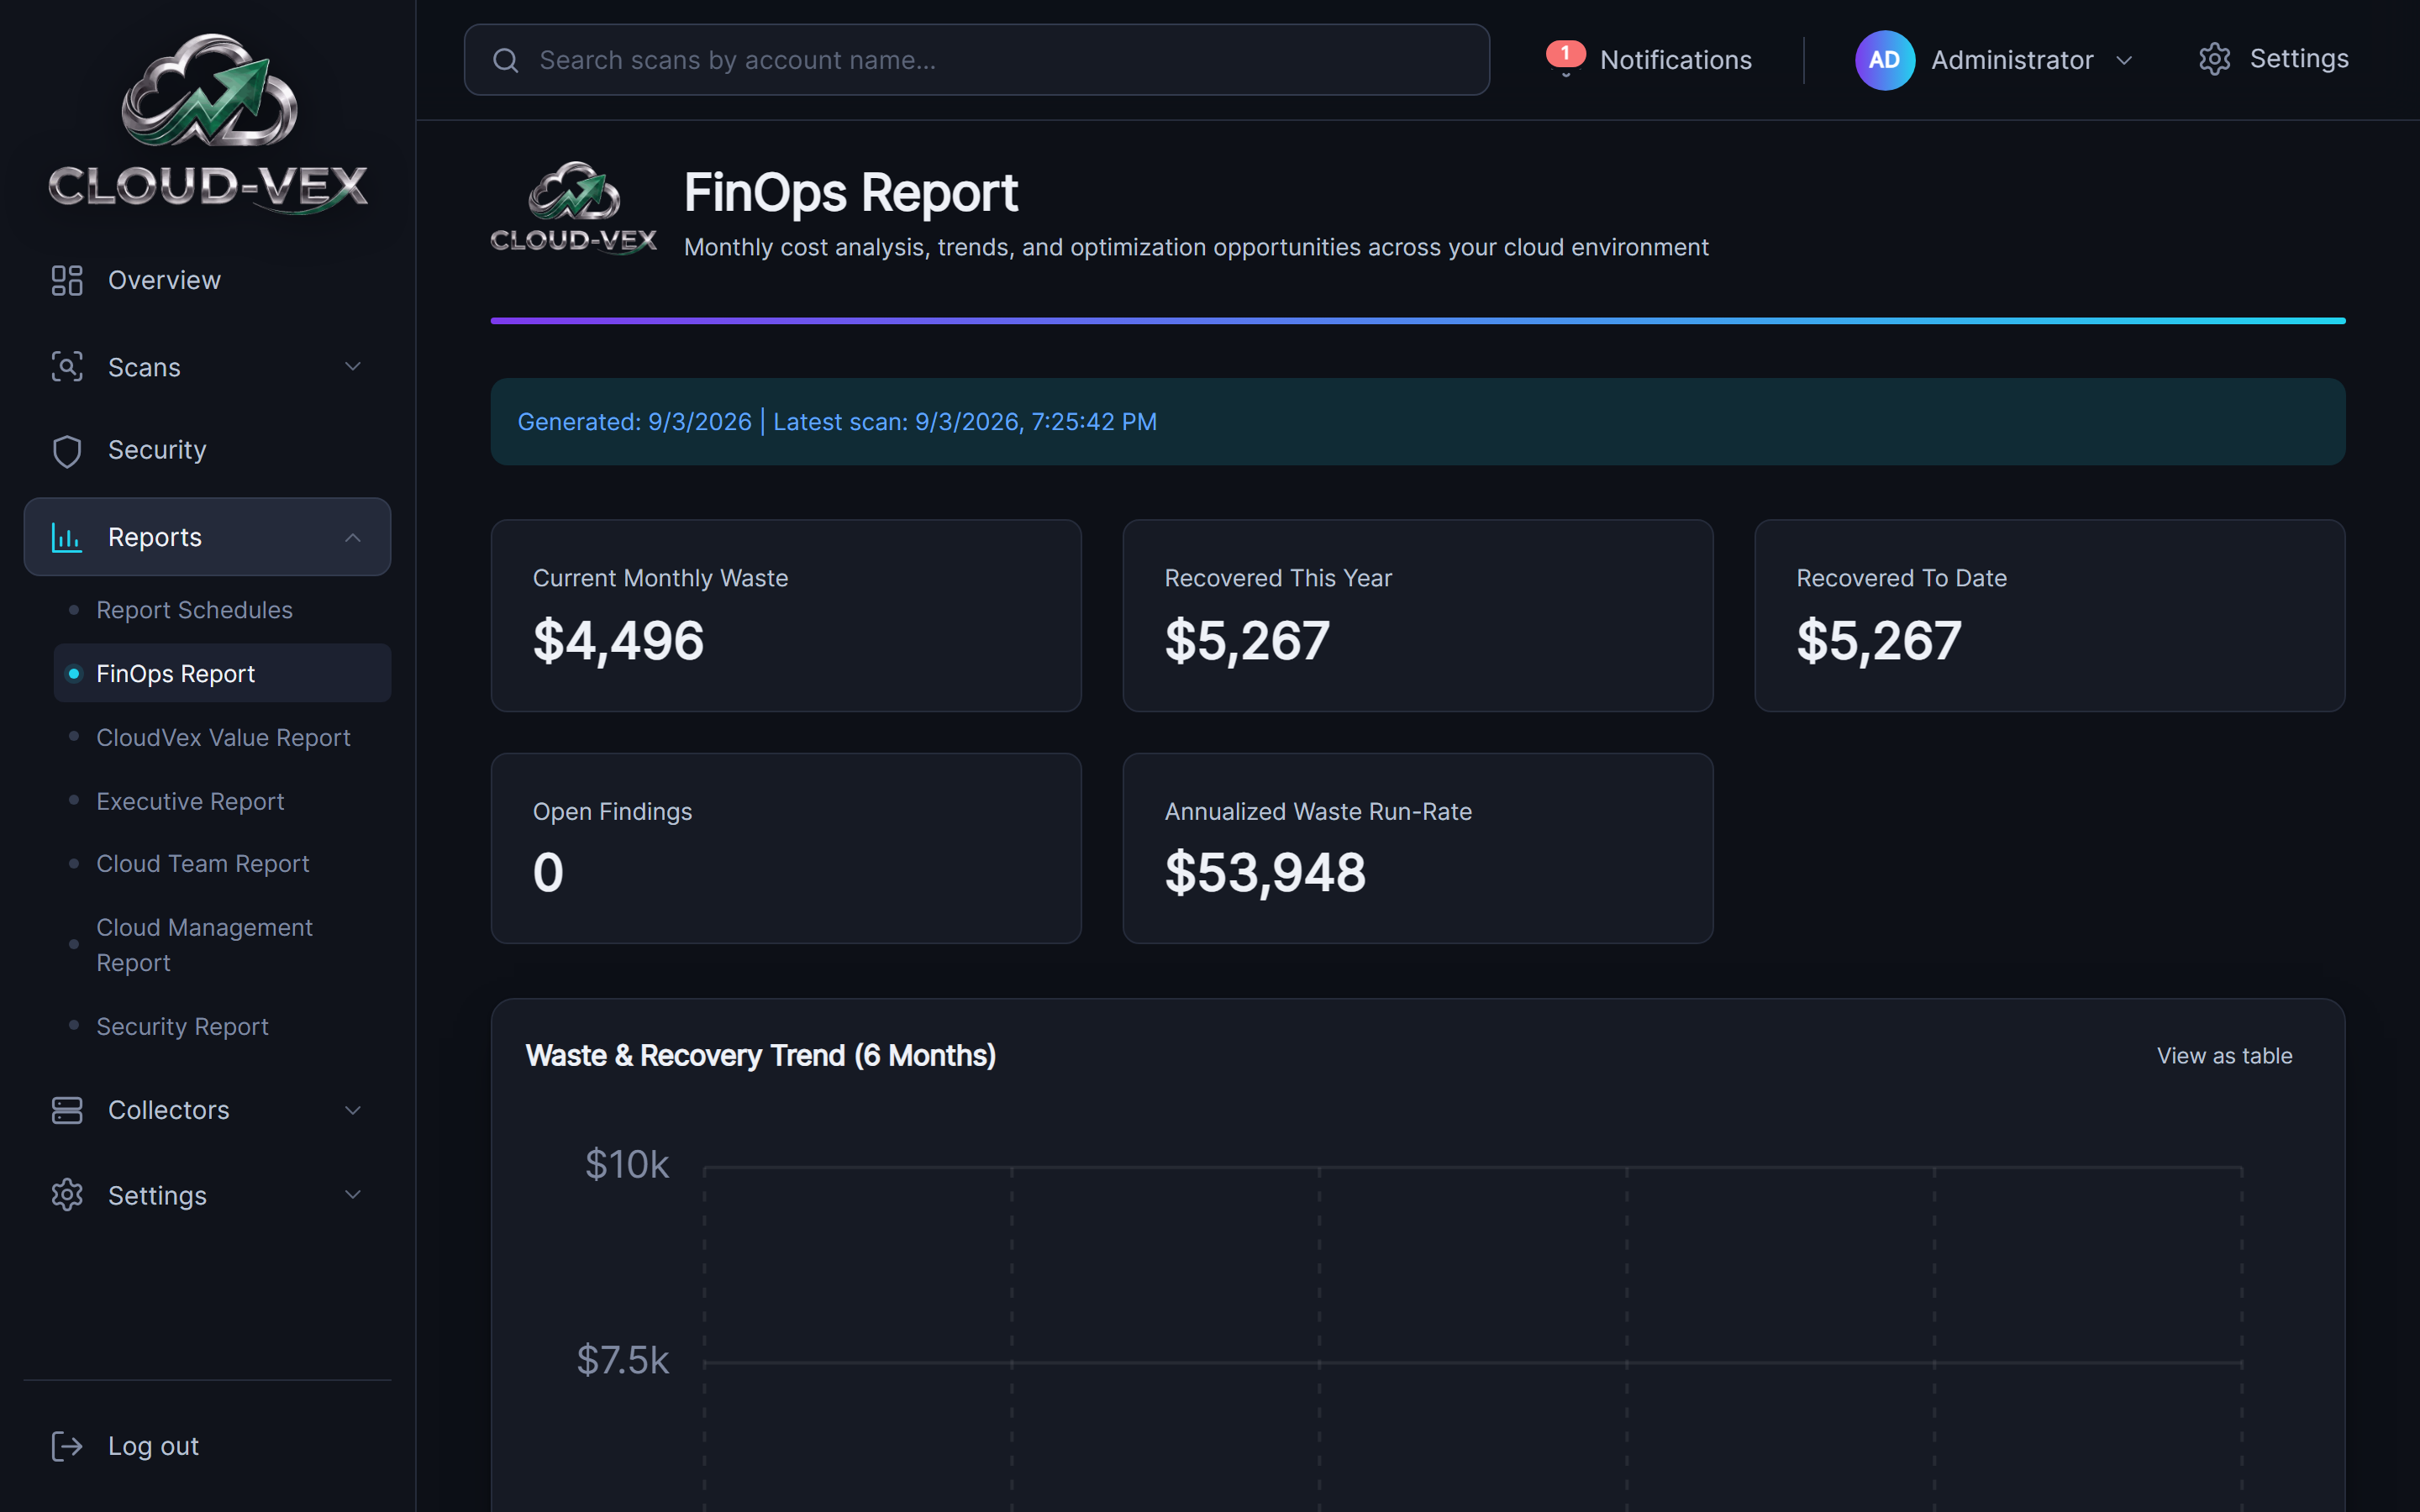
CloudVex Value Report
The measurable value CloudVex itself has delivered: automated checks running per scan, total scans run, waste recovered to date and this year, accounts under management, and cumulative findings surfaced, plus a value-delivered-over-time chart and an environment-growth chart showing accounts onboarded over time.
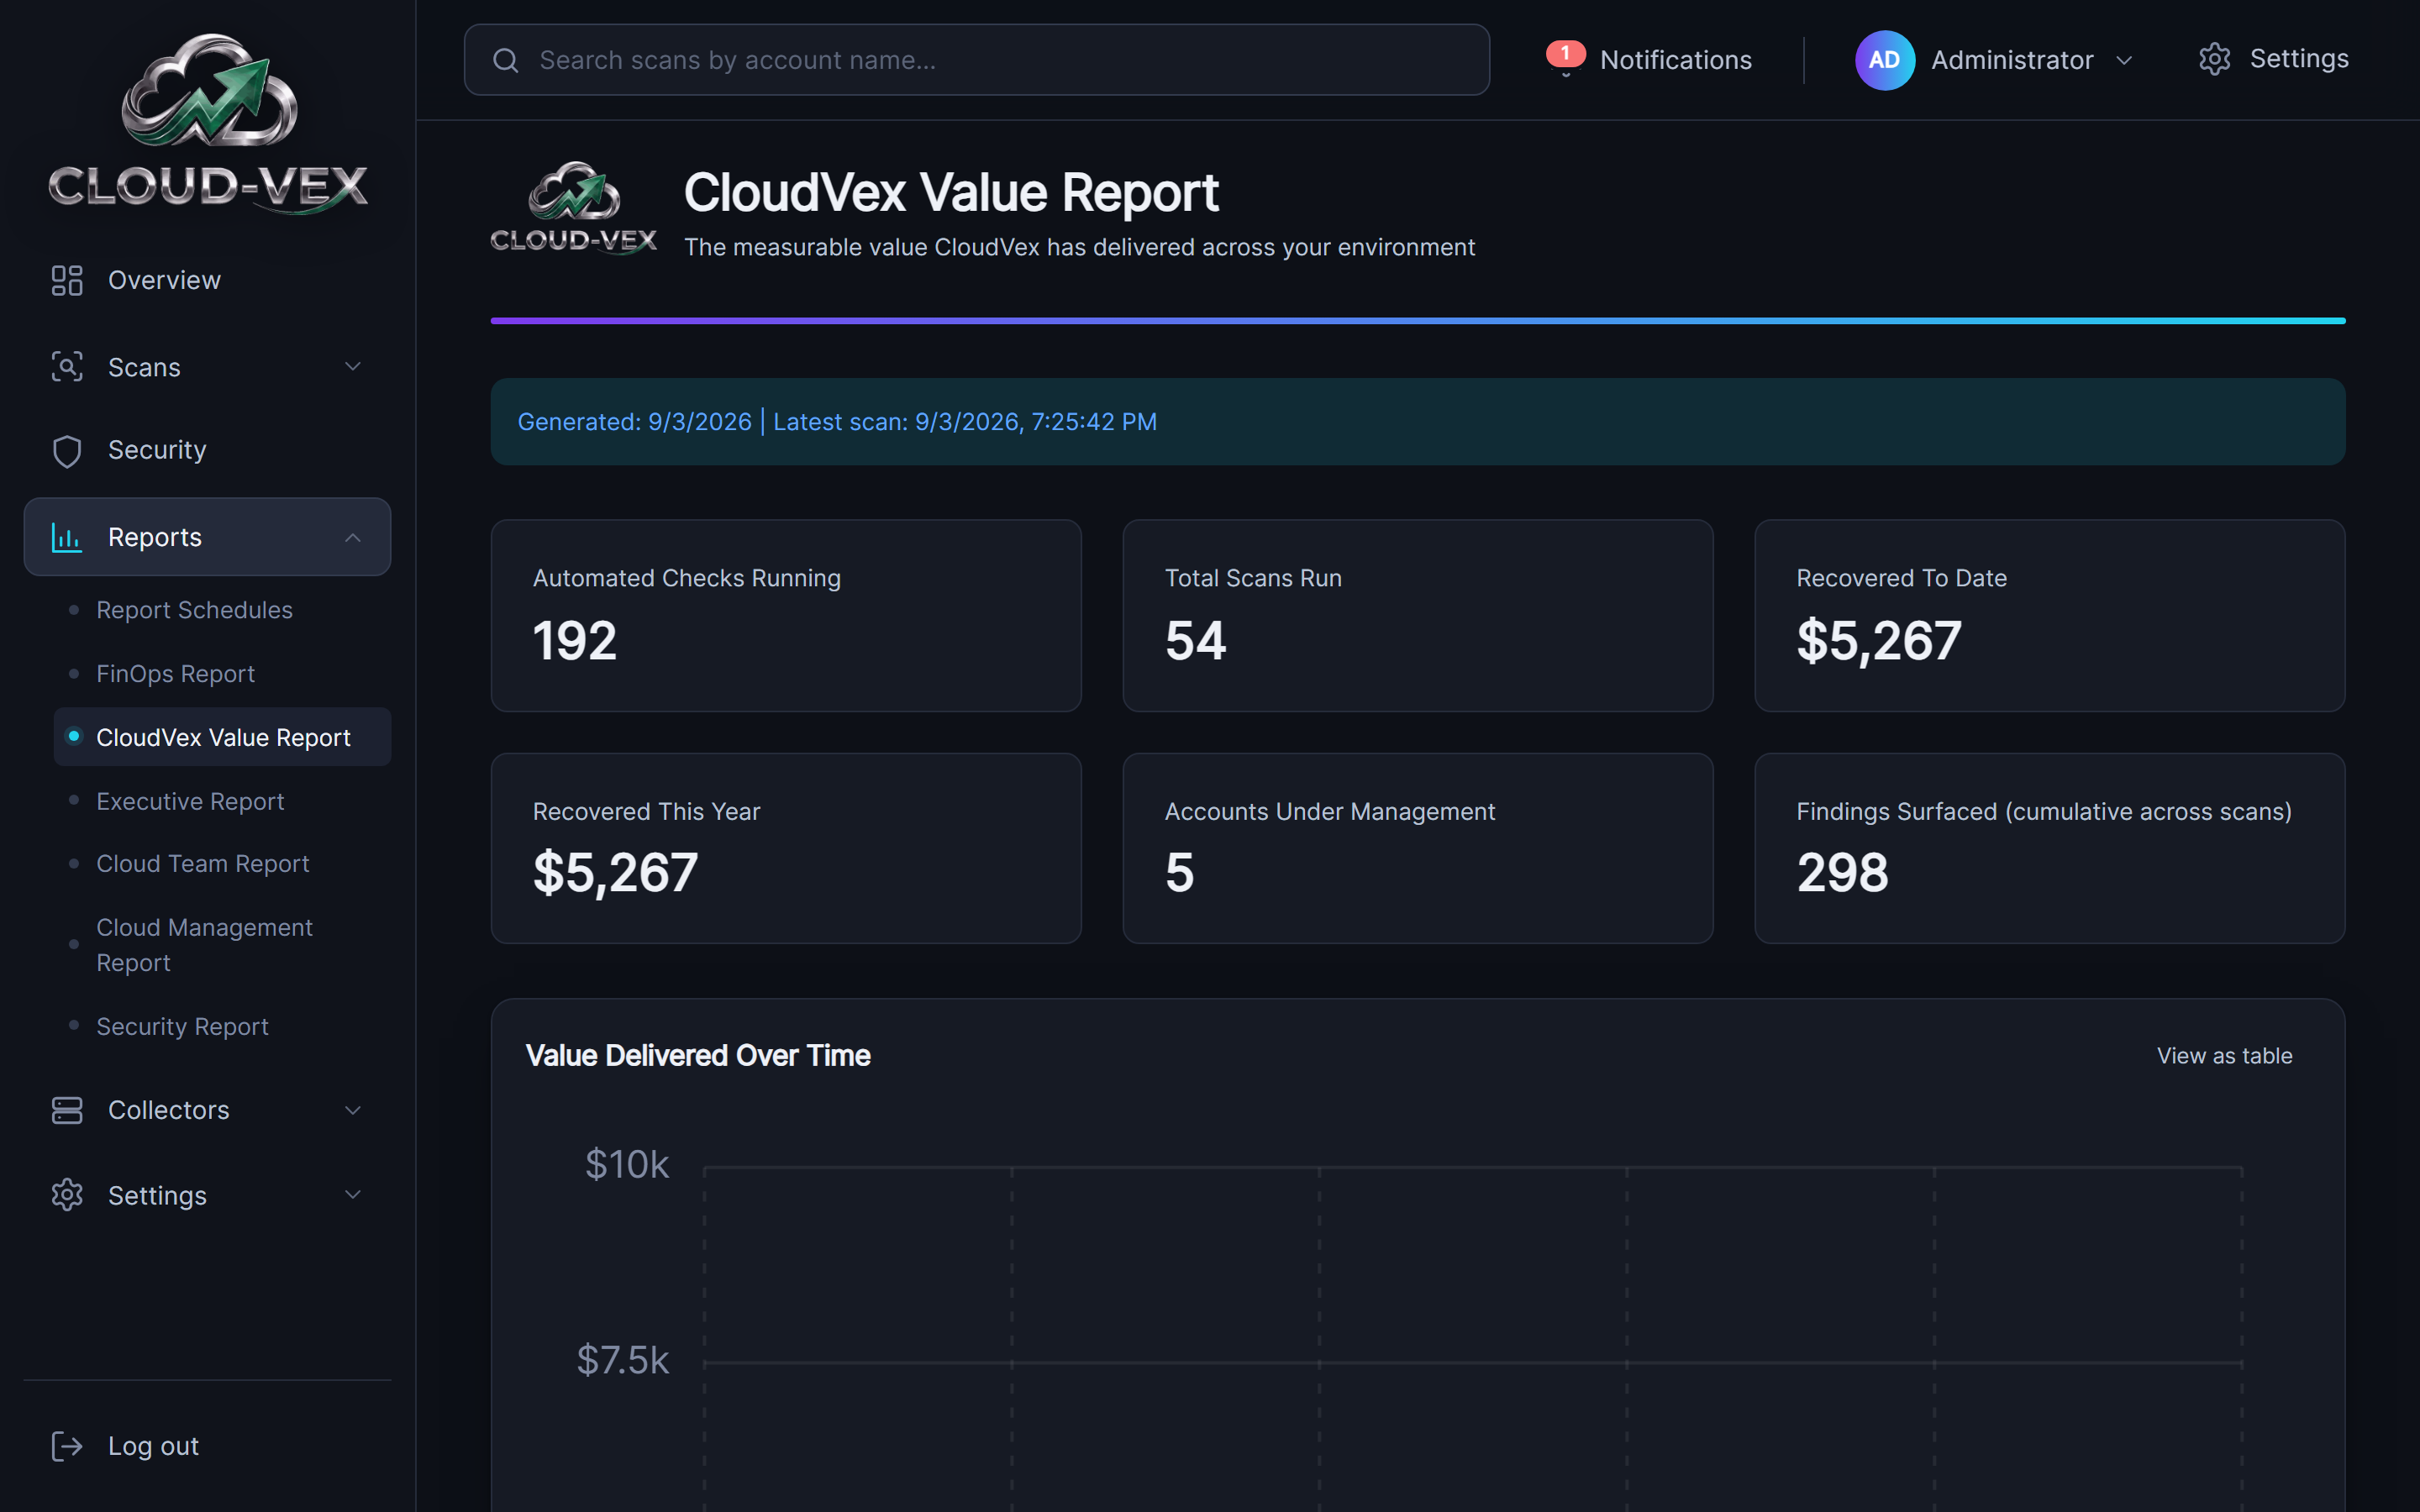
Executive Report
High-level strategic metrics: current and annualized waste, waste recovered this year, critical/high-severity findings, a Security Score averaged across every mapped framework with a risk-level tier derived from it, and a Security Framework Scores table — built for sharing outside the team running Cloud-Vex day to day.
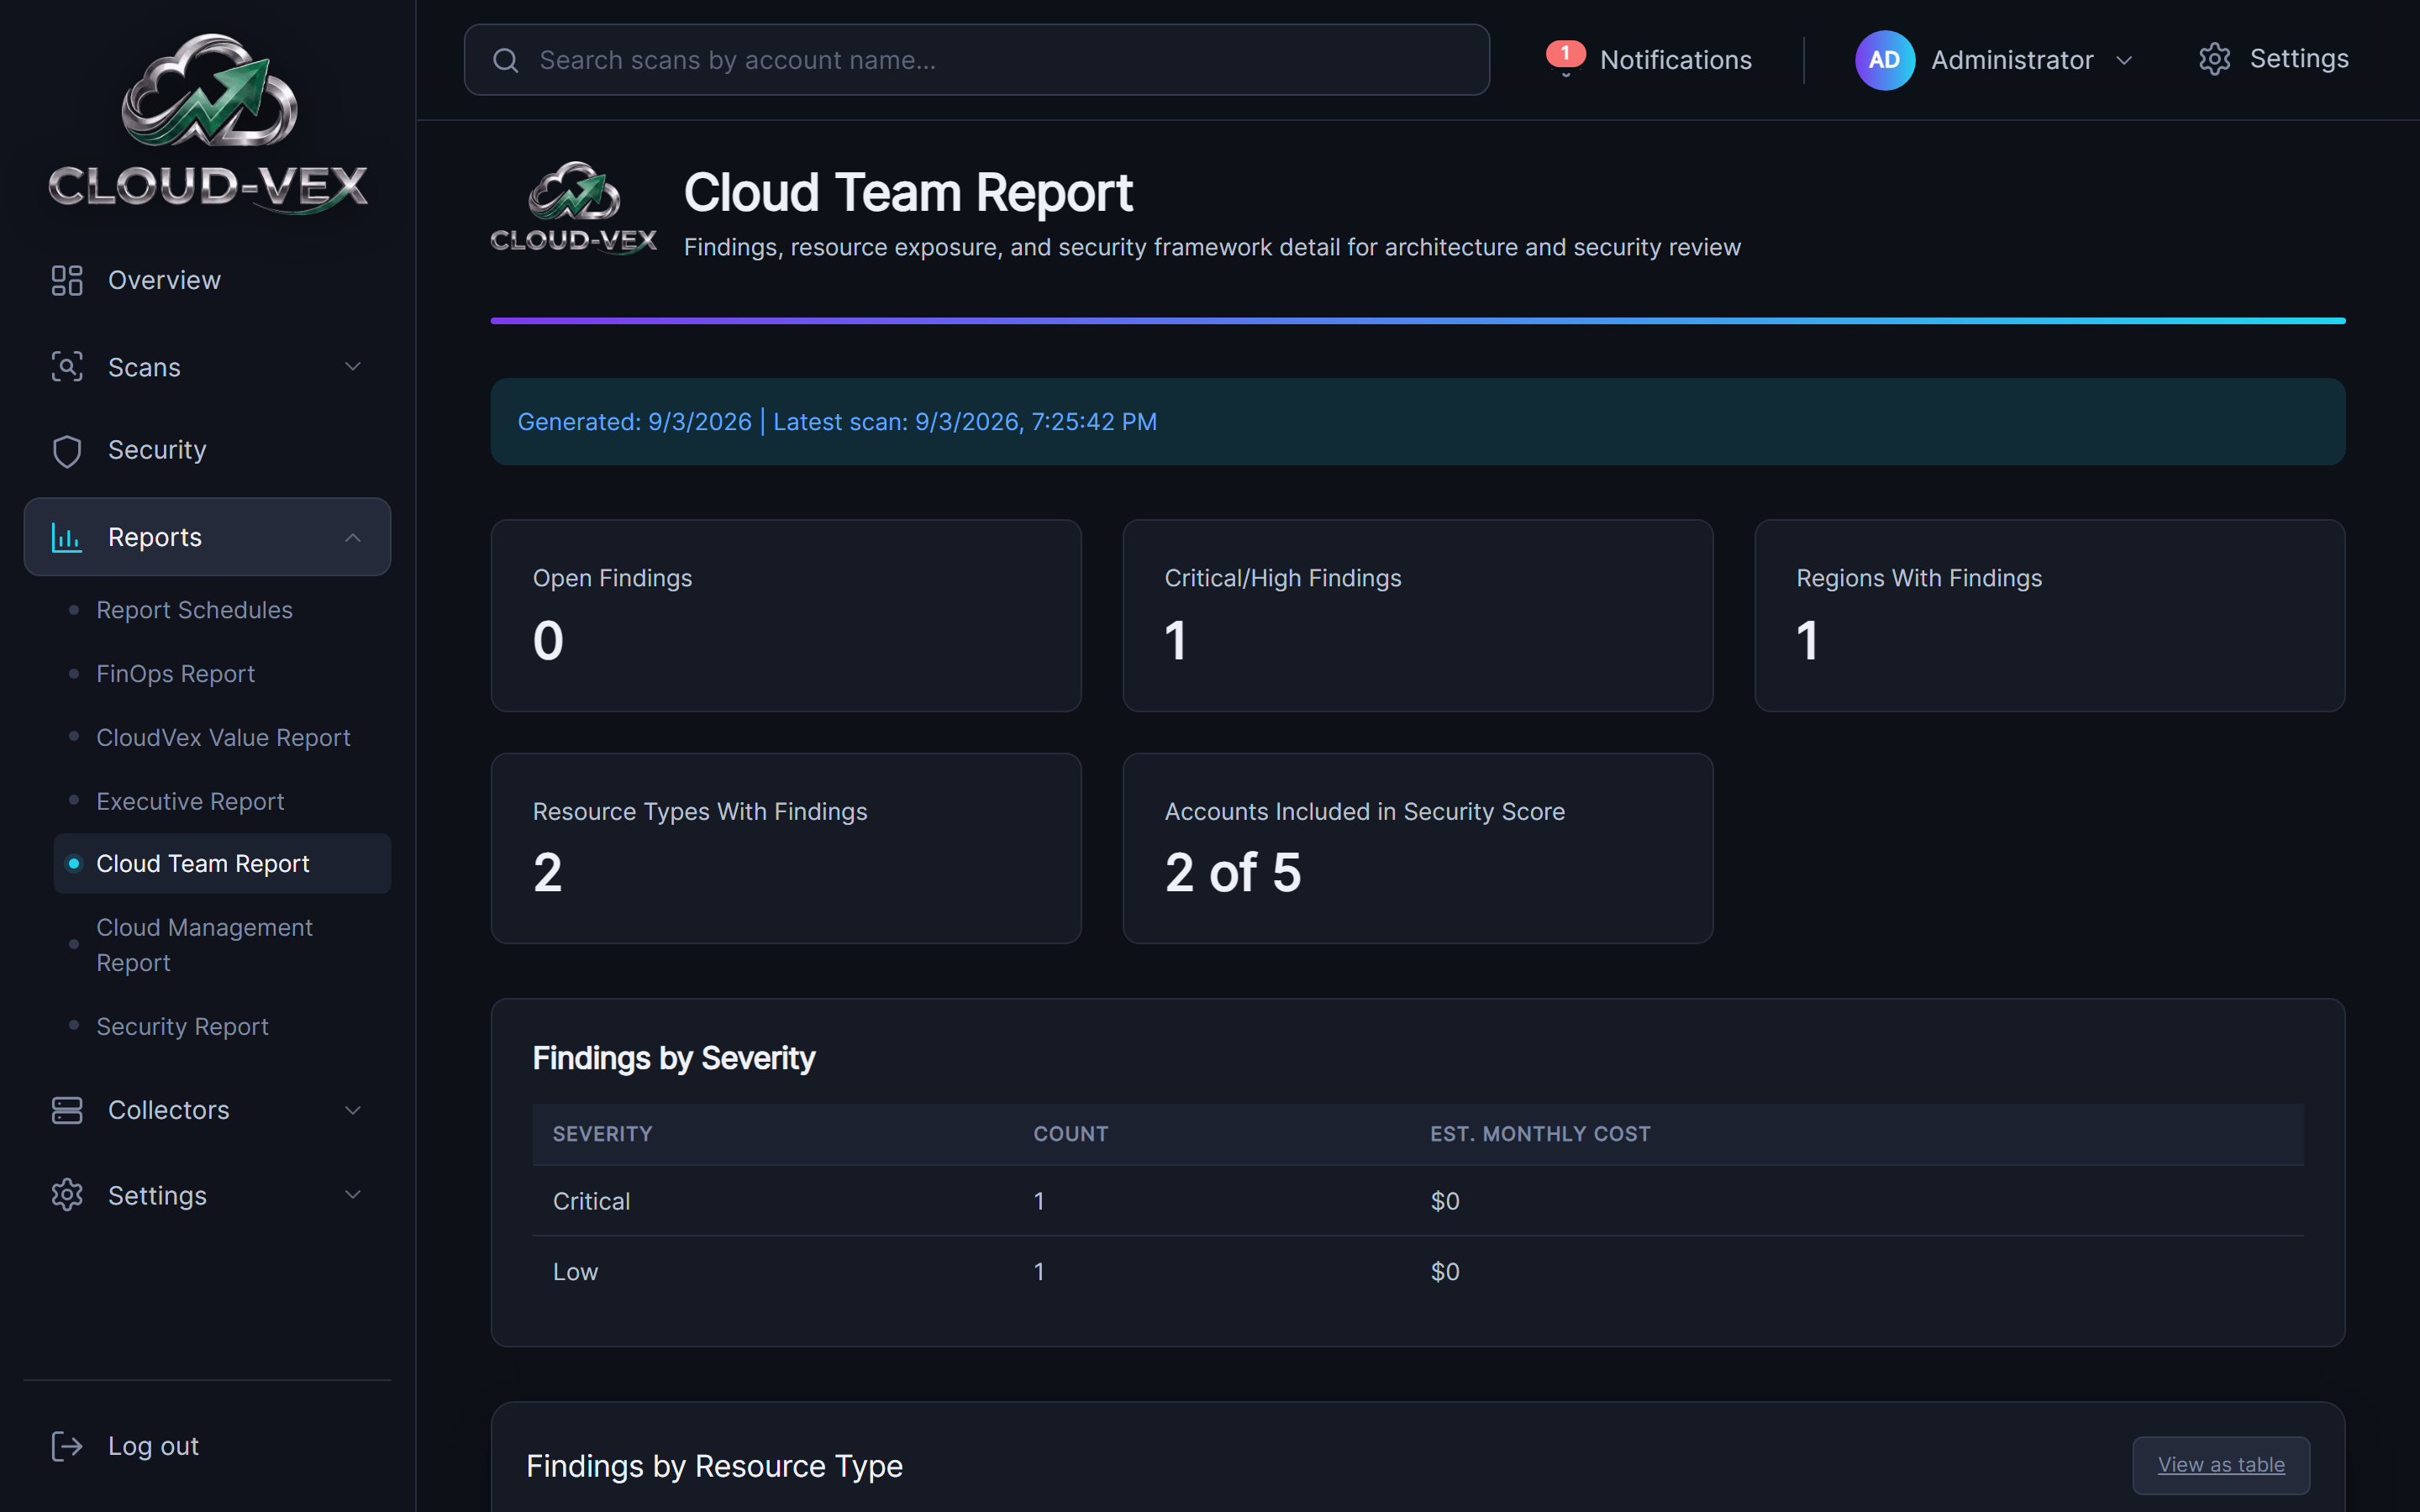
Cloud Team Report
Findings, resource exposure, and security framework detail for architecture and security review, scored against the single most recent scan across the whole environment. Open findings by severity and resource type, then one card per security framework with a pass/total count you can expand into the individual controls, each marked pass or fail and, where it failed, which specific checks are behind that. A best-effort technical mapping to each framework's closest-matching controls — not a certification and not a substitute for a formal audit, and the report says so on its face. An account scan coverage table shows which connected accounts have a completed scan feeding the score, and which don't yet.
Overlaps by design with the Security Report below, which covers the same framework scoring across every account's latest scan rather than one environment-wide snapshot. Reach for this one when the audience is the team that owns the infrastructure; reach for Security when the audience is specifically about security posture.
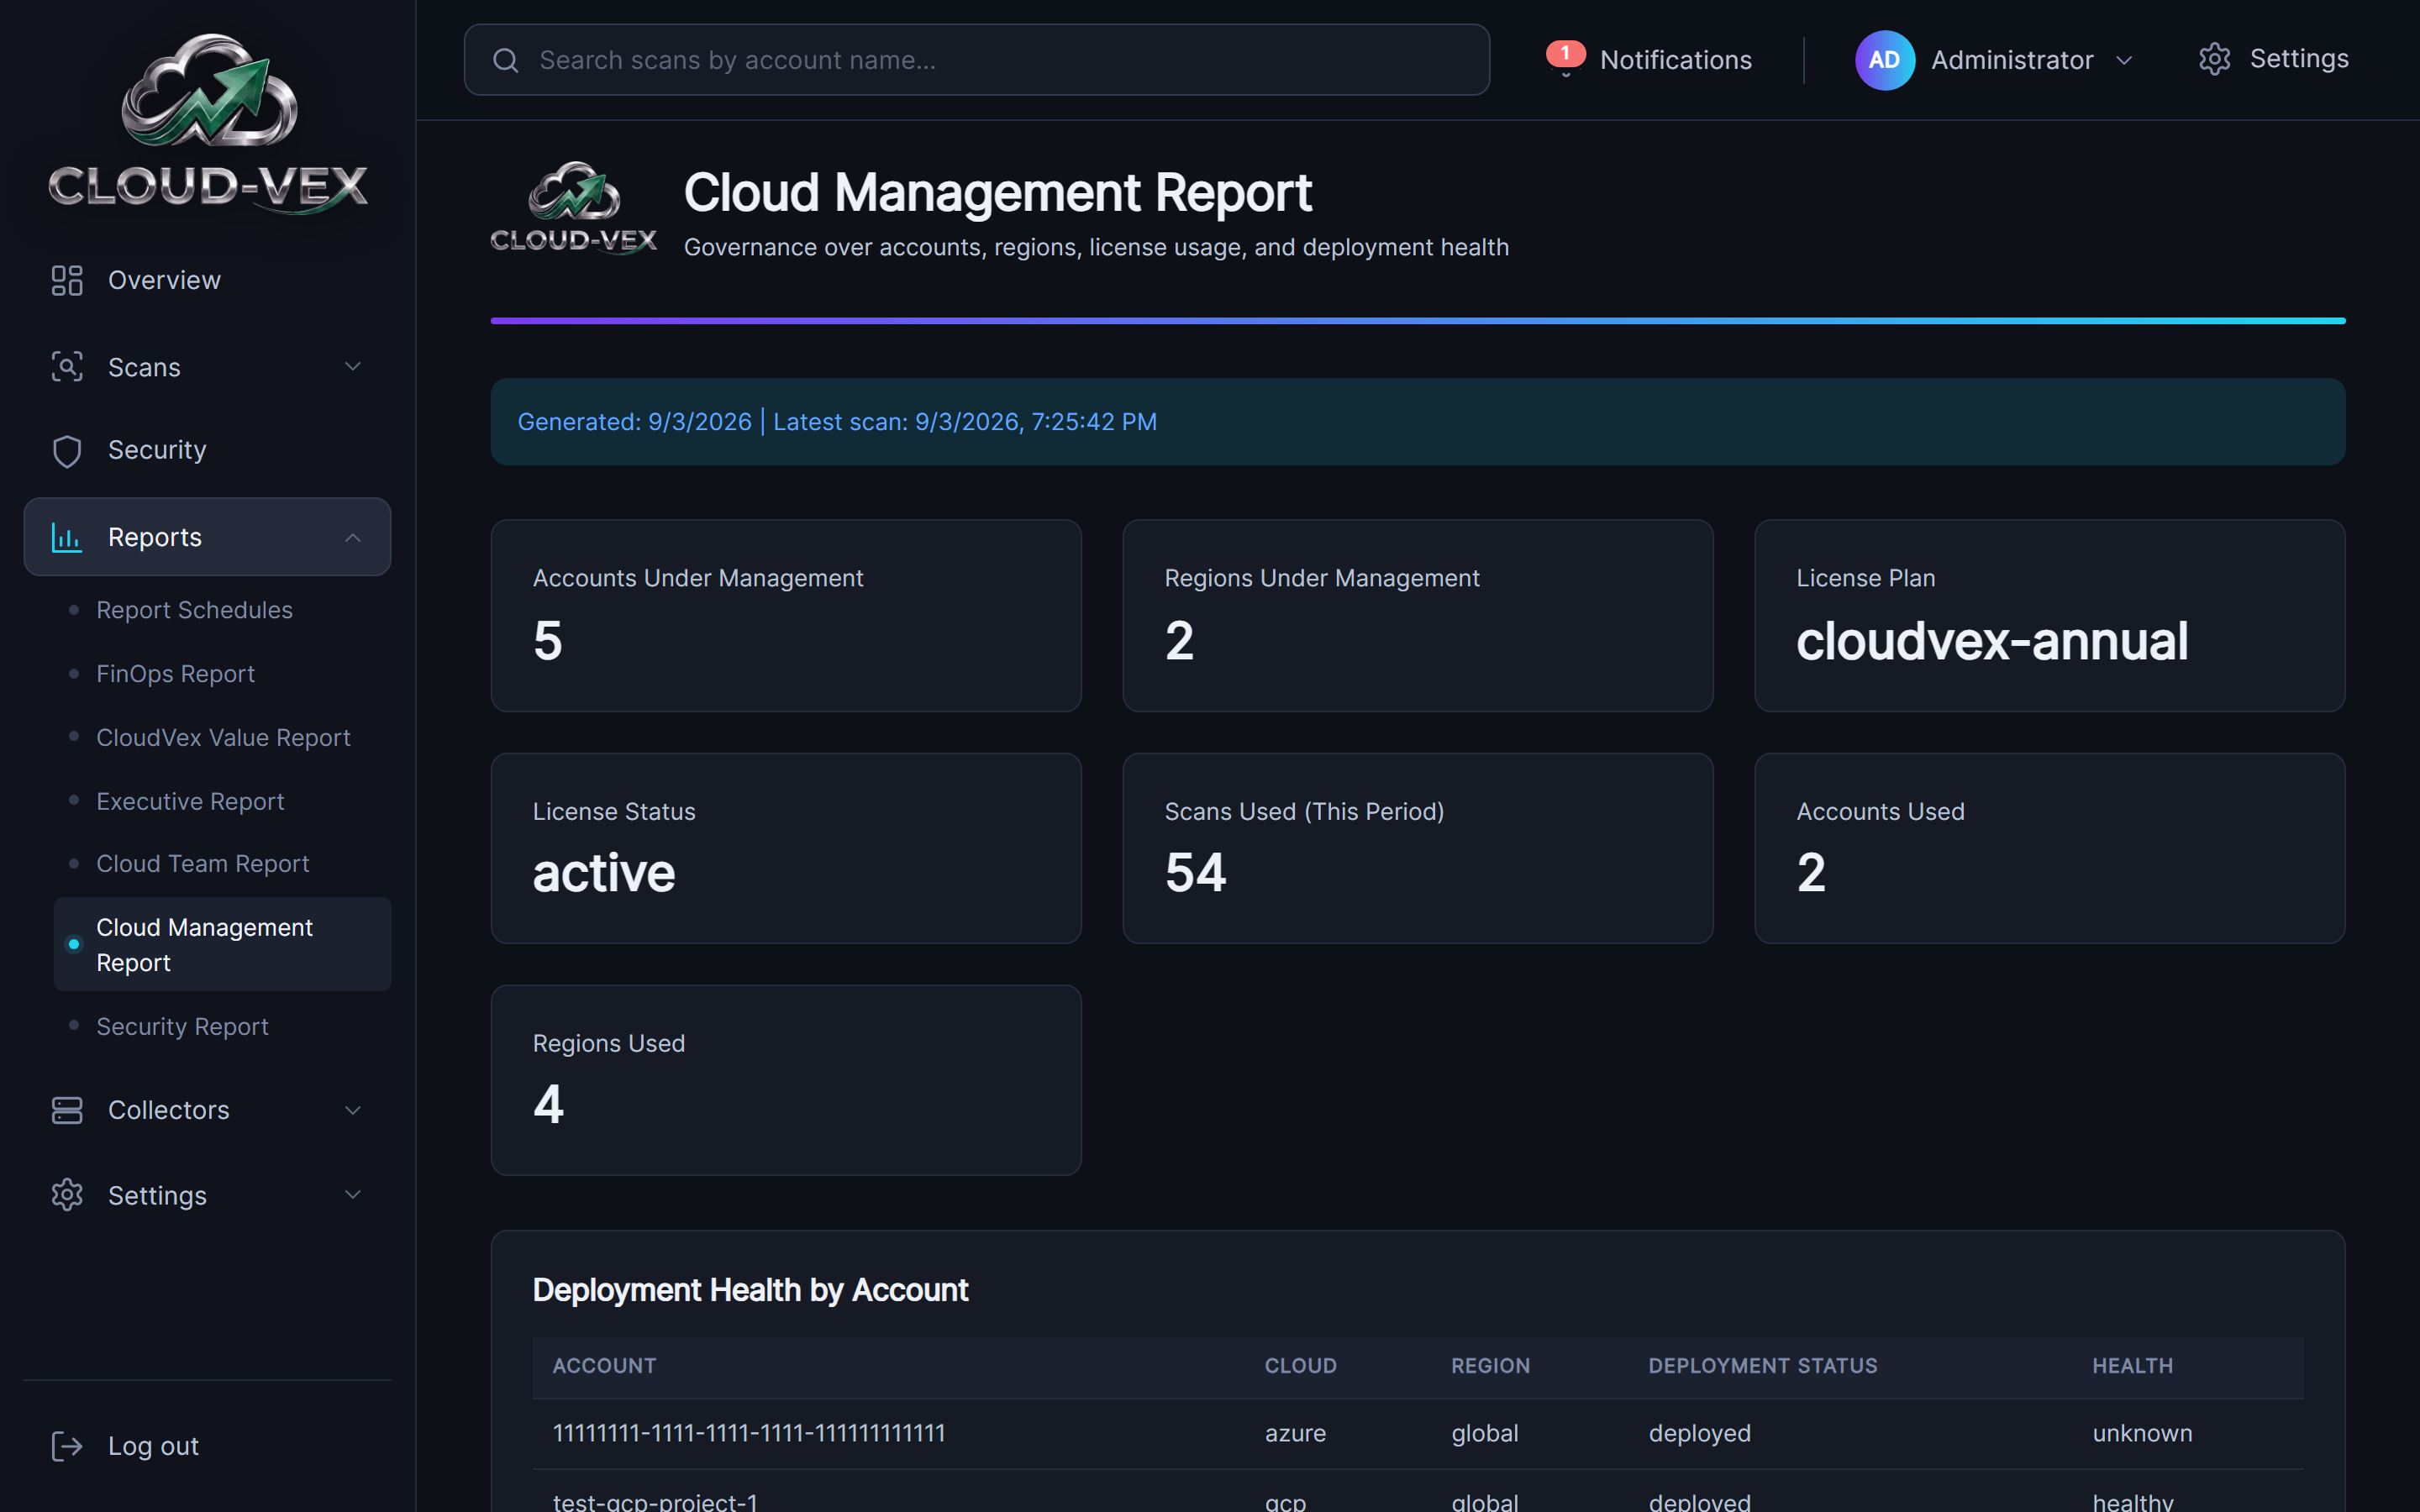
Cloud Management Report
Governance over accounts, regions, license usage, and deployment health: accounts and regions under management, license plan and status, scans/accounts/regions used this period, a deployment-health table per account, and cost governance broken out by account.
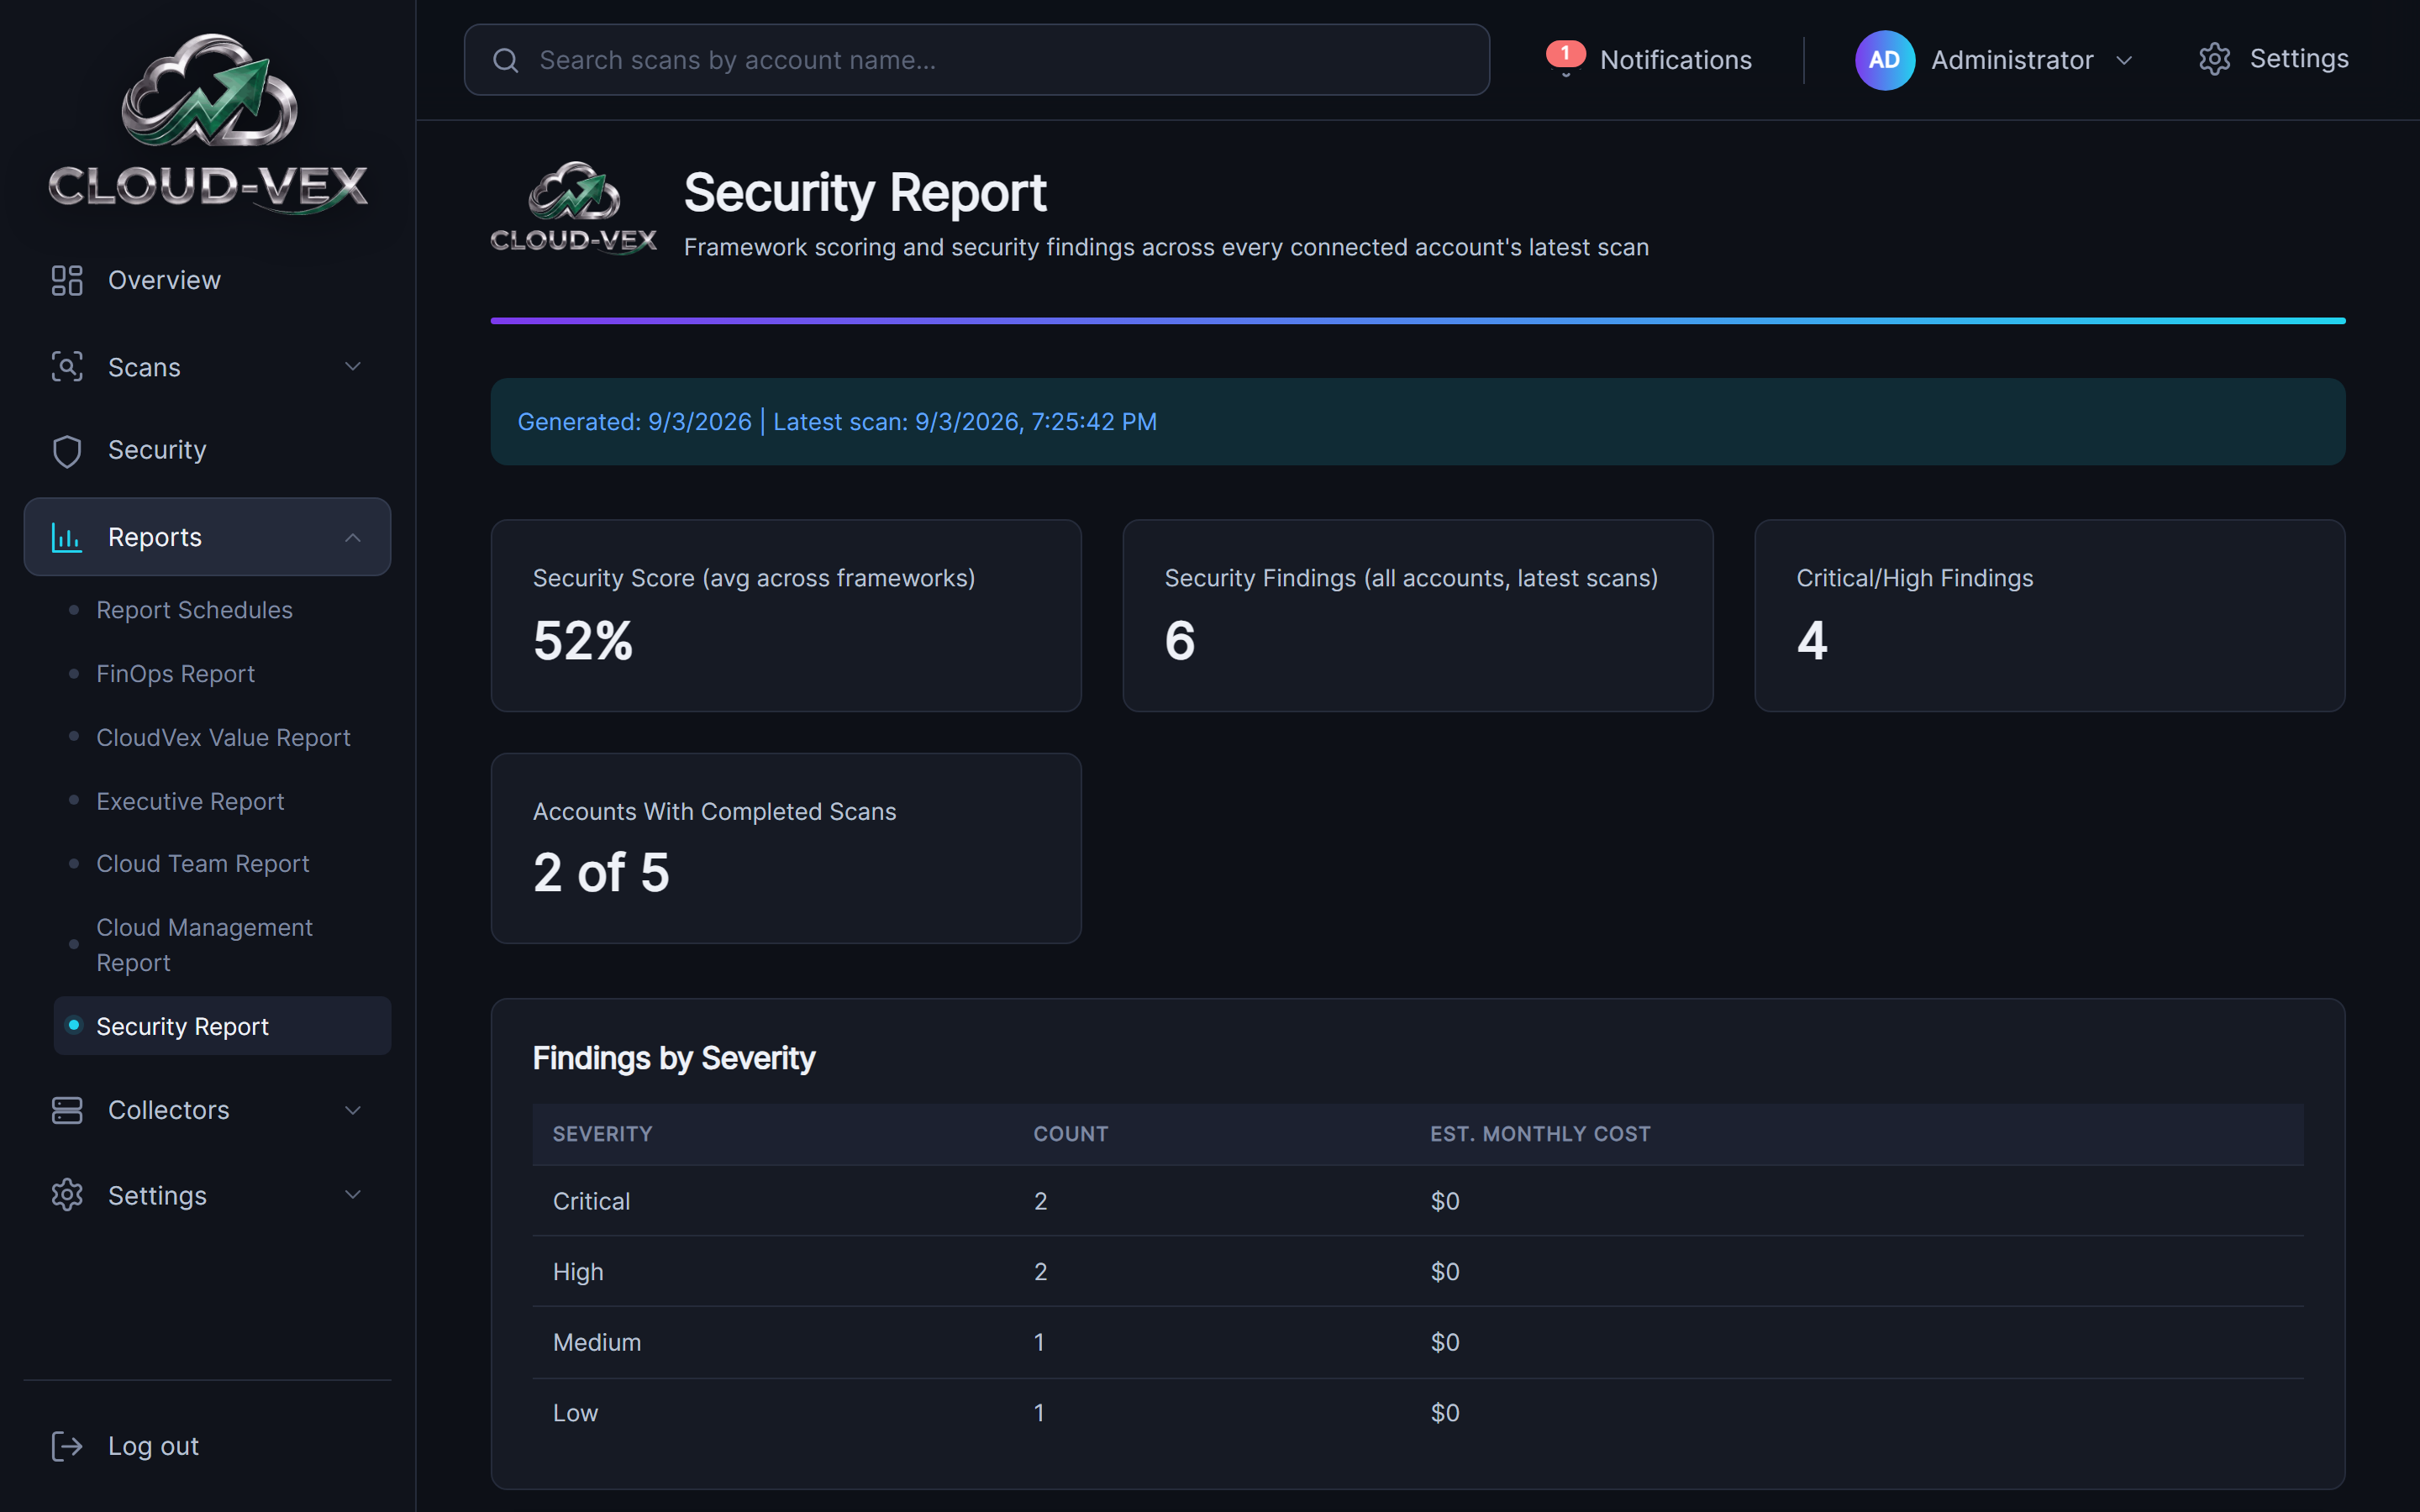
Security Report
Framework scoring and security findings across every connected account's latest scan — the whole-environment rollup referenced elsewhere in this guide, and the dedicated report to hand to a security-focused audience. A Security Score averaged across every mapped framework, total security findings and critical/high findings across every account, then the same per-framework control breakdown and account scan coverage table as the Cloud Team Report above, scored across every account's own latest scan rather than a single environment-wide snapshot.
9. Collectors
Collectors covers adding, updating and scheduling the read-only collector deployed into each cloud account — see the high-level architecture and permission model pages for what a collector actually does and what it's granted.
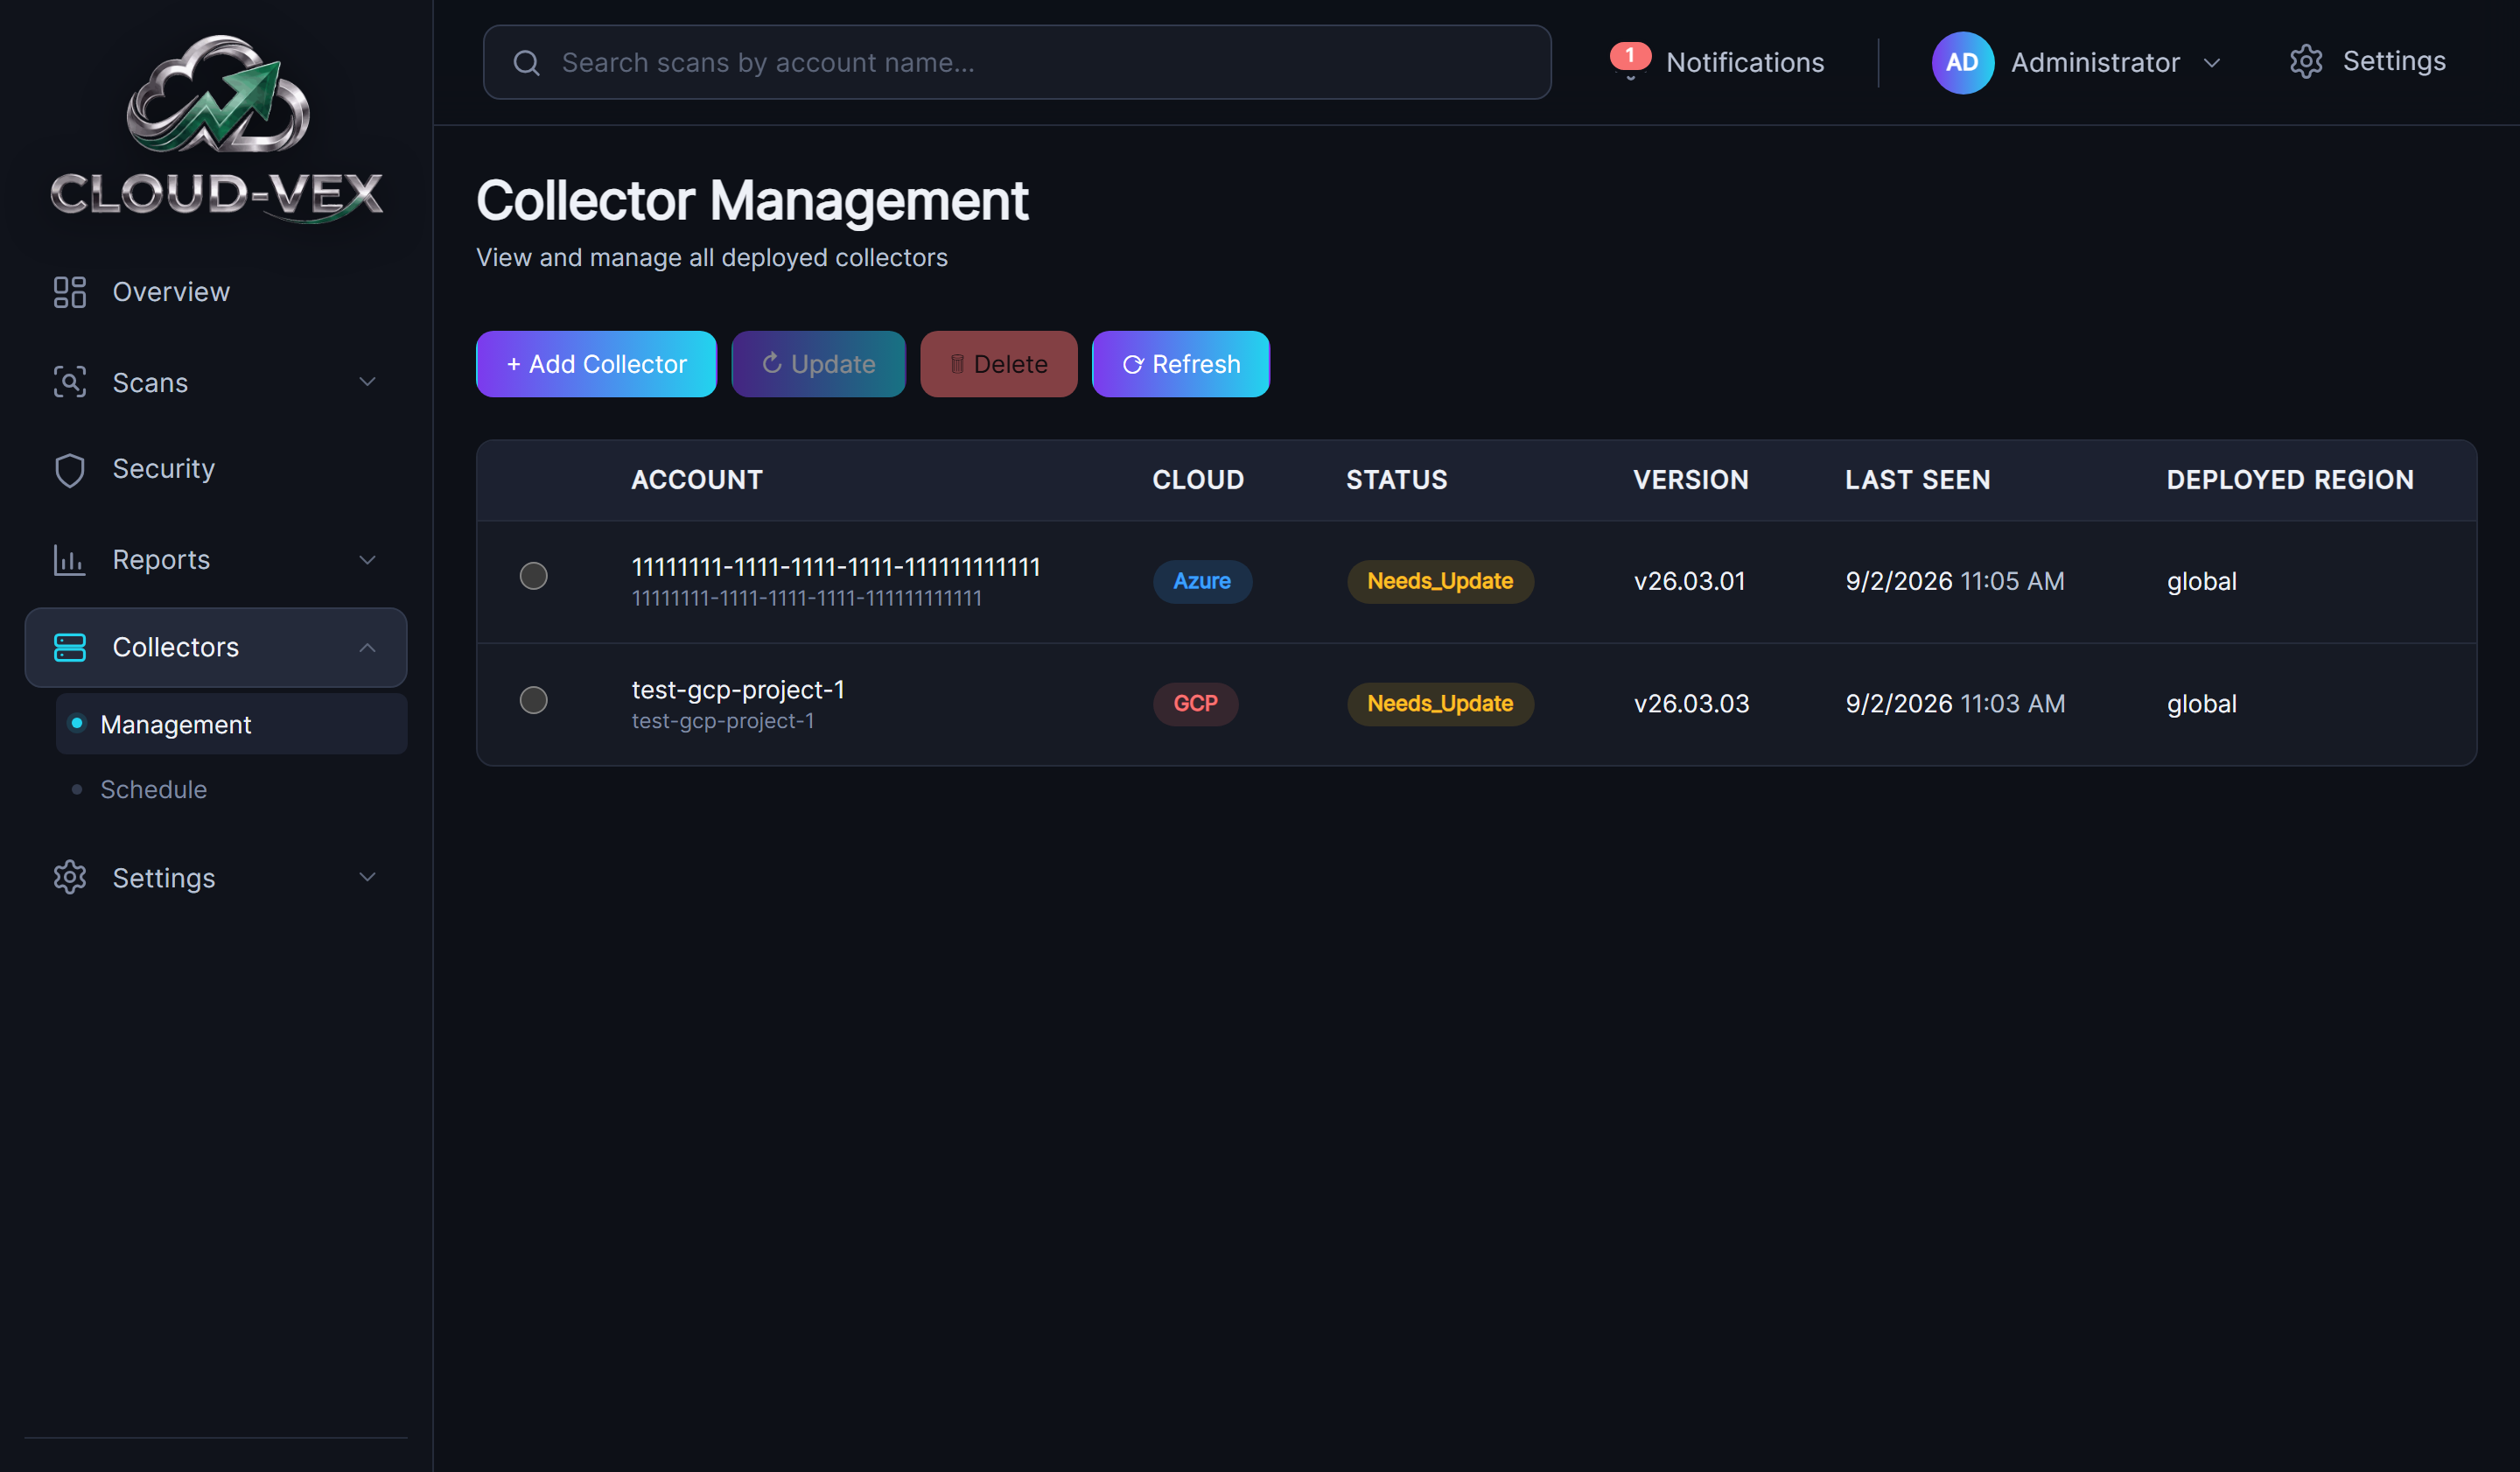
Management
One unified table across all three clouds — account, cloud, status, version, when it last checked in, and the region its own infrastructure deployed into. Collectors phone home on their own schedule rather than waiting to be pushed to, so Last Seen reflects its most recent check-in, not when it was first registered. A Needs_Update status badge appears consistently for any collector on an old version, regardless of cloud.
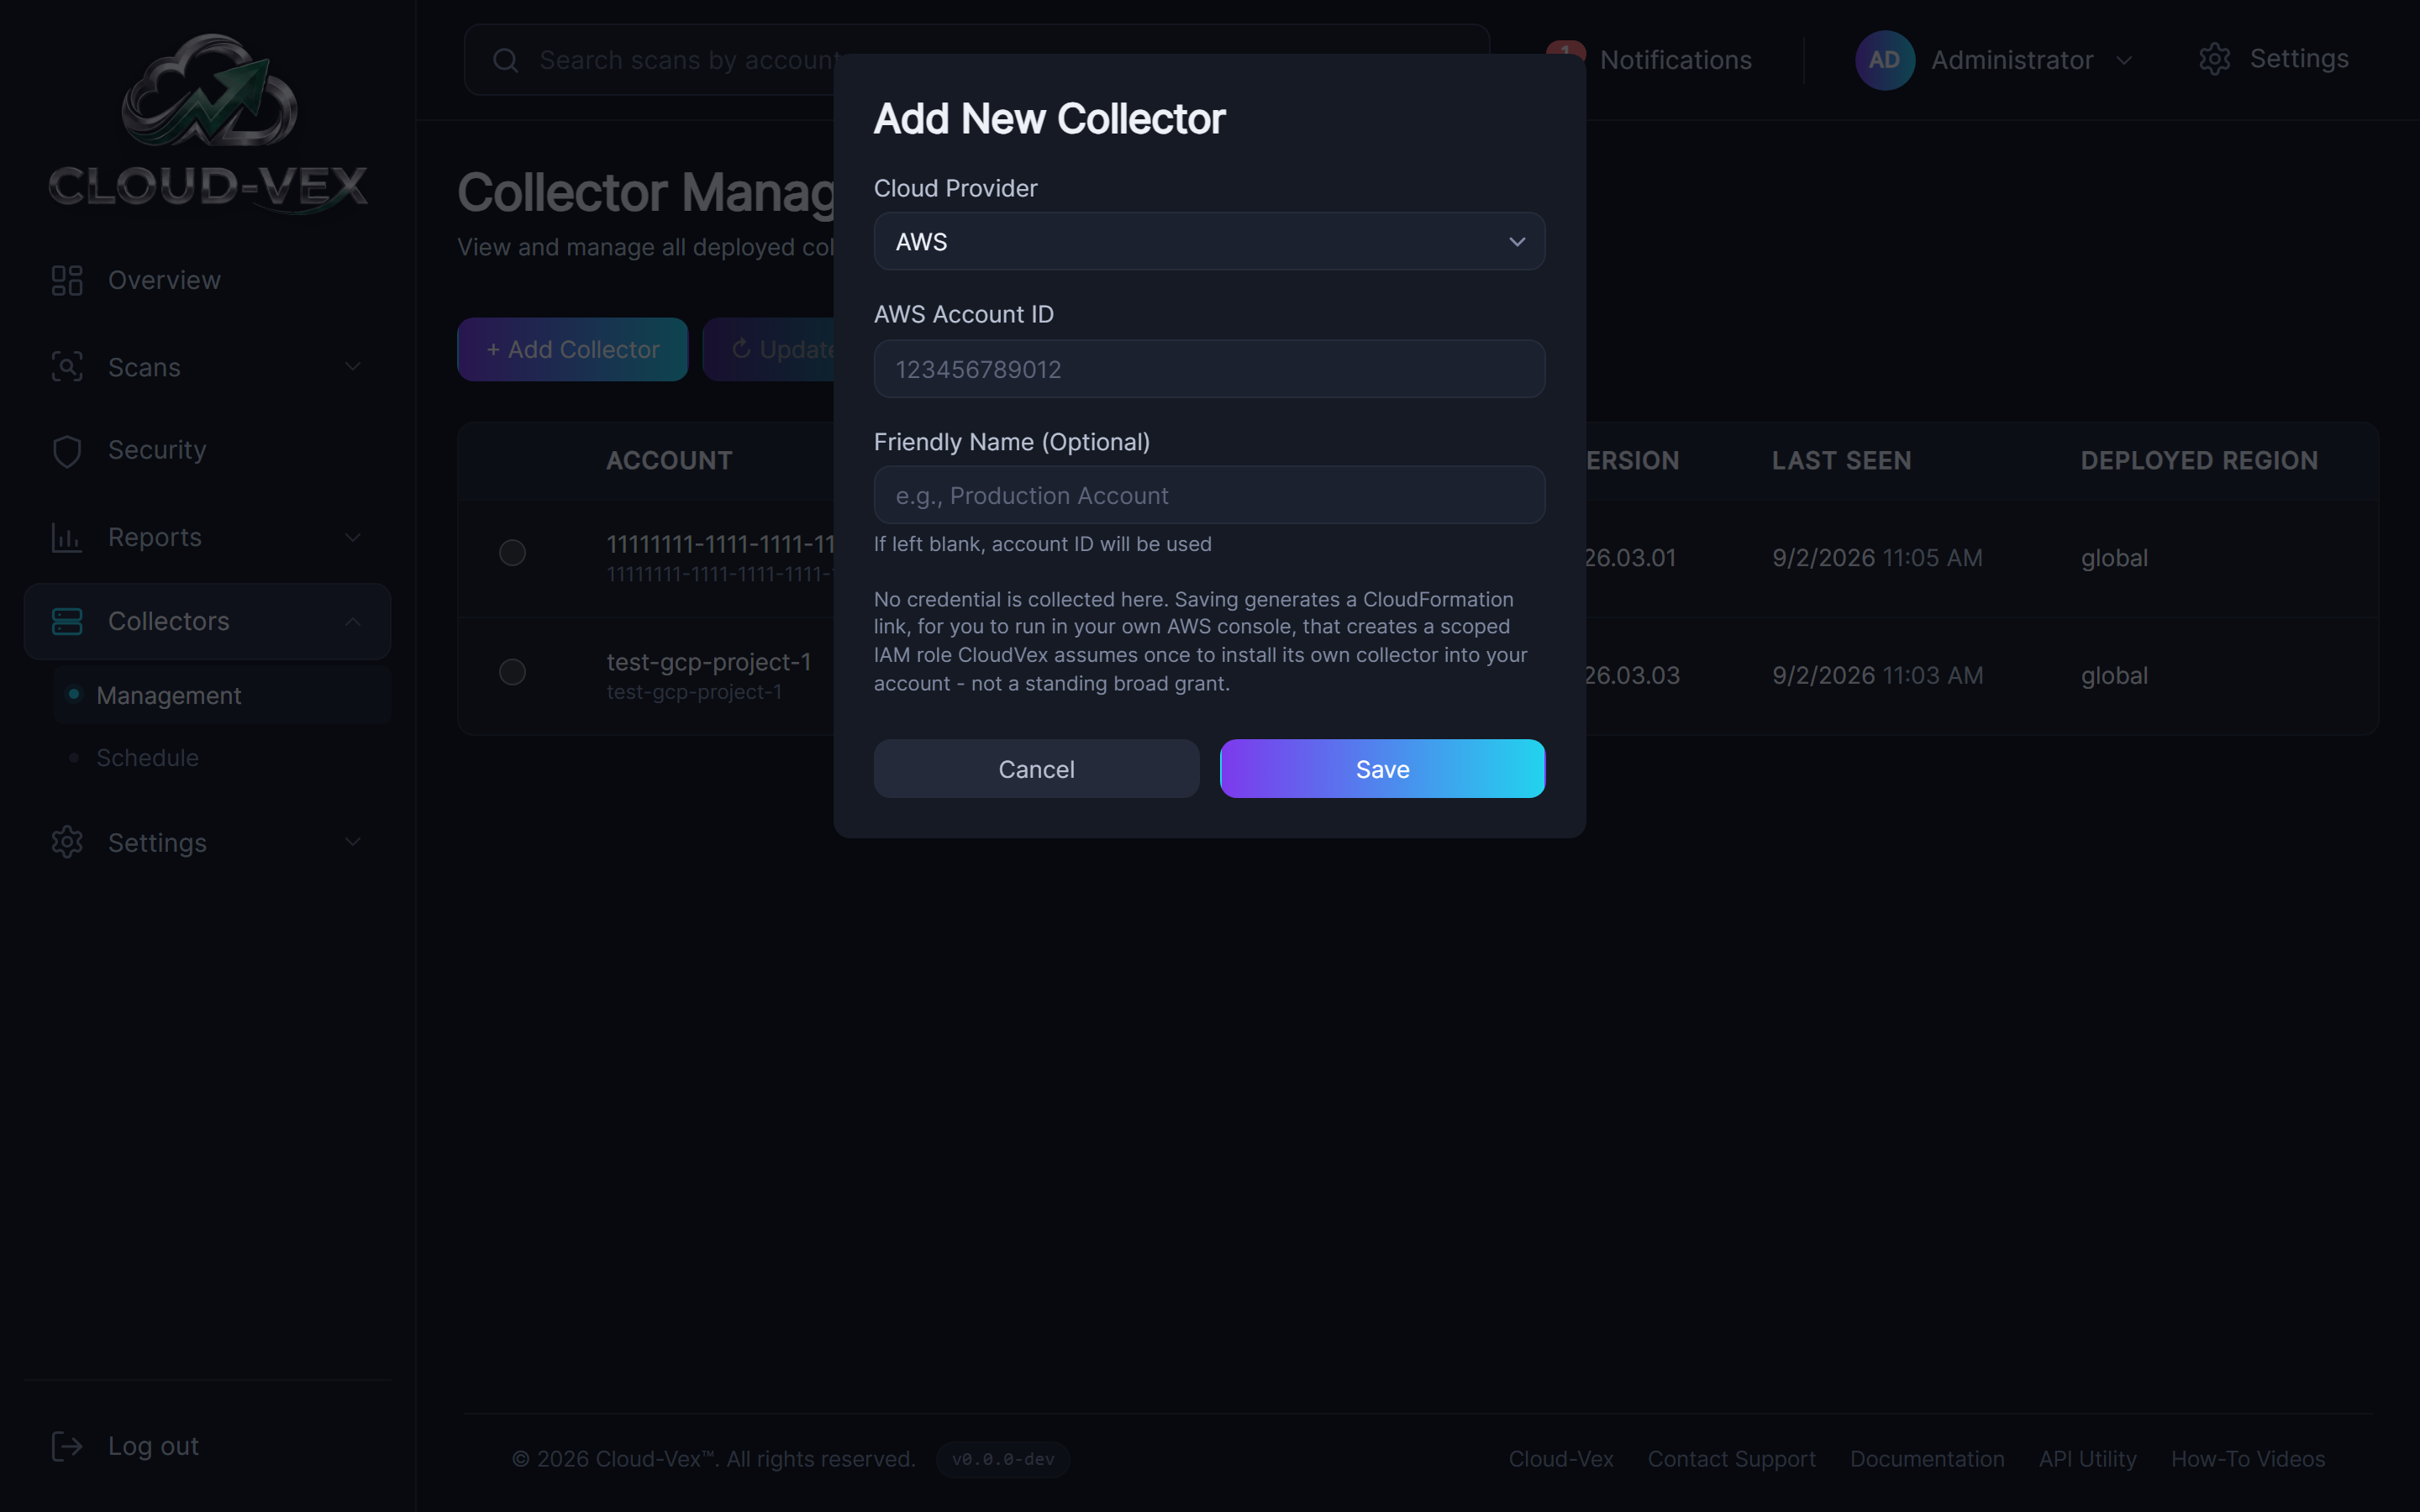
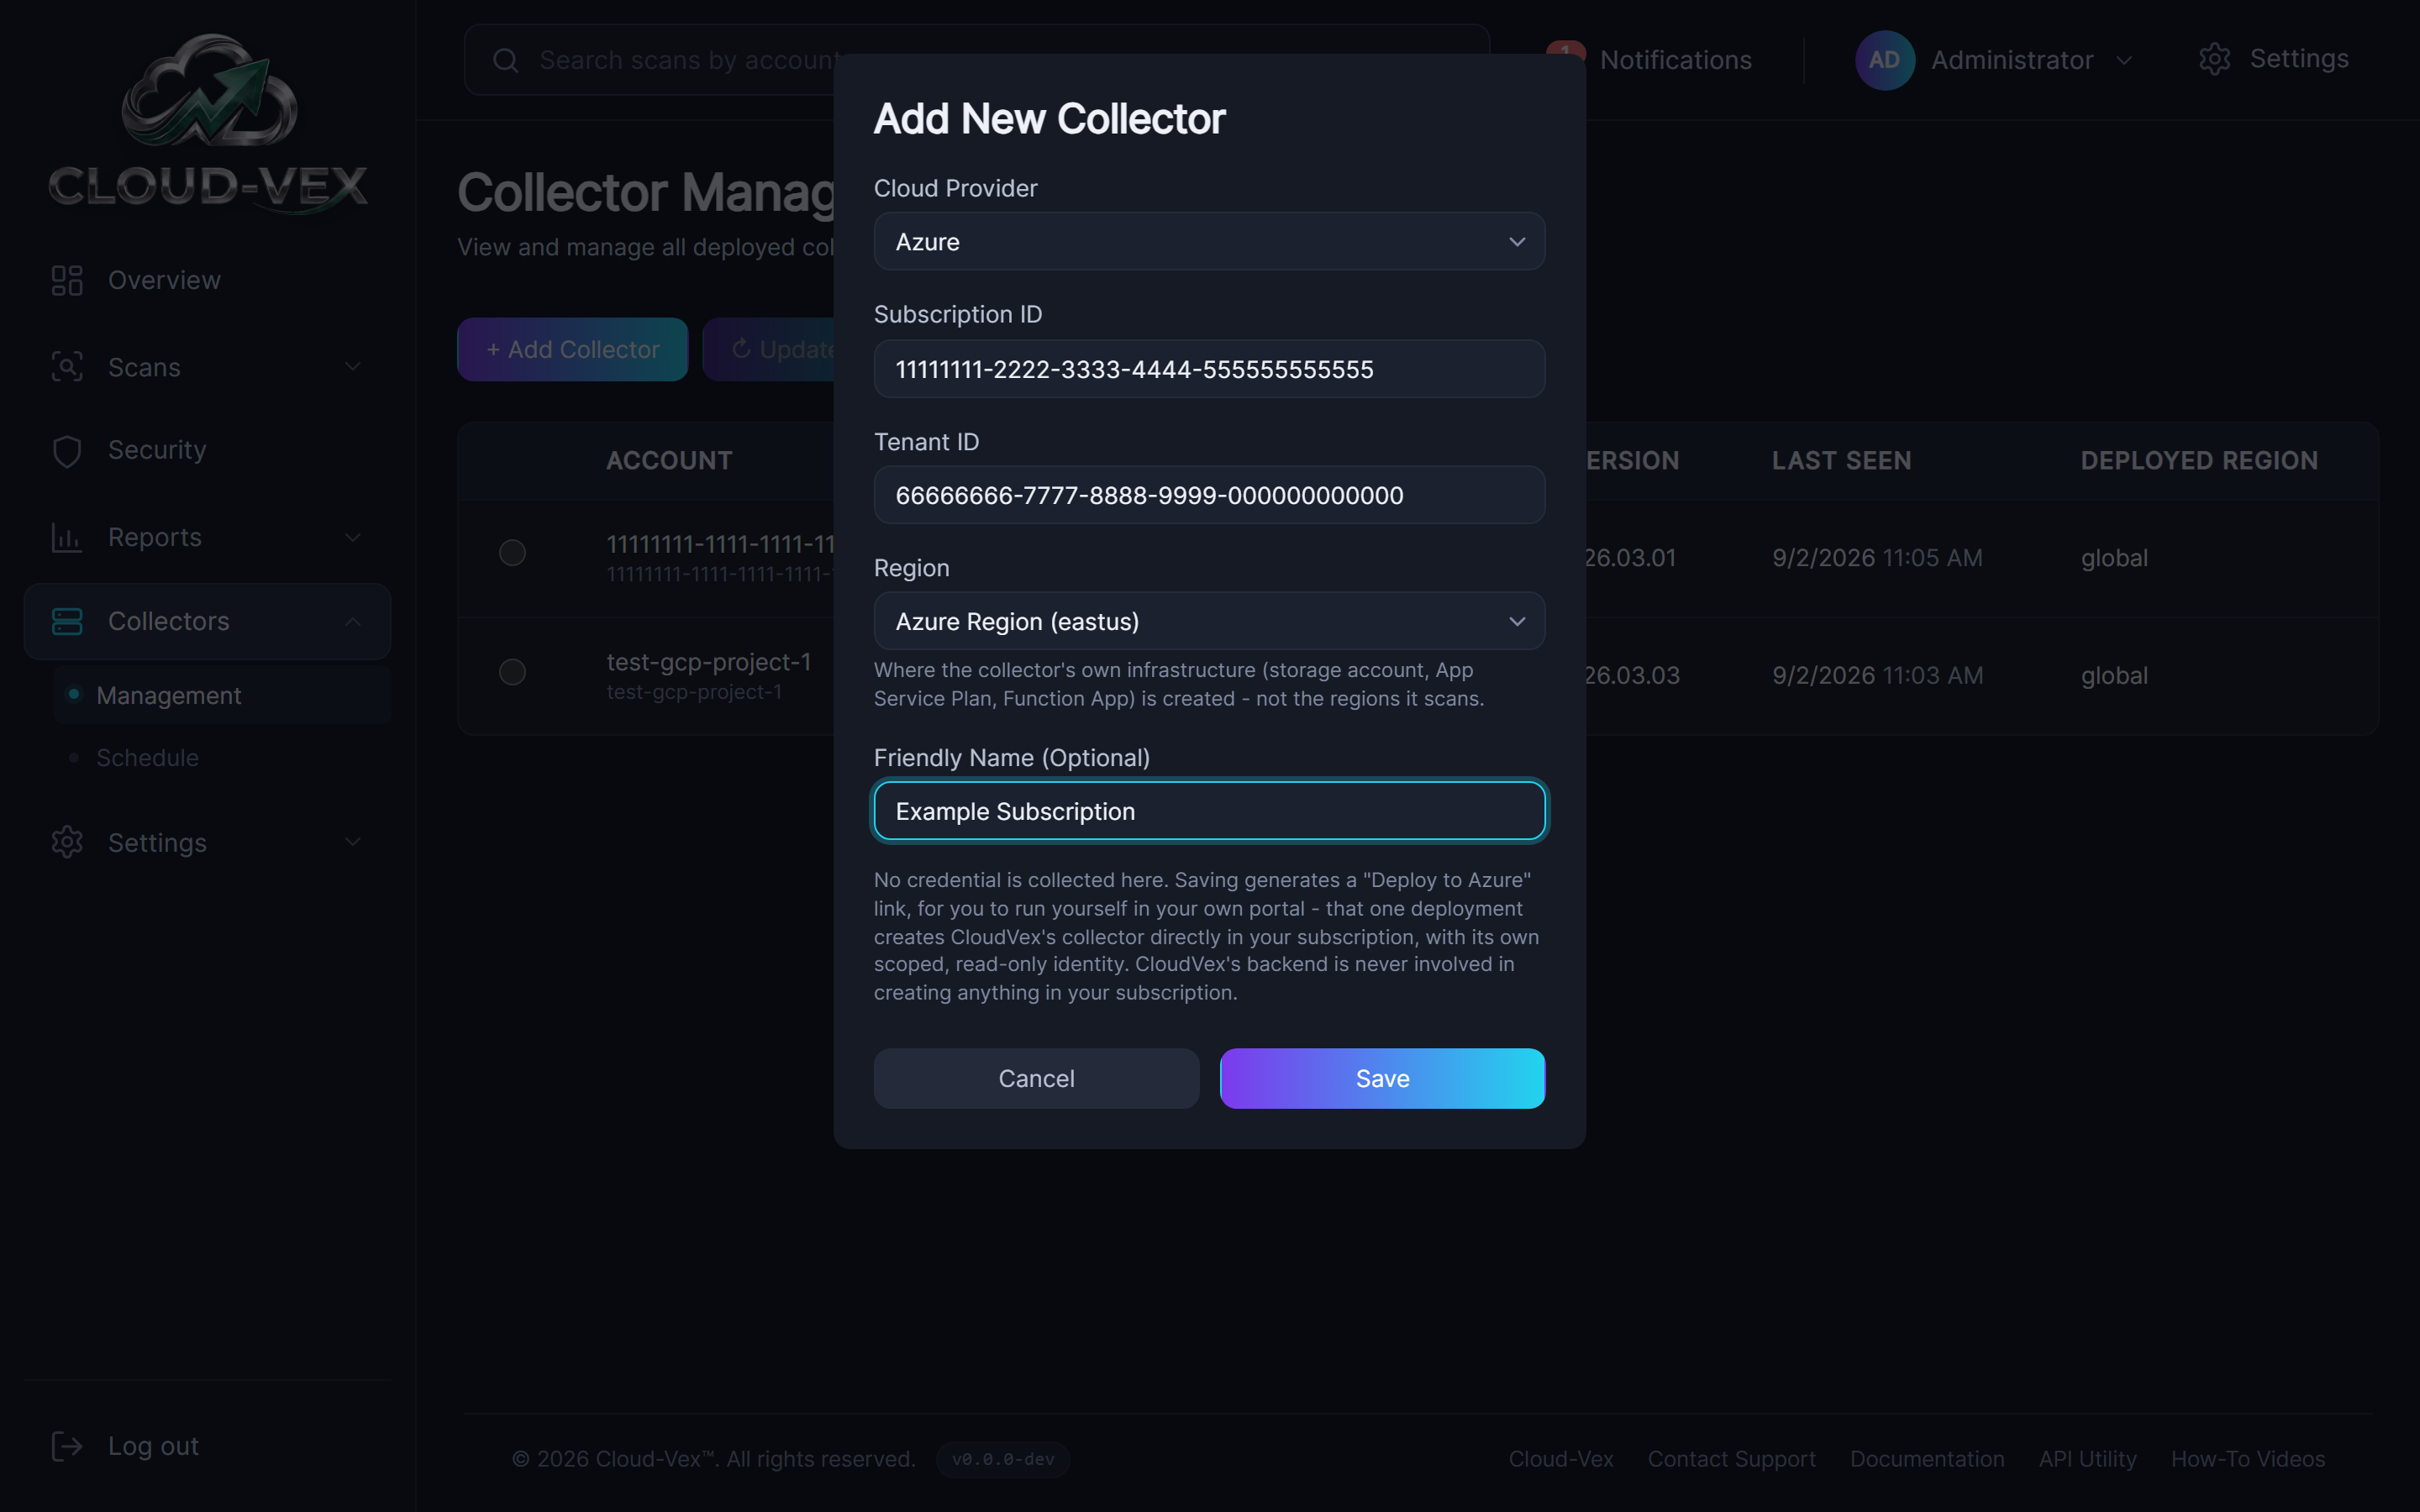
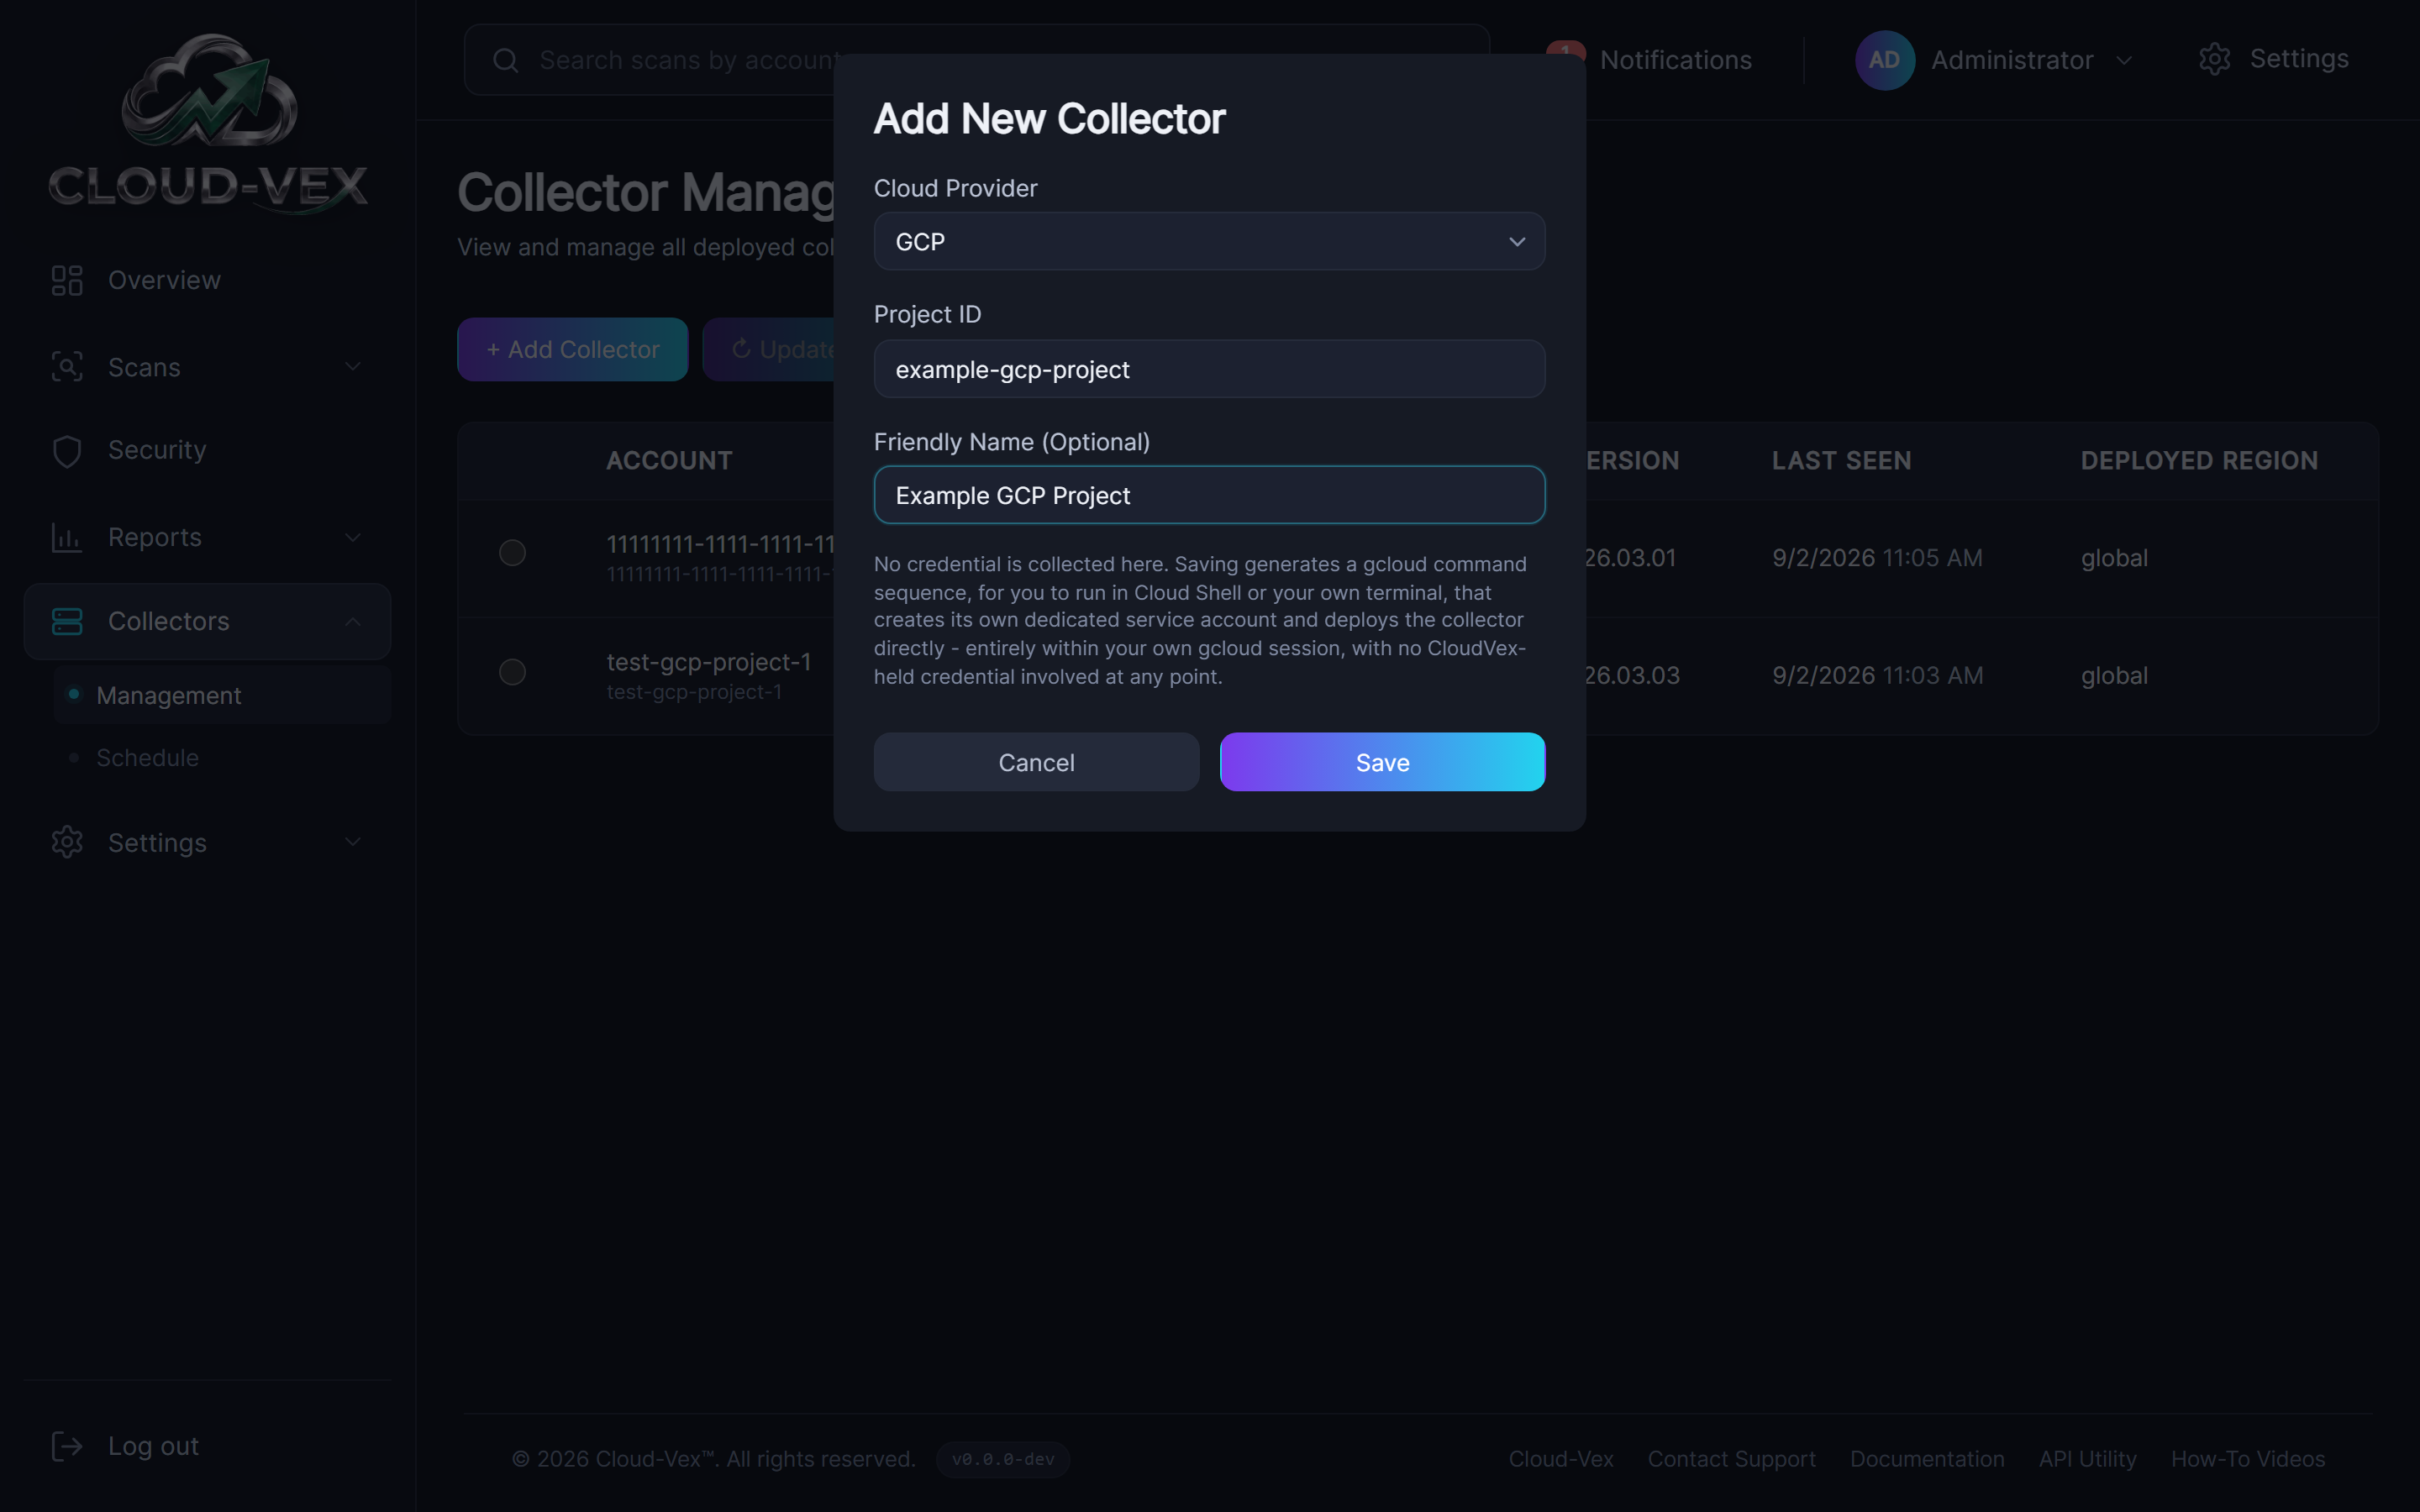
Add Collector starts a new one: pick the cloud provider, then that cloud's identifier — an AWS account ID, an Azure subscription ID and tenant ID plus the region its own infrastructure should deploy into, or a GCP project ID. No credential is collected for any of the three. Saving generates a self-service artifact for you to run yourself, in your own cloud console: a CloudFormation link on AWS, a “Deploy to Azure” link on Azure, or a gcloud command sequence on GCP. Each one creates its own scoped, read-only identity directly in your account/subscription/project — CloudVex's backend is never involved in creating anything there, and never holds a credential of yours at any point.
The Add Collector dialog for each cloud:
Update re-runs the same credential-free pattern for the selected collector, on any of the three clouds: it generates a fresh artifact (new code, a freshly rotated key) for you to re-apply yourself, and re-running it updates the existing collector in place rather than creating a second one. Delete removes the selected collector on any of the three clouds, and Refresh re-checks status immediately rather than waiting on the once-a-minute background check. There's no separate Edit any more — every cloud now goes through the same credential-free Add/Update pattern, so there's nothing left to hand-edit.
Schedule
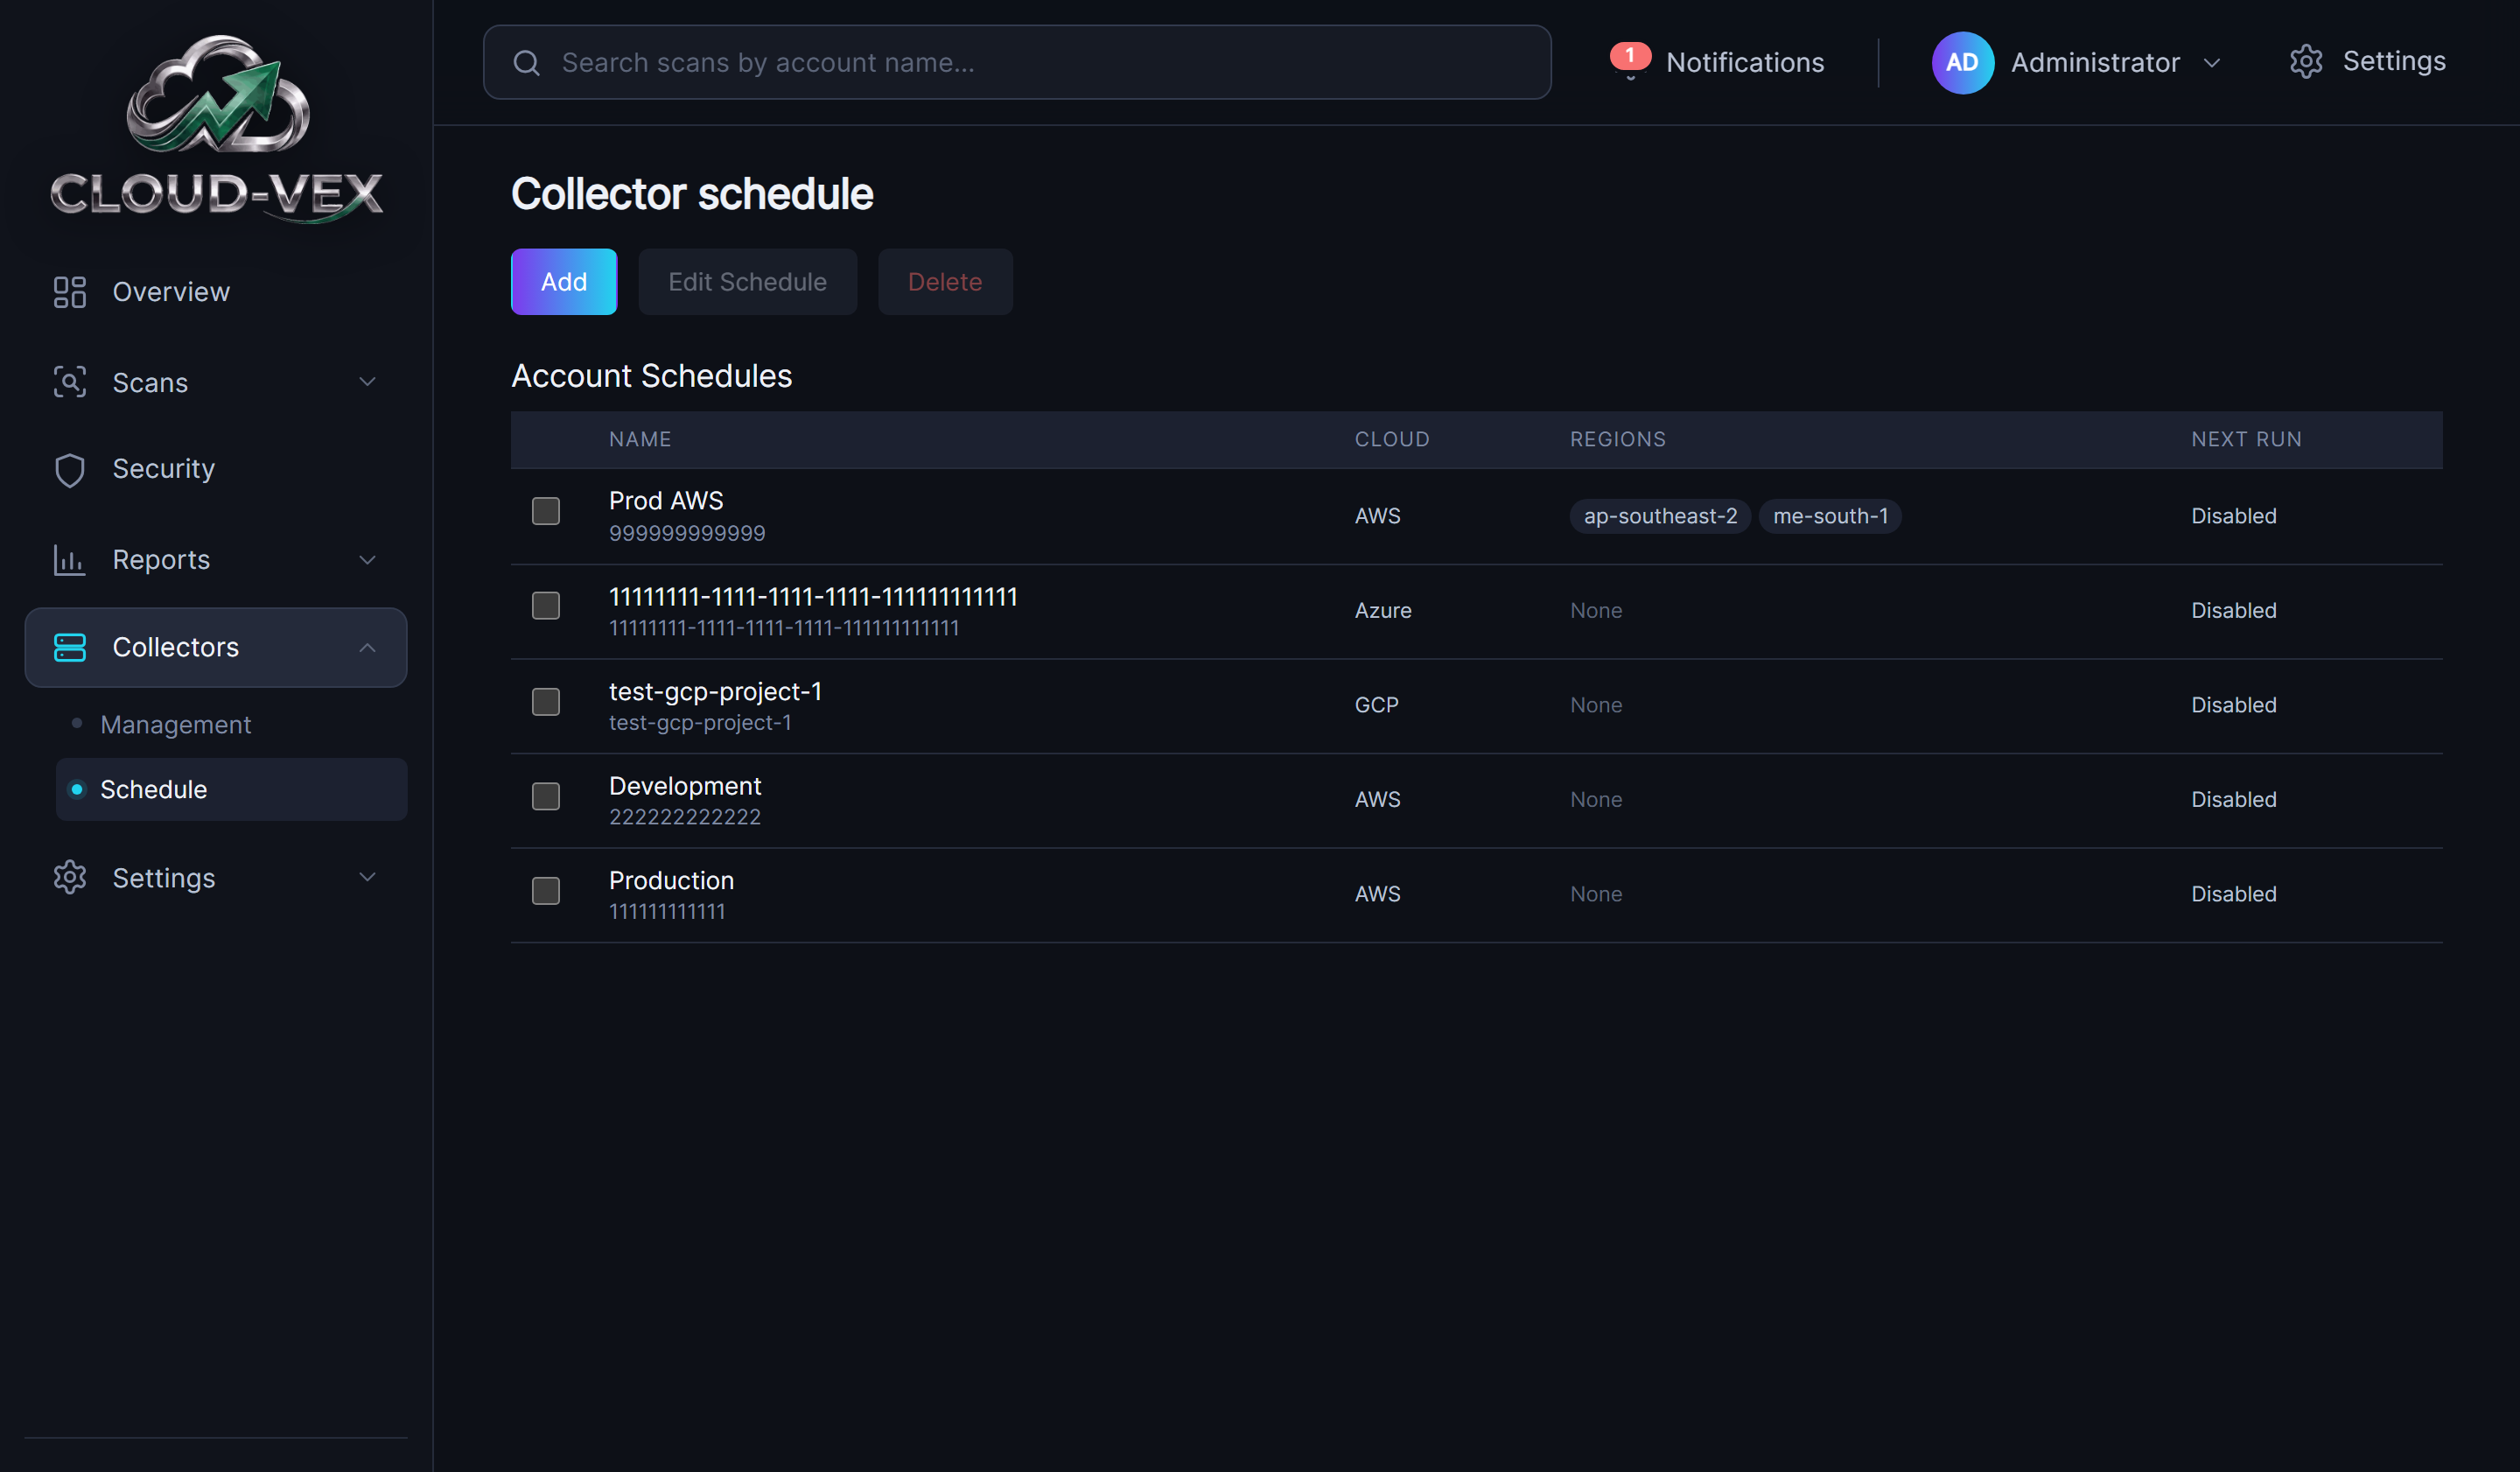
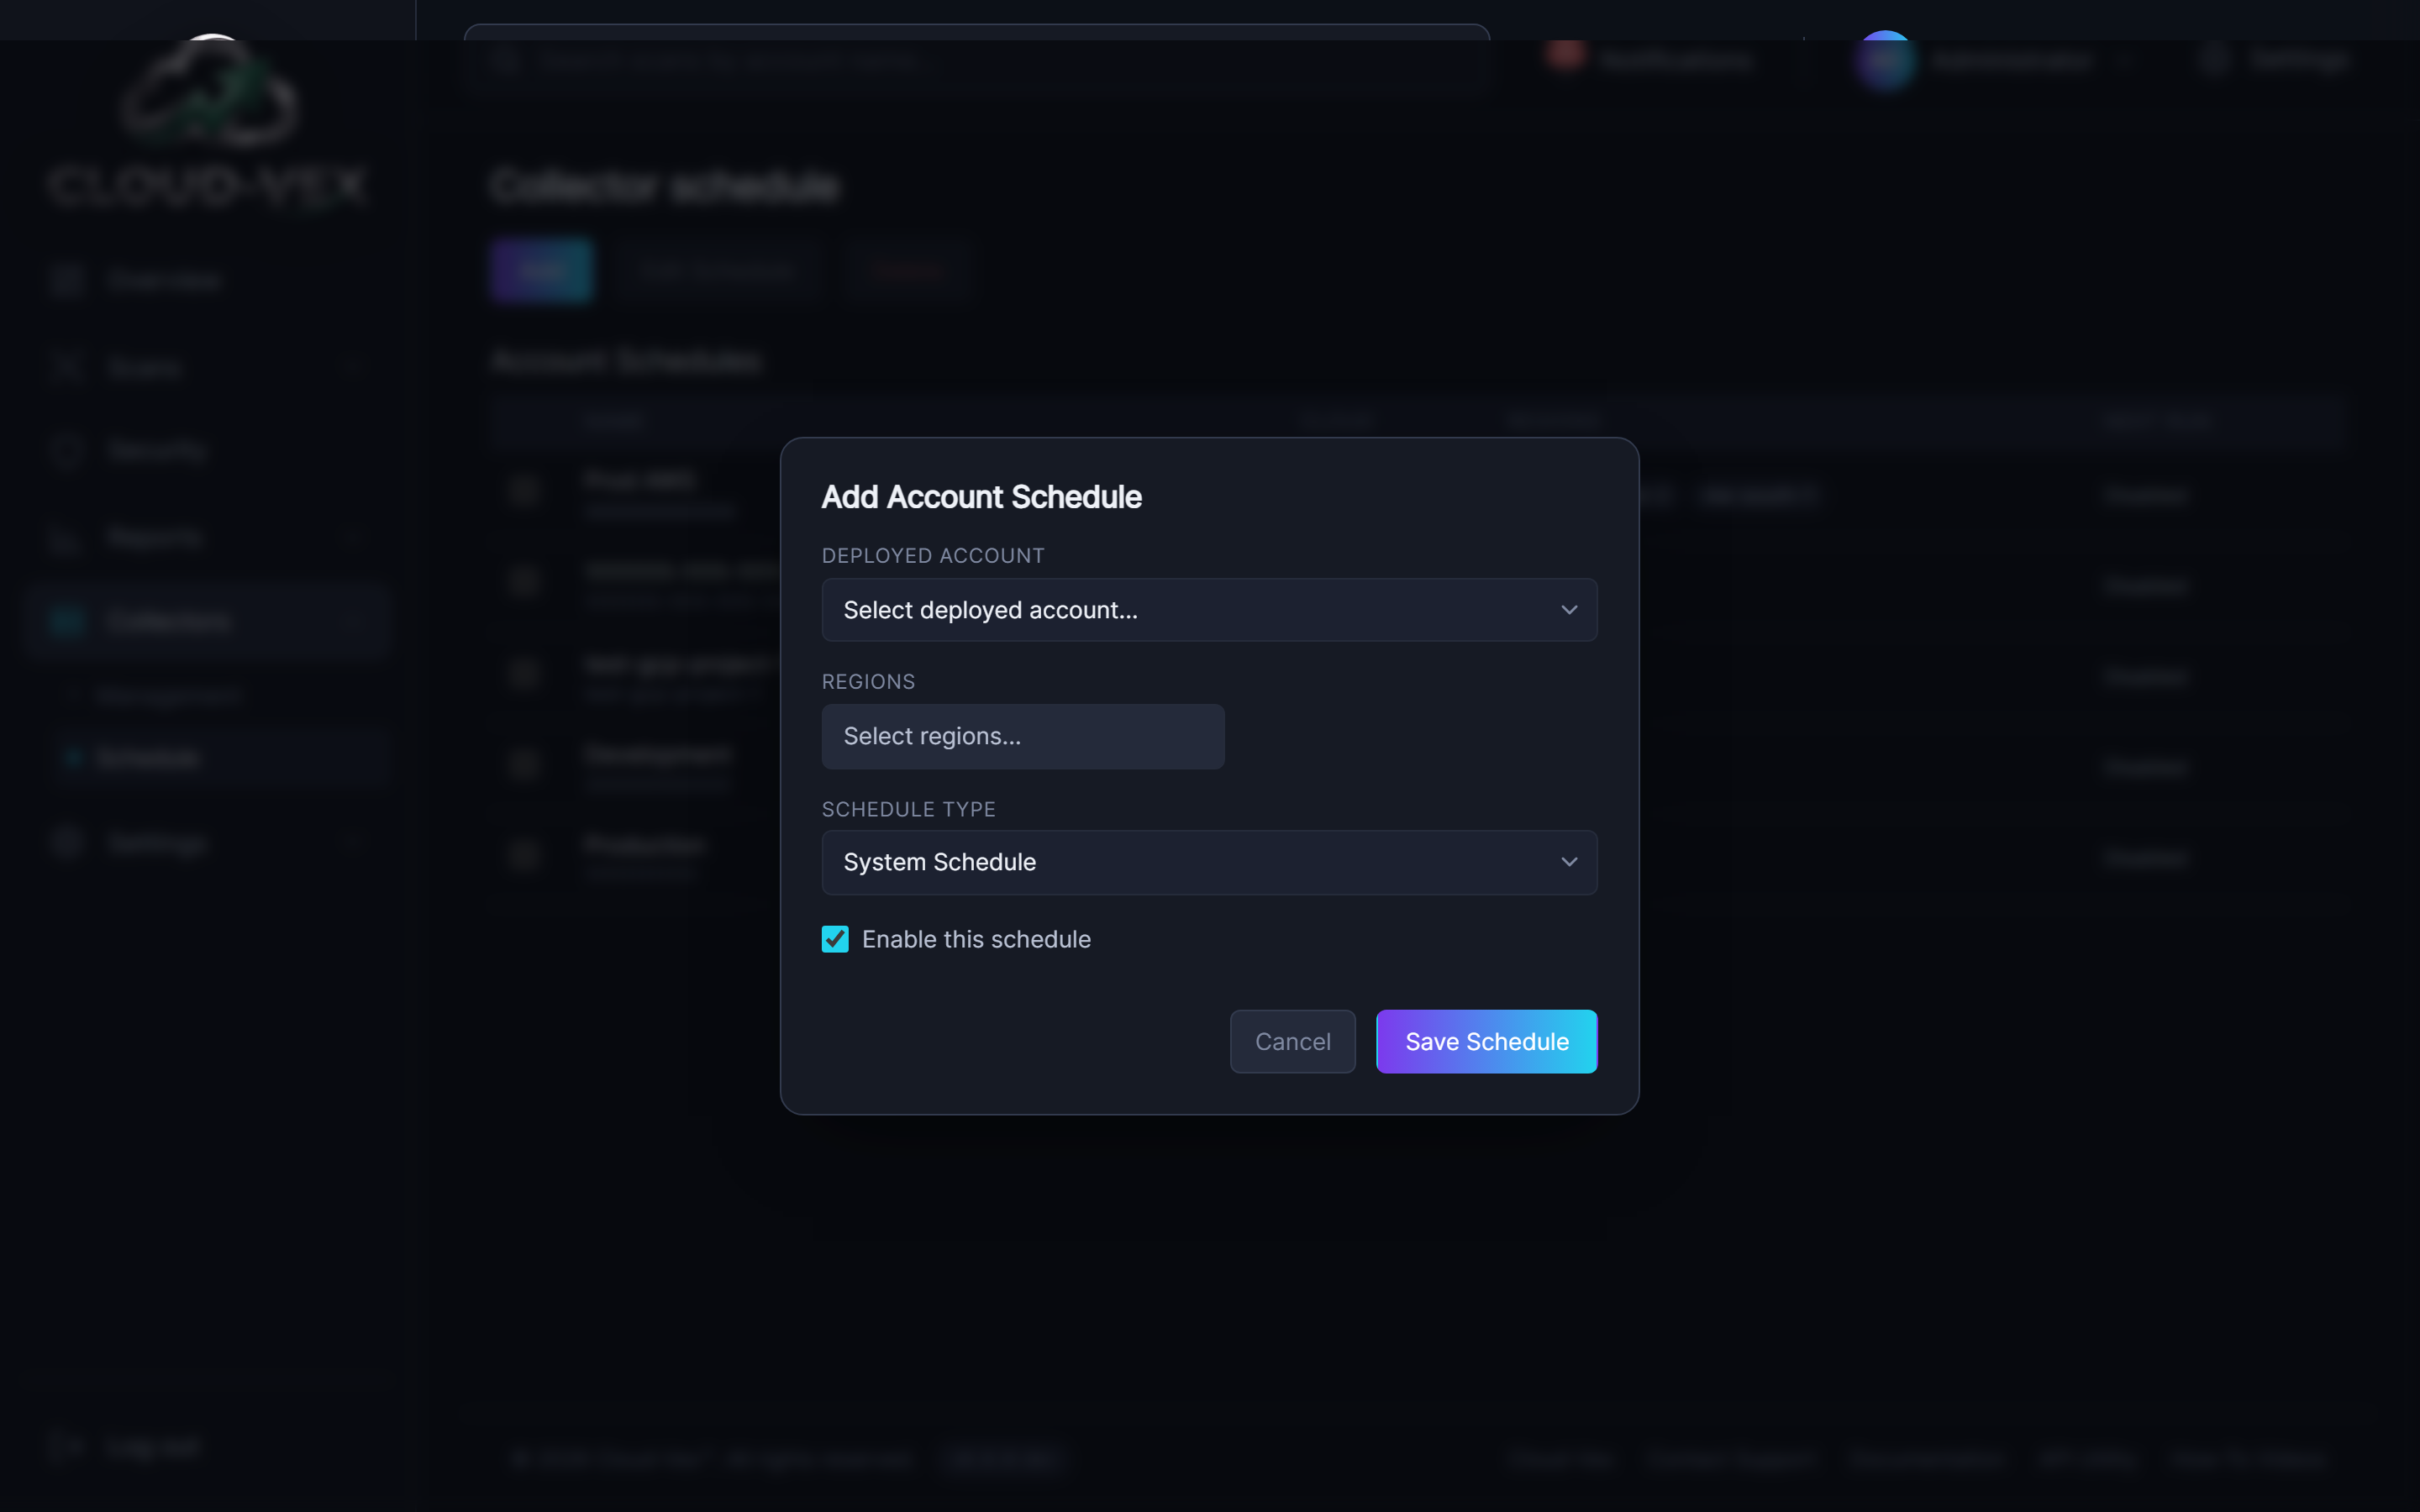
One row per account with a collector deployed, across all three clouds: its cloud, the regions it's scoped to, and when its next scheduled run is — or Disabled if that schedule (or, for one following the system schedule, the system schedule itself) is switched off. Add opens a form to pick any deployed account (AWS, Azure, or GCP) and its regions, then either follow the system-wide scan schedule or set an individual cadence just for that account, with its own Enable this schedule checkbox — on by default. Edit Schedule changes an existing one, and both Edit and Delete require a schedule to already be selected before they activate.
10. Settings
Two areas: Application, covered in full under Initial setup recommendations, and Access & Identity, covered under Configure roles and Configure claims. What's left here is changing your own password.
Application
Five panels — Scanner, Updates, Authentication, SMTP, User Experience — detailed in full under Initial setup recommendations above.
Access & Identity
Two tabs: Users, where identities are registered against an OAuth role claim or a specific OAuth subject, and Roles, where those registered claims are mapped to what a signed-in user can actually do — see Configure roles and Configure claims for the detail and screenshots.
Change password
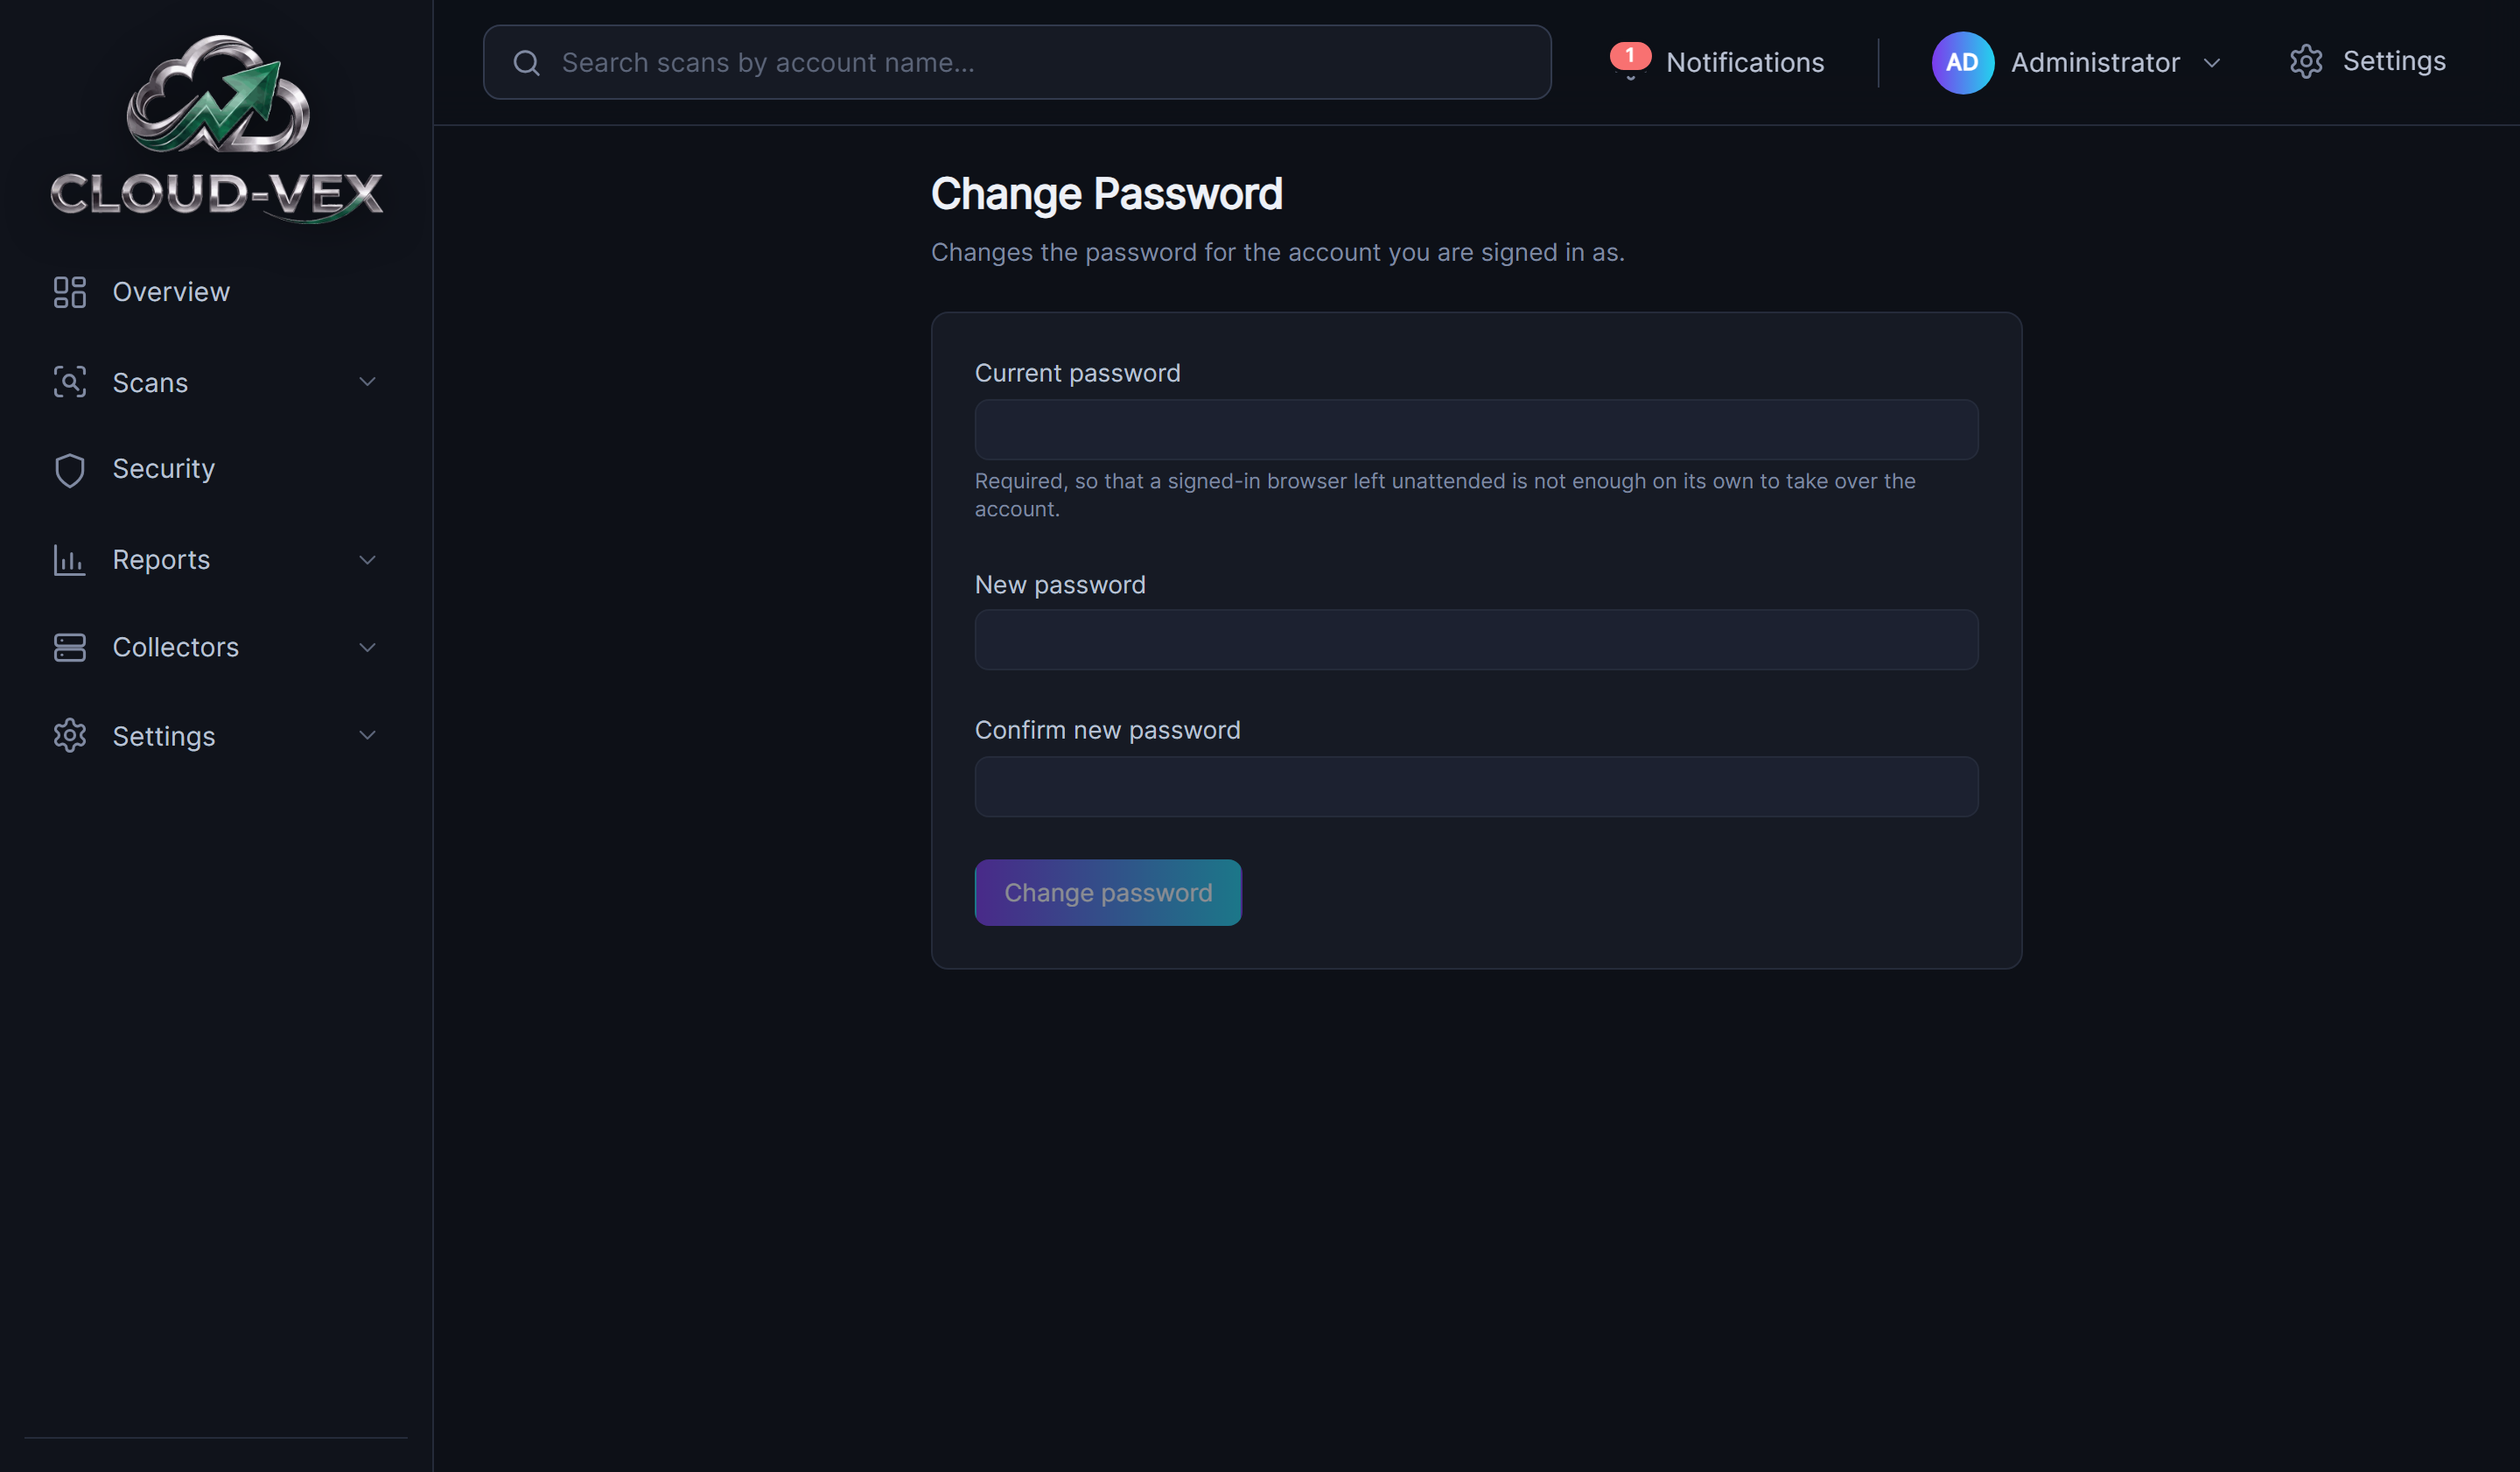
Self-service, for the local account you're currently signed in as. Requires the current password even though you're already signed in — so a signed-in browser left unattended isn't enough on its own to take over the account. This is the same screen the forced first-login change uses, reachable afterward any time you want to rotate the credential yourself.
11. API utility
Every Cloud-Vex deployment serves its own interactive API reference at
/swagger on the backend's own domain — the same OpenAPI
document the UI itself talks to, browsable and callable directly. It's
linked from the footer of every page in the product as
API Utility.
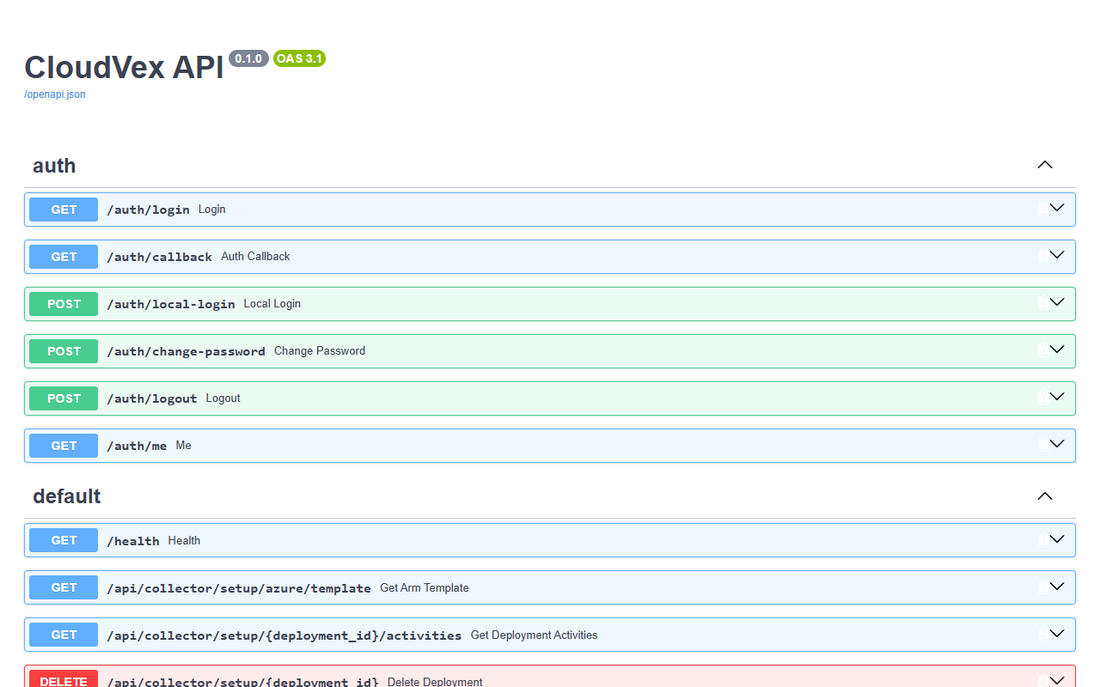
Useful for scripting against a deployment directly — kicking off a scan, pulling findings, or wiring collector setup into your own automation — without going through the UI.
12. Appendix
Accessing the API with an OAuth sub claim
Every API call, including one made from
/swagger itself (see
API utility above),
authenticates one of two ways: the browser's own session cookie, or an
Authorization: Bearer header
carrying a real access or ID token issued by the deployment's
configured OIDC identity provider. There is no separate CloudVex-issued
API key for this — no HTTP Basic auth either — only a token
from whichever provider is already connected under
Configure SSO
(OAuth).
Testing in Swagger. By default, "Try it out" runs as whoever is signed in — no token needed, and whatever that session's role can do is exactly what the call is allowed to do. Click Authorize and paste in a Bearer token, and Swagger switches to that token instead: every call afterward runs as that token's identity, not the signed-in session, which is what makes Swagger useful for testing a role claim's actual permissions before handing a token to a real caller. Once a token is presented this way, it is used exclusively — a token that fails to resolve (expired, wrong issuer or audience, no matching claim, or SSO not even enabled) is refused outright, not silently replaced with the ambient session, so a bad token surfaces as a bad token rather than a confusing pass.
Header format. Exactly one header, exactly this shape:
Authorization: Bearer <token>
The Bearer prefix (capital B, one trailing space) is
required and matched exactly — a token sent any other way is
treated as no credential at all, the same as an empty header.
What has to be true about the token itself. Its signature is verified against the identity provider's live JWKS, and three claims are checked explicitly rather than assumed from a passing signature:
- exp (and nbf, if present) — the token has to be currently valid, not just validly signed.
- iss — must match the configured provider's issuer. One documented exception: on Entra ID, a client-credentials (app-only) token carries the older
https://sts.windows.net/{tenant}/v1.0 issuer even though discovery and JWKS both use the v2 issuer, and both are accepted for the same tenant. - aud — must be the deployment's configured client ID, or (Entra again)
api://{client_id}, which is what a client-credentials token requested against this app's own exposed API carries instead of the bare client ID.
A token that fails any of those is rejected outright. One that passes all three still isn't enough on its own — see below.
Why the sub claim
specifically. Role resolution is the same tiered claim match
Configure roles
describes for interactive sign-in, run fresh on every single request
rather than once at login: first the configured role claim (typically a
group), then — only if that tier matches nothing — the
token's sub (subject) claim. A valid token that matches
neither tier is refused with 401; it is not "authenticated
with no permissions," it is not authenticated at all.
This is what makes sub the one that matters for
machine-to-machine access. A client-credentials (service principal /
app-only) token generally carries no group or role claim — there's
no signed-in person for the identity provider to put one on — so a
service caller almost always has to authenticate through the
sub tier. To allow one in: register that service
principal's sub value under
Configure
claims exactly as you would a person's, then attach it to a role on
the Roles page — then confirm it with the Swagger flow above
before handing the token to whatever is going to use it.
This is unrelated to collectors reporting scan data back, which
authenticate with their own X-CloudVex-Api-Key header
instead — a separate mechanism, not interchangeable with a Bearer
token.
Friendly URL name
By default, the application is reachable at whatever domain the cloud
provider assigns it — a CloudFront distribution's own
*.cloudfront.net address on AWS, or an App Service's own
*.azurewebsites.net address on Azure. Both support a
custom domain instead.
On AWS, set the stack's
DomainName parameter along with a
CertificateArn for a certificate issued in
us-east-1 — the only region CloudFront accepts
certificates from, regardless of which region the stack itself runs
in. That update only touches the CloudFront distribution — no
downtime, and nothing else in the stack changes.
Pointing the domain's DNS at CloudFront is then a manual step —
unless the domain's hosted
zone is in Route 53, in that same AWS account. In that case, also set
the optional HostedZoneId parameter and the stack creates
the alias record itself, skipping the manual DNS step entirely. Every
other case — a different DNS provider, or a Route 53 zone in a
different account — still points the domain at the stack's
CloudFrontDomainName output by hand; the template has no
way to reach a zone outside its own account.
If you run collectors against this
deployment: keep them pointed at the
CloudFrontDomainName output, not the friendly domain.
That output never changes, so collectors keep working across future
domain changes without reconfiguration.
On Azure, add a custom domain to the App Service after it's deployed, through the App Service's own domain settings — there's no Route 53-style auto-DNS equivalent yet, so this step is always manual on Azure today.
Making it highly available
As deployed today, the database and cache are single-instance on all
three clouds — RDS with MultiAZ: false on AWS,
Postgres Flexible Server and Redis Enterprise with high availability
disabled on Azure and GCP. That's a deliberate cost trade-off for a
new deployment, not an oversight, and it's on the roadmap to change:
RDS Multi-AZ, a multi-node ElastiCache replication group, and dual NAT
gateways for AWS once there's enough validated usage to justify the
added running cost. Ask support
if you need that sooner — each piece can be turned on ahead of
schedule for a specific deployment.
Something here not match what you're looking at? Email support@cloud-vex.com and we'll sort it out directly.
Join the waitlist